UV LED Curing for Flexo & Labels: Web Printing Curing Solutions (Systems, Setup, Costs, and Troubleshooting)
UV LED curing for flexo and labels is a web printing curing method that instantly cures energy-curable inks on a narrow-web printing line so converters can hit production speed targets without sacrificing cure quality. This guide is written for label converting teams, flexo operators, and engineers who need a stable curing window on a flexographic press—whether you’re planning a retrofit conversion, validating a new UV LED curing system, or troubleshooting tack/adhesion issues. You’ll learn what a curing solution includes (lamp, control, cooling, quality validation), how dose and irradiance interact with web speed, and where pinning vs full cure fits on real press layouts. We’ll also cover system types, setup decisions, cost drivers, and the most common failure modes so you can choose, commission, and run web printing curing reliably.
What is UV LED curing for flexo & labels in web printing?
UV LED curing in flexo label printing is a photopolymerization process where UV-curable ink, UV varnish, or UV adhesive crosslinks when exposed to a UVA wavelength from an LED source, creating an instant cure as the web moves through inline converting. In practical terms, a curing solution is more than a lamp head: it’s the UV LED curing system (LED array + optics), the control/driver hardware that manages output, the cooling approach that maintains thermal stability, and the quality validation tools that confirm cure at web speed. Three core variables define performance: irradiance (how intense the UV light is), curing dose (the total energy delivered over exposure time), and wavelength (which must match the ink/coating chemistry). Because label converting often includes inks, coatings, and adhesives on multiple stations, UV curing performance must stay consistent across changing line speeds and job mixes.
How does UV LED curing differ from traditional drying in flexo label printing?
Unlike hot air/IR drying, UV LED curing polymerizes the ink film instead of relying on solvent evaporation or water removal, which changes both the press footprint and the throughput limits.
UV curing vs traditional drying (press-side view):
- Mechanism: UV curing = crosslinking; traditional drying = drying time driven by evaporation.
- Speed & footprint: UV LED can enable higher throughput with fewer drying ovens and less thermal load.
- Ink pairing: UV-curable systems vs water-based inks/solvent systems that can drive VOC emissions.
- On-press change: You tune exposure and curing dose rather than extending dryer length to avoid setoff.
UV LED curing vs mercury arc UV—what’s the difference?
Compared with mercury arc UV, UV LED systems deliver narrowband LED output (typically centered around a chosen wavelength) rather than a broadband spectrum produced by a mercury vapor lamp in a medium pressure mercury arc UV system.
Key differences that matter in label converting:
- Spectrum: Narrowband UV LED can require ink/coating reformulation to match photoinitiator response, while arc UV’s broadband output can be more forgiving.
- Operations: UV LED is instant on/off with no warm-up time; arc UV typically involves warm-up and output drift as lamp aging progresses.
- Safety & upkeep: Arc UV is associated with ozone generation and mercury handling; it also relies on reflectors that can degrade and need maintenance.
- Heat management: UV LED generally reduces heat at the web, which helps with substrate sensitivity on films—though cooling design still matters.
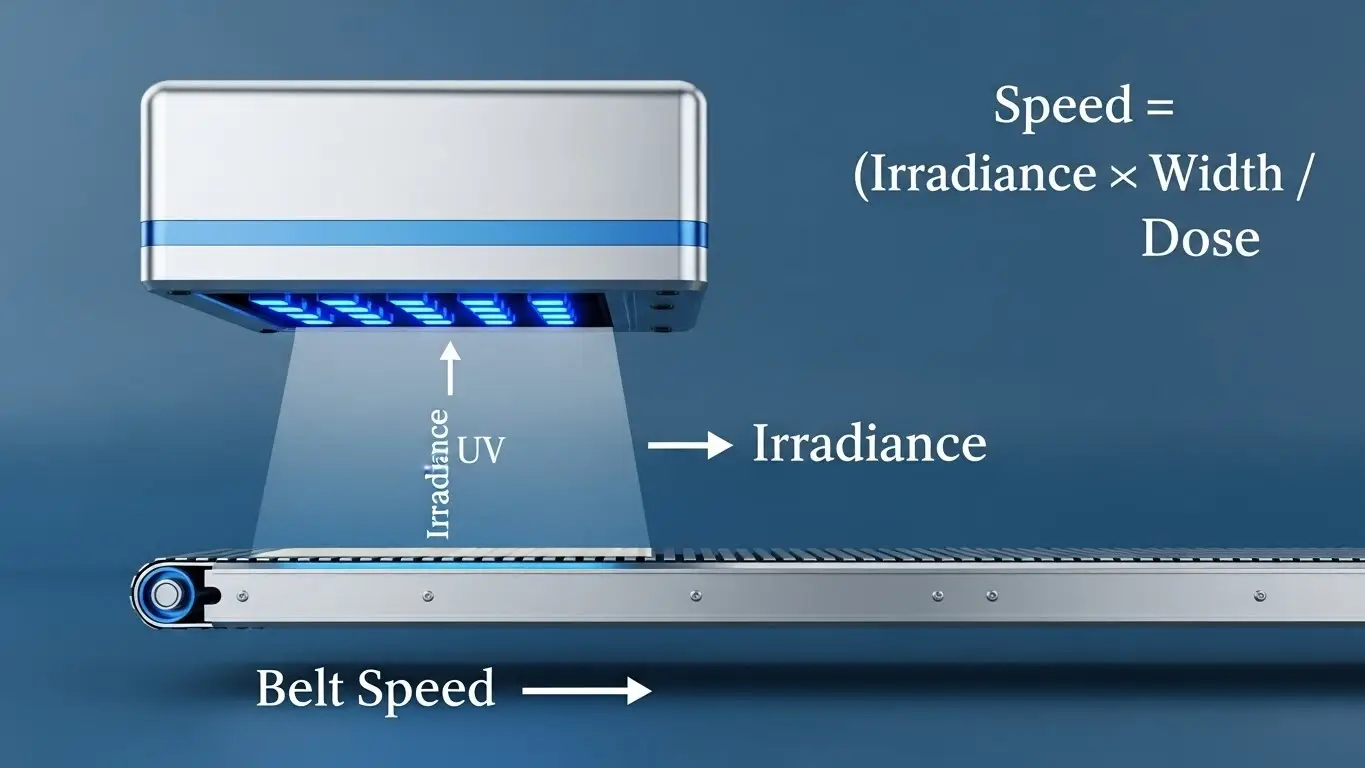
What are “dose” and “irradiance,” and why do they matter on a moving web?
In web printing, cure quality depends on irradiance and dose working together at your line speed and working distance. Irradiance (mW/cm²) describes the intensity of UV light at the web surface, while curing dose (mJ/cm²) represents the total energy delivered over exposure time as the web passes under the lamp. If web speed increases, exposure time drops—so dose can fall even if the lamp “looks bright.” Dose also interacts with ink film thickness: thicker films and higher coverage can demand more energy to reach cure depth, while surface cure can still appear acceptable (or show oxygen inhibition as surface tack). This is why cure uniformity should be verified with measurement, not guesses, especially after changes to distance, optics, or press speed.
How does UV LED curing work on a flexo press step-by-step?
A UV LED curing workflow on a flexo press follows these steps…
- Unwind/rewind: Load the roll and stabilize unwind/rewind with consistent web tension control.
- Web path setup: Confirm rollers, nip pressure, and web tracking to prevent flutter near curing heads.
- Print stations: Run ink laydown through print stations using the anilox roll, plate cylinder, and impression cylinder.
- Interstation decision: Choose whether interstation curing is needed based on coverage and trapping.
- Pinning station: Apply a pinning station exposure for wet-on-wet stability when required.
- Second color laydown: Print the next station and monitor ink trapping and dot gain control.
- Repeat per station: Continue print → (optional pin) → print sequence across stations as job demands.
- Inline varnish: Apply inline varnish or OPV if the label requires gloss, protection, or scuff resistance.
- Final cure station: Use a final cure station (often end-of-press curing) to achieve full cure.
- Finishing modules: Run lamination station, cold foil module, or other inline converting steps as needed.
- QC check point: Insert quality validation checks during startup and after any speed change.
- Rewind: Rewind with controlled tension to prevent blocking or setoff on the finished roll.
What does a typical narrow-web LED UV setup look like?
A typical narrow-web UV LED setup includes…
- LED lamp head(s): One or more LED lamp head units (LED array + optics) for interstation and/or end-of-press use.
- Driver/power supply: A driver/power supply that controls output and supports dimming or recipe settings.
- Controller interface/HMI: A controller interface for lamp status, alarms, and setpoints.
- Cooling method: Air-cooled housing or liquid-cooled housing; a water chiller is common for higher thermal management demands.
- Mounting and shielding: Mounting brackets, guarding/shielding, and safety interlocks to protect operators.
- Integration touchpoints: PLC integration signals for speed changes, interlocks, and fault states.
Pinning vs full cure—when do you need each in labels?
Pinning is used when you need fast surface set to stabilize wet-on-wet printing and improve ink trapping, while full cure is required when the finished label must meet durability targets like scuff resistance and lamination bond strength.
Pinning (interstation cure):
- Used for high coverage, wet-on-wet jobs to control dot gain and prevent smear between print stations.
- Example: heavy solids early in the deck that would otherwise move during downstream printing.
Full cure (final cure):
- Used to lock in cure depth and surface properties before finishing and rewind.
- Example: labels heading to lamination or cold foil transfer where incomplete cure can cause adhesion failures.
How do wavelength choices (365/385/395/405 nm) affect curing performance?
Wavelength selection matters because the LED spectral output must align with the photoinitiator match and absorption peak of the ink/coating system to achieve consistent cure depth without surface tack—especially with opaque white or heavy varnish.
| Wavelength | Typical fit in label converting | Practical tradeoff to watch |
|---|---|---|
| 365 nm | Often used where chemistry is formulated for deeper response | Can be less forgiving if materials aren’t matched |
| 385 nm | Common compromise wavelength in many LED UV builds | Balance of speed and compatibility varies by ink |
| 395 nm | Widely used in many UV LED curing systems | May require careful chemistry matching on heavy films |
| 405 nm | Used for certain formulations and specialty needs | Can shift performance depending on photoinitiator package |
If your job mix includes pigment loading extremes (opaque white ink) or thick coatings, validate the best wavelength with supplier guidance and press trials at real web speed.
What types of UV LED curing solutions are used for flexo & label converting?

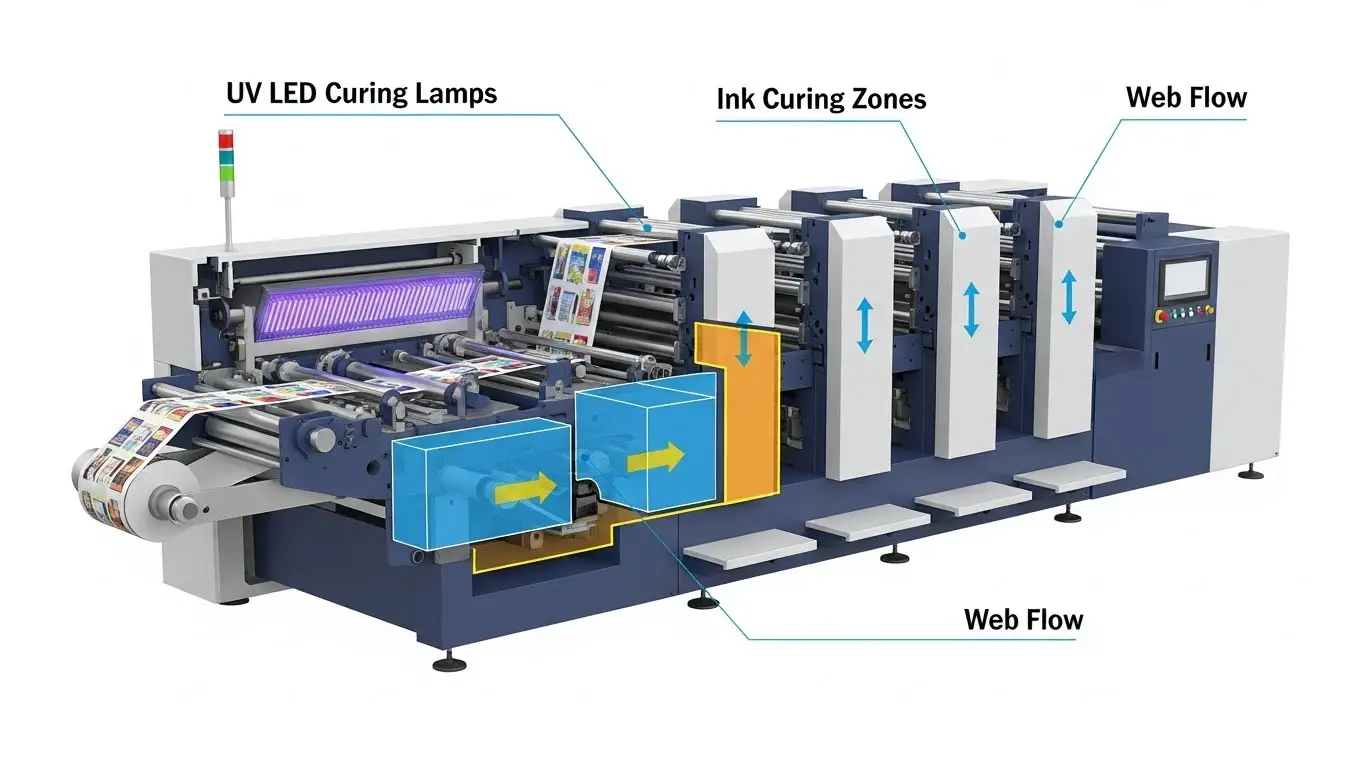
UV LED curing solutions for flexo labels generally fall into a few practical categories defined by integration style, cooling method, and atmosphere control, with the core goal of keeping the curing window stable across changing web speeds. From an installation standpoint, you’ll see retrofit solution packages designed to replace arc UV in existing decks, and OEM integration options that come engineered with the press OEM. From an operating standpoint, solutions can be air-cooled or water-cooled, and can run in open air or as inert UV in a closed-cabin UV design with a nitrogen blanket. Placement is also a defining category: interstation curing supports pinning and color-to-color stability, while end-of-press curing targets full cure before rewind and downstream converting.
Narrow-web vs mid-web vs wide-web—what changes in curing design?
As web width increases, curing design changes because edge-to-edge uniformity and thermal load become harder to manage while maintaining irradiance uniformity at production speeds.
What changes as you scale width:
- Uniformity: Wider web width increases the challenge of consistent exposure across the full press footprint.
- Power density: Larger widths can require higher power density or more modules to maintain cure.
- Cooling capacity: Cooling capacity and airflow/liquid cooling demands rise with thermal load.
- Integration: Shielding and mounting complexity increases, especially with more station count and longer decks.
Air-cooled vs water-cooled systems—how do you choose?
Choose air-cooled systems when duty cycle and heat sink design can be supported by airflow management in your press environment, and water-cooled when thermal management demands require a liquid cooling loop with chiller sizing sized for high output and enclosure constraints.
Decision cues (press-practical):
- Duty cycle & heat load: Higher output and longer runs push toward liquid cooling.
- Footprint: Water cooling can reduce in-hood heat but may add external chiller footprint.
- Maintenance: Air systems need filter and ventilation attention; water systems need coolant, pumps, and chiller upkeep.
- Reliability: Lamp head temperature stability is often easier to hold with well-designed water cooling.
Inerting (nitrogen) systems—when is oxygen inhibition a real issue?
Inerting is considered when oxygen inhibition causes surface tack or inconsistent surface cure even when your dose and cure speed appear sufficient. In radical polymerization systems, oxygen at the surface can interfere with curing reactions, leaving a tacky feel that shows up as rub failures, blocking risk, or inconsistent gloss—particularly in some high-gloss coatings at higher web speeds. In a sealed curing chamber, a nitrogen inerting setup reduces oxygen exposure and can improve surface cure consistency, but it adds cost, gas flow control requirements, and mechanical complexity. The practical approach is to treat inerting as a testable lever: confirm whether surface tack is truly oxygen-driven (and not a measurement, distance, or ink mismatch issue) before committing.
Retrofit kits vs new press integration—what’s the best path?
The best path depends on…
- Press constraints: Available space, existing electrical integration, and whether the press OEM supports LED retrofit without major modifications.
- Downtime planning: How much downtime planning you can tolerate for mounting, wiring, and commissioning scope.
- Safety requirements: Guarding compliance, safety interlocks, and shielding requirements for the new lamp layout.
- Controls strategy: How control signals and recipes will be handled via PLC integration or a dedicated controller.
- Validation plan: How you’ll verify full cure at production speed after installation (and after future changes).
What materials and applications are most common in flexo & label UV LED curing?
In label converting, UV LED curing is most commonly used on paper labels and filmic facestocks like BOPP, PET, and PE, especially for pressure-sensitive labels where instant cure helps maintain throughput and clean rewind. Typical applications include prime labels (cosmetics, beverage, household), industrial/pharma labels that demand durability, and shrink sleeves or flexible packaging segments where heat-sensitive substrates benefit from reduced thermal load. In these jobs, UV flexo inks provide color, UV overprint varnish adds protection and gloss, and laminating adhesives or specialty coatings support effects and performance targets. The key is matching the ink/coating/adhesive system to your press speed and validation method so adhesion, scuff resistance, and finish remain consistent.
How does UV LED curing behave on films (BOPP, PET, PE) vs paper labels?
Films behave differently than paper because surface energy and contamination sensitivity are more likely to drive adhesion outcomes, while heat-sensitive substrates can introduce curl or web handling issues at higher lamp outputs.
Film vs paper (what changes in practice):
- Surface energy: Films often rely on corona treatment for adhesion promotion; paper is generally more forgiving.
- Heat sensitivity: Film shrink/curl can show up sooner, requiring careful thermal management and distance control.
- Failure modes: Films commonly show ink anchorage or adhesion failure; paper more often shows scuff or surface wear depending on varnish.
- Example: BOPP labels may fail a tape adhesion check if surface energy is low, while paper varnish can scuff if under-cured.
What changes when curing opaque whites, metallics, or heavy varnish?
High-opacity or thick films are harder to cure because pigment loading (especially titanium dioxide in opaque white ink) scatters UV light and reduces penetration vs surface cure, which can starve cure depth even if the surface seems “set.” With metallic inks and thick varnish laydown, the ink film thickness and optical behavior can demand higher dose requirement or staged curing approaches. Practical levers include multi-head strategies (pin + full cure), optimizing working distance and exposure, and adjusting line speed to maintain through-cure without overheating. A common symptom is under-cured white that rubs off or a tacky varnish that blocks on rewind, both of which should trigger measurement-based validation rather than guesswork.
How does UV LED curing support finishing steps like lamination and cold foil?
Finishing steps rely on cure quality because lamination bond strength and cold foil transfer performance depend on having the right surface and depth cure before downstream modules. For lamination, incomplete cure can reduce adhesive wet-out or cause long-term bond issues; for cold foil transfer, the adhesive and surface condition must be consistent for clean release and edge definition. Cure also ties directly to rub/scuff and blocking resistance, which affects die-cutting behavior and rewind stability. A simple pre-finishing QC checklist is: confirm cure dose verification, run rub/scuff checks, perform a tape adhesion check where relevant, and verify no smear before committing to long runs.
What are the main benefits of UV LED curing for flexo & labels?
UV LED curing benefits label converters by…
- Enabling faster starts and stops: Instant on/off capability supports quick changeovers and less start-up waste.
- Supporting higher throughput: Many operations see increased production rates when curing keeps up with production speed targets.
- Reducing heat at the web: Reduced heat load can help with heat-sensitive substrates, especially films, when thermal management is engineered correctly.
- Improving process stability: Consistent output and better control over the curing window can improve repeatability.
- Lowering some operating burdens: Reduced operating costs can come from lower maintenance needs and fewer consumables, depending on the existing baseline.
How does UV LED curing improve print consistency and uptime?
Consistency improves because UV LEDs deliver stable irradiance with less drift over time than many lamp-based systems, which helps maintain repeatability job-to-job on the same press. With instant on/off operation, warm-up delays shrink and press availability improves, especially during frequent changeovers. Many teams also see reduced lamp degradation issues and fewer interruptions from lamp changes, which can translate into less start-up waste reduction over a shift. The operational best practice is to pair these gains with process control: monitor output over time using routine checks so the curing window stays consistent as optics get dirty or cooling performance changes.
What cost savings are realistic (energy, maintenance, downtime)?
Cost savings typically come from…
| Savings bucket | What changes with UV LED | What can offset the savings |
|---|---|---|
| Energy | Lower electricity consumption than some arc UV baselines | Added cooling energy from chillers in some setups |
| Consumables | Fewer replacements vs frequent lamp/reflector cycles | Ink/coating changes during conversion |
| Downtime & labor | Less maintenance labor and fewer stoppages | Integration/commissioning time and training needs |
| Waste | More stable starts can reduce waste reduction events | Poor validation can increase scrap and rework |
Track overall equipment effectiveness (OEE), downtime minutes, and reject rates to quantify payback period realistically, and use ranges rather than assumptions when job mix varies.
What quality improvements are most noticeable in labels?
Quality gains usually show up as…
- Higher rub resistance and abrasion resistance: Better cure can improve durability on prime labels and industrial labels.
- More consistent color and dot reproduction: Stable curing supports repeatable dot gain and ink trapping behavior.
- Reduced setoff and better rewind behavior: Proper cure reduces blocking risk and improves roll handling.
- Better surface protection with gloss control: UV overprint varnish performance becomes more consistent when cure is validated.
How much does UV LED curing cost for flexo & label presses?
The cost of UV LED curing depends on the total solution you’re installing—not just the lamp head—because CAPEX and total cost of ownership are shaped by press integration requirements and the number of curing points needed to hold cure quality at web speed. Major drivers include station count and web width pricing (wider heads and more stations cost more), cooling/chiller cost for high-output thermal stability, and whether nitrogen inerting is required for surface cure reliability. Integration labor—mounting, wiring, controls, and guarding—often rivals hardware costs, and commissioning plus validation tooling (radiometer/dosimeter and QC testing routines) adds required budget. Quotes also vary because job mix matters: heavy coverage, opaque white, thick varnish, and film substrates typically tighten the curing window and raise system requirements.
What factors drive system pricing the most?
Pricing is mainly driven by…
- Lamp head width: Wider lamp head width increases cost and demands tighter uniformity engineering.
- Number of curing stations: More curing stations raise hardware, wiring, and controls complexity.
- Output power density: Higher power density requirements increase thermal and electrical demands.
- Cooling type: Cooling type (air vs water) affects cost, maintenance, and chiller sizing.
- Control features: Dimming, monitoring, and integration complexity influence total installed cost.
Retrofit cost vs new installation—what should you budget for?
Budgeting differs because retrofits require…
| Cost line item | Retrofit (typical) | New integration (typical) |
|---|---|---|
| Mounting & fitment | Custom brackets, mechanical fitment constraints | Designed-in mounting points |
| Electrical integration | Electrical cabinet work, wiring harness routing | Cleaner wiring paths planned by OEM |
| Safety | Safety interlocks, guarding panels updates | Guarding often integrated in design |
| Cooling | Chiller plumbing / airflow rework as needed | Cooling planned for the system |
| Downtime | Press downtime for installation + commissioning tests | Commissioning still required, often shorter |
| People | Operator training + validation tooling | Training still required, often smoother |
How do you estimate ROI and payback for UV LED conversion?
ROI can be estimated by…
- Baseline your current costs: Energy, lamp replacements, maintenance labor, and downtime minutes per month.
- Estimate LED-side operating changes: Expected reduction in consumables and maintenance savings, plus any cooling energy added.
- Model production gains carefully: Speed increase and waste reduction are variables that depend on your curing window and job mix.
- Use a simple payback framework: (Annual savings + value of production gains − added operating costs) ÷ total conversion cost.
- Run sensitivity analysis: Model best/expected/worst cases so payback period expectations stay realistic.
For deeper fundamentals on UV LED ink behavior and setup variables that affect ROI, see UV LED ink curing guide → /uv-led-ink-curing-guide.
What tools and equipment are needed to run and validate UV LED curing?
To run UV LED curing reliably, you need…
- Measurement tools: A UV radiometer and/or UV dosimeter for dose mapping and routine checks.
- QC tests: Rub test, scuff checks, and an adhesion tape test suited to your substrates and inks.
- Process logs: Simple process logs to record web speed, lamp settings, and test outcomes for repeatability.
- Maintenance tools: Cleaning supplies for optics, plus a calibration schedule for measurement devices.
- A validation mindset: Cure verification tests at startup, after maintenance, and whenever the job mix changes.
What should a UV LED curing system include (components checklist)?
A complete UV LED curing system should include…
- Lamp head(s) + optics: LED lamp head modules with the right optics/lens package for your working distance.
- LED driver and controller/HMI: LED driver hardware, power supply, and a controller/HMI for dimming and alarms.
- Cooling: Cooling via air flow or a liquid-cooled loop; a water chiller when heat load demands it.
- Safety and integration: Shielding, cable assemblies, and safety interlocks tied into the press.
- Sensors and protection: Temperature sensors and fault handling that prevent thermal runaway or output drift.
Which instruments help validate cure quality (radiometer, dosimeter, test methods)?
Validation typically uses a radiometer to…
| Tool / method | What it verifies | When to use it |
|---|---|---|
| UVA radiometer | Irradiance measurement at the web | Startup, after maintenance, when settings change |
| Dosimeter / dose strips | Dose measurement over exposure | During dose mapping and speed changes |
| Rub resistance test | Surface durability proxy | After setup, per batch/shift as needed |
| Adhesion test | Ink anchorage and bond risk | Films, coated stocks, and critical labels |
| Documentation | Acceptance criteria and repeatability | Every time you adjust cure settings |
Keep a calibration certificate for instruments and define acceptance criteria so “good cure” is measurable, not subjective.
What maintenance practices keep UV LED performance stable over time?
Stable output depends on…
- Optics cleaning: Clean lenses/optics on a routine schedule to avoid lens contamination that reduces irradiance.
- Cooling checks: Verify airflow inspection items (filters, vents) or chiller maintenance (coolant temperature, flow).
- Output monitoring: Trend output monitoring results so drift is caught before defects appear.
- Preventive cadence: Use a preventive maintenance checklist with daily/weekly/monthly tasks.
- Alarm response: Treat thermal alarms and intermittent faults as urgency signals, not “nuisances.”
What problems happen most often with UV LED curing in flexo & labels?
Most UV LED curing issues show up as tacky ink, poor adhesion, under-cure in heavy films, or cure inconsistency across the web—often after a change in speed, substrate, or maintenance condition. The fastest way to reduce troubleshooting time is a root-cause mindset: measure irradiance and curing dose first, then evaluate press variables (working distance, shielding, web tension, cooling performance) separately from chemistry variables (photoinitiator match, pigment loading, oxygen inhibition). Common mechanical contributors include dirty optics, overheating that reduces output stability, and edge-to-edge nonuniformity that appears as scuff failure on one side of the web. If measurements confirm the system is delivering consistent energy yet defects persist, escalate to supplier trials to verify formulation compatibility at your real production speed.
Why is the ink still tacky after LED UV curing—and how do you fix it?
Tackiness after LED curing usually indicates…
| Likely cause | What it looks like | Practical fix lever |
|---|---|---|
| Oxygen inhibition | Surface tack with decent through-cure | Evaluate nitrogen inerting or chemistry changes |
| Insufficient dose | Smear/rub failures at target line speed | Reduce speed or increase exposure/dose |
| Low irradiance at web | Weak cure, especially at edges | Check distance, optics, and lamp output |
| Wrong wavelength match | Inconsistent cure across materials | Confirm photoinitiator match with supplier |
| Dirty lens/optics | Gradual decline and curing drift | Clean optics and re-measure |
| Too much speed change | Failures appear only on fast jobs | Validate with dose mapping at each speed |
Use quick verification steps: re-measure irradiance/dose, confirm working distance, and repeat rub test before changing multiple variables at once.
What causes poor adhesion on films, and how do you correct it?
Adhesion failures on films often come from…
- Low surface energy: Verify corona treatment and dyne level before blaming ink chemistry.
- Contamination: Oils, dust, or slip additives can disrupt ink anchorage and cause tape test failure.
- Cure depth mismatch: A surface-cured film can still fail adhesion if cure depth is insufficient.
- Material compatibility: Confirm substrate compatibility and whether an adhesion promoter or primer is required.
Example: A BOPP label that passes initial appearance but fails a tape adhesion test after rewind often points to surface energy or under-cure interacting with the film surface.
Why do opaque whites or heavy varnishes under-cure with LED systems?
Opaque and thick layers under-cure because light penetration is limited by pigment scattering (especially TiO₂ opacity in opaque white) and thick varnish film builds, which reduces through-cure even if the surface seems acceptable. In these cases, staged curing (pin then final cure) or dual-head curing can increase dose without overheating, and slower line speed may be necessary to reach cure depth. If changes to exposure and working distance do not resolve the issue, ink/coating reformulation may be required to better match the LED spectral output and photoinitiator response. Always confirm improvements using cure validation measurements and rub/scuff checks rather than relying on visual dryness.
What are the most common mistakes when switching from mercury UV to UV LED?
Most conversion problems happen when teams assume…
- “The same ink will work”: Ignoring wavelength match and photoinitiator differences in UV LED conversion.
- “Trials aren’t necessary”: Skipping press trials at real production speed and real job coverage.
- “Power fixes everything”: Increasing output without checking distance, optics, or measurement.
- “No need to measure”: Operating with no radiometer, so curing drift and edge failures go unnoticed.
- “Cooling is optional”: Underestimating thermal management and how it affects output stability.
- “Safety is plug-and-play”: Missing shielding and safety interlocks needed for guarding compliance.
- “Documentation can wait”: No SOPs, no acceptance criteria, and inconsistent settings between shifts.
For broader context on web press curing approaches beyond labels (and where offset differs), see UV LED offset curing → /uv-led-offset-curing/.
What are the best practices for selecting and setting up UV LED curing on web presses?
The most reliable way to select and set up UV LED curing is to…
- Start with job mix analysis: Map substrates, ink coverage, opaque whites, and coatings that tighten the curing window.
- Use a selection checklist: Match UV LED curing systems to web width, station placement needs, and target line speed.
- Plan commissioning deliberately: Treat setup like a commissioning checklist—mounting, shielding, cooling, and controls.
- Validate at production speed: Run validation protocol steps at real speed with dose mapping and QC tests.
- Lock in process control: Document settings, train operators, and build preventive maintenance plan routines.
How do you choose the right system for your press (selection checklist)?
Choose a system by matching…
- Press constraints: Web width, station count, footprint limitations, and available power.
- Performance targets: Target line speed, ink coverage, and substrate mix (paper vs films).
- Cooling plan: Cooling constraints and whether chiller sizing is required for your duty cycle.
- Safety and controls: Dimming control needs, shielding, and safety interlocks with integration.
- Support: Service/support coverage and integration readiness for your press environment.
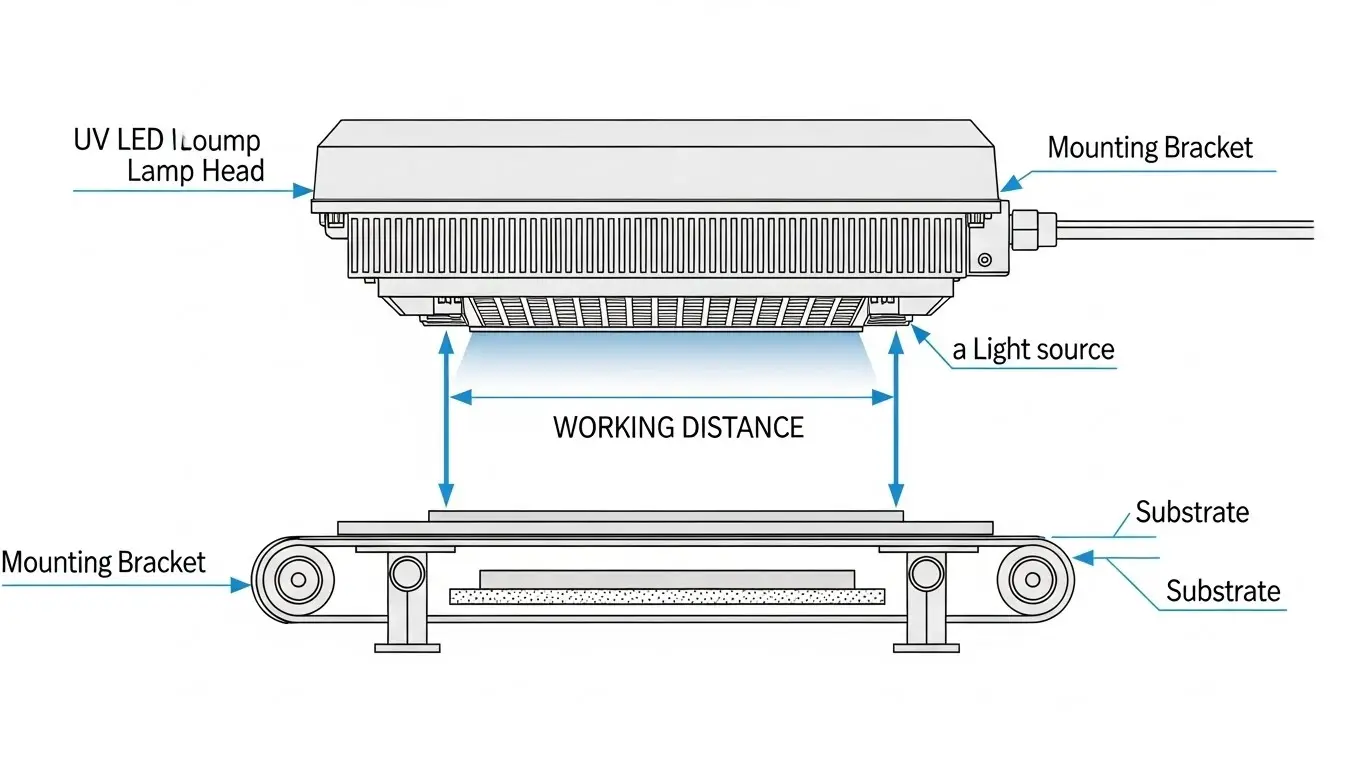
What setup parameters matter most (distance, optics, speed, station placement)?
Setup quality depends on…
| Parameter | What it changes | What to watch |
|---|---|---|
| Working distance | Irradiance at the web | Too far reduces cure; too close can increase heat risk |
| Optics configuration | Cure uniformity and focus | Misalignment can cause edge curing issues |
| Web speed | Exposure time and dose | Speed changes require dose validation |
| Station placement | Pinning vs full cure capability | Wrong placement can cause smear or weak durability |
| Shielding | Safety and stray exposure | Poor shielding can create hotspots and risk |
How do you run trials and scale to production without quality surprises?
A good trial plan tests…
- A trial matrix: Substrate × ink/coating × web speed × coverage (include opaque whites and heavy varnish).
- Speed ladder testing: Validate cure at slow/target/fast speeds so dose doesn’t fail when production pushes.
- Acceptance tests: Rub/adhesion criteria plus dose mapping; record results in documentation logs.
- Sign-off process: Require production validation sign-off before releasing full runs.
- Sample retention: Keep samples and settings so you can troubleshoot later with consistent references.
FAQs about UV LED curing for flexo & labels
These are the most common questions converters ask about UV LED curing when deciding whether to retrofit, how to validate cure quality, and what to expect for wavelength choice and lifetime. The answers below are intentionally practical: they point you to the variables that matter (job mix, measurements, and trials) without making regulatory promises. Use them as a quick reference, then return to the validation and setup sections for the “how-to” details.
Can UV LED curing fully replace mercury UV in label converting?
In many label applications, UV LED can replace mercury UV, but results depend on legacy ink compatibility and whether your formulations are matched to the LED wavelength and cure window. UV LED curing often performs well for many pressure-sensitive labels and common coatings, especially when integrated with correct cooling and measurement. However, some legacy chemistries may still favor hybrid curing during a phased retrofit. The safest path is station-by-station conversion with validation trials at production speed.
Is UV LED curing suitable for low-migration/food-contact label applications?
For low-migration applications, suitability depends on the low migration inks you choose, supplier documentation, and your process controls that ensure curing completeness under worst-case conditions. Use checkpoints like ink declarations, guidance aligned with EuPIA guideline approaches, and a clear testing/verification plan with your supply chain. Keep cure settings stable, measure routinely, and avoid assumptions based on appearance alone. This section is not legal advice—treat compliance as a validated program.
What’s the best wavelength for flexo UV LED curing?
The best wavelength is the one matched to the photoinitiator package and absorption spectrum of your ink/coating system while still meeting performance requirements across your job mix. Common options include 365, 385, 395, and 405 nm, but pigment load, cure speed, and surface tack risks can shift which performs best. Ask your ink supplier for recommendations, then confirm with application trials at real speed. Avoid “one best wavelength” claims.
How long do UV LED curing lamps last in web printing?
Lamp life depends on thermal management, duty cycle, and cleanliness, not only the number of hours the system has been on. LED lifetime hours can look excellent on paper, but output degradation accelerates when cooling stability is poor or optics are contaminated. The practical approach is to monitor irradiance trends as part of maintenance cleanliness routines and use preventive checks. If output drops, re-measure and service before defects show up.
How do I know if curing is complete without damaging labels?
You can confirm cure completeness by…
- Running non-destructive QC checks: Visual smear checks and blocking risk checks after rewind.
- Using rub/scuff checks: A rub test or scuff test for surface durability on representative samples.
- Checking adhesion where relevant: Tape adhesion test on films or critical label stocks.
- Confirming with measurement: Cure dose verification using radiometer readings or a dosimeter.
- Defining acceptance criteria: Set pass/fail thresholds and sampling frequency so results are consistent.
Share on Social:


