What Causes Incomplete Cure in UV Coatings (And How to Fix It)
Incomplete curing is the most common failure in UV coating processes. It leads to sticky surfaces, poor adhesion, and product rejection. You need to identify the root cause—whether it is oxygen inhibition, equipment settings, or chemical incompatibility—to fix it permanently.
Why Is My UV Coating Sticky or Soft After Curing?
The most frequent cause of a sticky surface is oxygen inhibition. Oxygen in the air reacts with free radicals in the coating, stopping the curing process at the very top layer. Other causes include insufficient UV intensity, incorrect wavelength matching, or excessively thick coating layers that block light penetration.
The Science of "Tackiness" vs. "Through Cure"
In my years troubleshooting industrial curing lines, I often see operators confuse "surface tack" with "under-cure." They are distinct issues.
- Surface Tack (Oxygen Inhibition): The coating is hard underneath but sticky on top. This happens because oxygen molecules quench the free radicals generated by your photoinitiators. This is especially common with lower-energy UV LED sources if the formulation isn't optimized.
- Incomplete Through-Cure: The coating is dry on top but soft or delaminating at the bottom. This usually means the UV light didn't penetrate deep enough, often due to high pigment loading (like white inks) or a coating thickness that exceeds the lamp’s penetration capability.
Expert Tip: Perform a "thumb twist" test. If the surface mars but doesn't detach, it’s surface inhibition. If the coating slides off the substrate, you have a through-cure or adhesion failure.
Does Wavelength Mismatch Cause Curing Failure?
Yes, wavelength mismatch is a critical failure point. Your UV lamp’s spectral output must align with the photoinitiator’s absorption peak. If your coating requires 365nm energy but your LED lamp outputs only 395nm, the reaction will not trigger efficiently, leading to a weak or incomplete cure.
Matching Your Light Source to Your Chemistry
Transitioning from mercury arc lamps to UV LED often reveals this issue. Mercury lamps emit a broad spectrum, "hitting" almost any photoinitiator. UV LEDs are monochromatic (narrow band).
If you use a formulation designed for a mercury lamp on a UV LED Coating Curing line, it may fail because the LED lacks the short-wave UV-C energy needed for surface curing.
Solution:
- Switch Photoinitiators: Use formulations doped with PIs that absorb strongly at 385nm or 395nm.
- Blend Wavelengths: Some advanced LED arrays mix wavelengths to target multiple depth layers.
How Do I Prevent Tacky Surfaces on UV Varnish?
To fix tacky UV varnish, you must overcome oxygen inhibition. You can increase the UV irradiance (intensity) to "outrun" the oxygen reaction, use a nitrogen inerting environment to remove oxygen, or switch to a varnish formulated specifically for LED curing with amine synergists.
Strategies for a Perfect High-Gloss Finish
Varnishes are particularly unforgiving. Because they are clear and often applied thinly, surface defects are obvious. In my experience, simply slowing down the line isn't always the answer—sometimes it makes things worse by allowing more oxygen time to interact with the surface.
Actionable Steps:
- Increase Peak Irradiance: High intensity (measured in W/cm²) generates a massive burst of free radicals that consume oxygen faster than it can diffuse back into the coating.
- Check Your Reflector/Lens: Dirty optics can reduce delivered energy by 30% or more. Clean them weekly.
- Optimize for LED: Learn more about how UV LED Curing for UV Varnish specifically addresses surface cure through high-intensity output.
Can Heat-Sensitive Plastic Films Be Fully Cured?
Yes, plastic films can be cured without damage using UV LED technology. Unlike hot mercury lamps, LEDs emit minimal infrared heat ("cold curing"). However, you must ensure the coating adheres properly to low-energy plastics by checking surface tension and potentially using corona treatment before coating.
Managing Thermal Load on Thin Substrates
One of the hardest challenges in the industry is curing a hard coating on a flimsy substrate like shrink wrap or thin PET. Traditional lamps warp these materials.
When you cure Coatings on Plastic Film with UV LED, you eliminate the IR heat spike. But, you introduce a new variable: Adhesion.
- The Challenge: LEDs don't heat the substrate, which can sometimes help "wet out" an adhesive.
- The Fix: Ensure your substrate surface energy (Dyne level) is at least 10 dynes higher than your coating's surface tension.
| Symptom | Probable Cause | Corrective Action |
| Film Warping | Excessive IR heat | Switch to UV LED "cold cure" systems. |
| Flaking/Peeling | Low surface energy | Treat film (Plasma/Corona) or check chemical compatibility. |
| Blocking (Rolls sticking) | Under-cured surface | Increase UV power or check for oxygen inhibition. |
Is It Possible to Cure Powder Coating with UV LED?
Yes, UV-cured powder coatings are a growing application, but they require a two-step process: first, the powder is melted (via IR or convection), and then it is cured instantly with UV light. This separates the flow stage from the cure stage, allowing for lower temperatures and faster processing.
The Revolution in Heat-Sensitive Substrates
Many people ask: Can UV LED Cure Powder Coating? The answer is yes, and it is a game-changer for materials like wood (MDF), plastic, and pre-assembled components that cannot survive a 400°F (200°C) oven.
Key Distinction:
- Thermal Powder Coating: Requires high heat for 20+ minutes to crosslink.
- UV Powder Coating: Melts at lower heat (~110°C) for 1-2 minutes, then cures in seconds under UV LED.
- Benefit: This drastically reduces energy consumption and the physical footprint of your production line.
Comprehensive Troubleshooting Checklist
If you are facing incomplete cures, run through this diagnostic checklist before calling your chemical supplier.
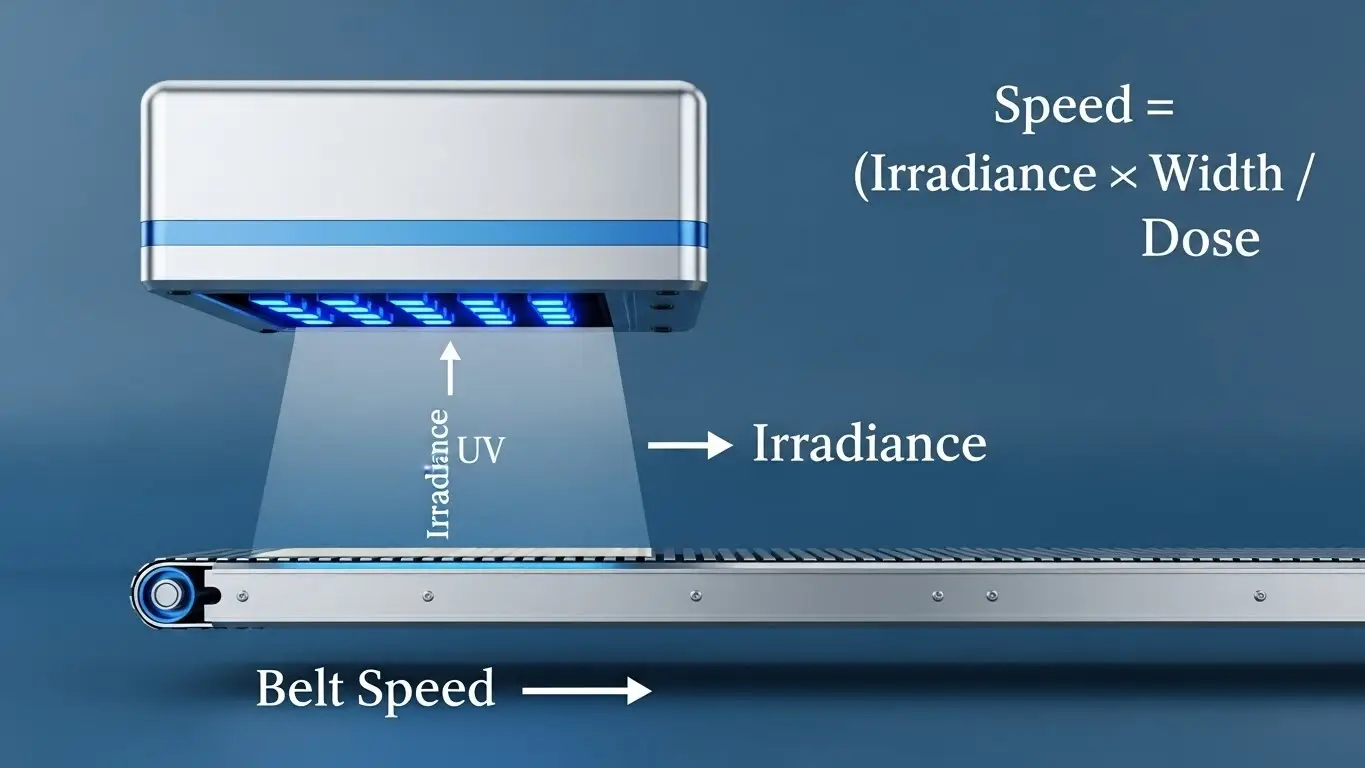
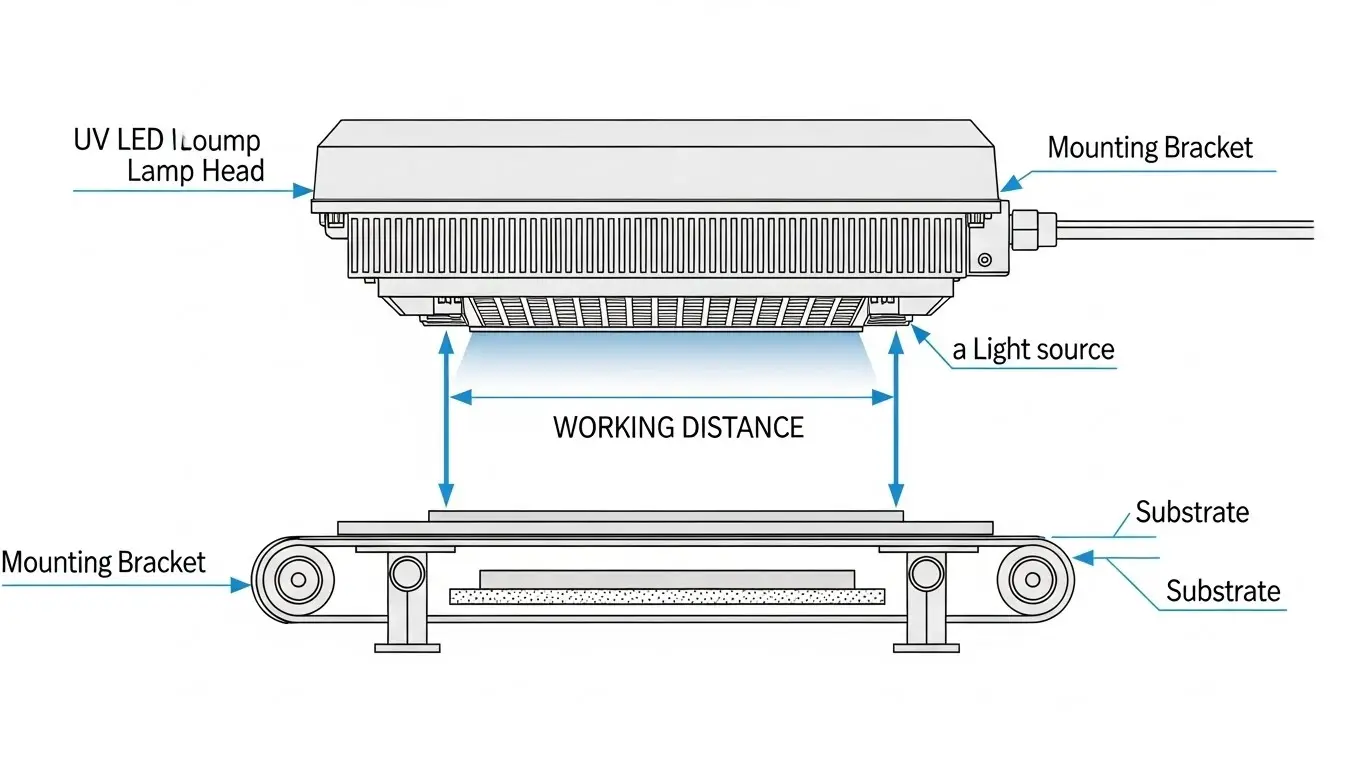
- Check the Lamp Height: Is the lamp >10mm away from the substrate? UV intensity drops appropriately with the square of the distance. Bring it closer (5-10mm is often ideal for LEDs).
- Verify Irradiance: Use a radiometer. Don't guess. Your eyes cannot judge UV intensity.
- Target: Ensure you are hitting the specific mJ/cm² (dose) and W/cm² (intensity) required by the coating's Technical Data Sheet (TDS).
- Inspect for Shadows: On 3D parts, are there areas the light isn't hitting directly? UV curing is line-of-sight.
- Review Shelf Life: Is your coating expired? Photoinitiators can degrade over time or if stored improperly.
- Analyze the Speed: Did someone increase the conveyor speed without increasing the lamp power?
- Rule of Thumb: If you double the speed, you cut the energy dose in half.
Expert Insight: "I once solved a 'bad batch' of coating complaint simply by wiping the quartz window of the UV lamp with isopropyl alcohol. It was covered in a fine mist of overspray that blocked 40% of the energy."
Final Thoughts on Optimizing Your Cure
Incomplete curing is rarely a mystery; it is a mismatch between physics (light energy) and chemistry (coating formulation). By switching to modern UV LED systems and rigorously controlling your process variables—distance, wavelength, and oxygen exposure—you can achieve consistent, durable, and high-quality finishes every time.
For more detailed guides on specific applications, explore our resources on UV LED Curing for Coatings and specialized setups.
Share on Social:


