Common LED UV Curing Problems in Flexo (And Fixes)
Switching to or optimizing common LED UV curing problems in flexo isn’t just about swapping lamps; it’s about mastering a new chemistry and energy balance. While LED curing offers game-changing consistency and energy savings, it brings unique challenges like oxygen inhibition and spectral mismatches that can stall your press.
If you are battling tacky surfaces, poor adhesion, or mystery odors, you are not alone. This guide dives into the most frequent hurdles flexo printers face with LED UV systems and provides actionable, floor-tested fixes to get your production back to speed.
Why Is My Ink Surface Still Tacky (Oxygen Inhibition)?
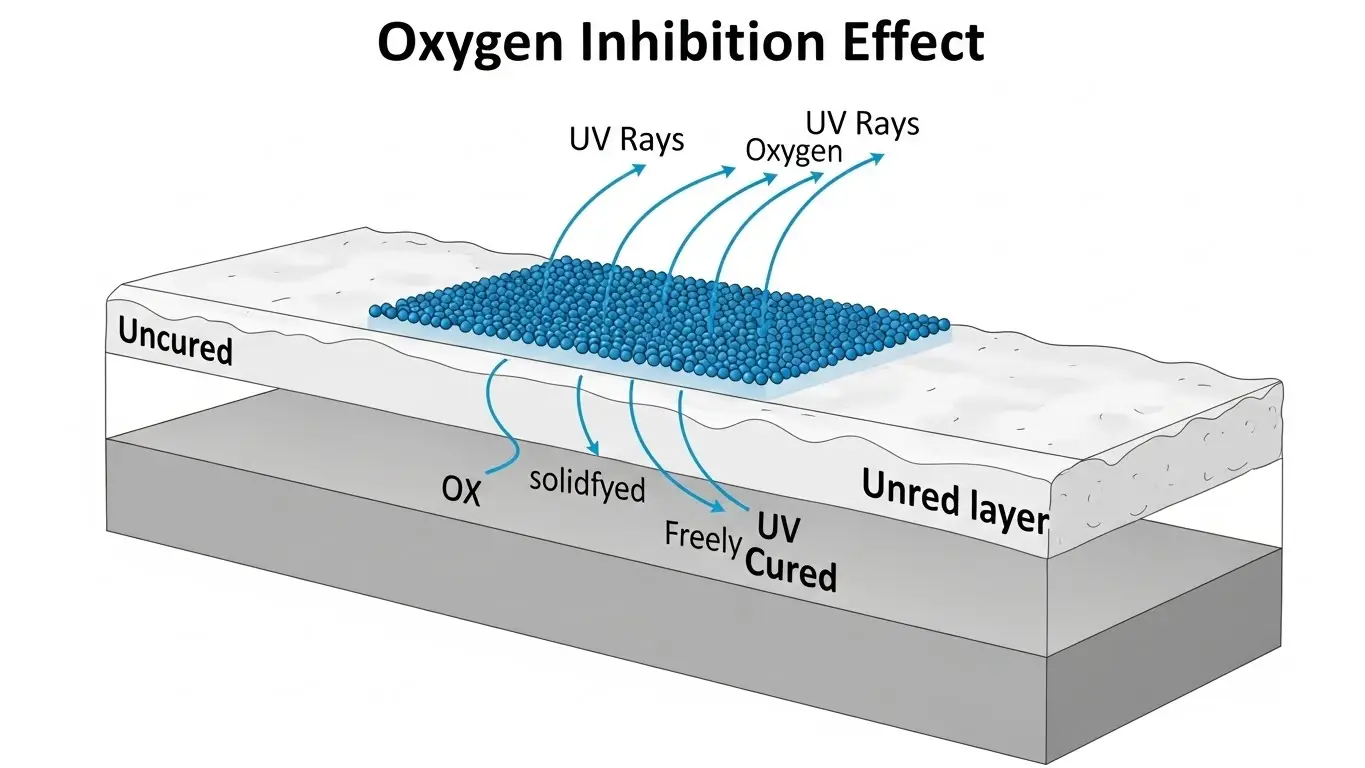
The Answer: Surface tackiness occurs when atmospheric oxygen blocks the curing reaction at the very top of the ink film, a phenomenon known as oxygen inhibition. To fix this, increase the LED peak irradiance to punch through the oxygen barrier, use nitrogen inerting systems, or switch to inks specifically formulated with "LED boosters" or amine synergists to consume surface oxygen.
The Deep Dive: Overcoming the "Air Trap"
One of the most frustrating common led uv curing problems in flexo is pulling a web off the press that looks cured but feels sticky to the touch. In traditional mercury curing, the immense heat and broad-spectrum UV (including short-wave UVC) naturally help seal the surface. LED lamps, which typically emit narrow UVA bands (like 395nm), don't have that UVC "surface sealing" wavelength.
Oxygen inhibition happens because oxygen molecules are eager to react with the free radicals your photoinitiators generate. If oxygen gets to them before the polymer chain forms, the reaction stops dead, leaving a layer of wet, uncured monomers on top.
Actionable Fixes:
- Boost Peak Irradiance: Ensure your LED array is set to a high intensity (W/cm²). High power density creates a "flood" of free radicals that outnumber the oxygen molecules, forcing the cure to completion.
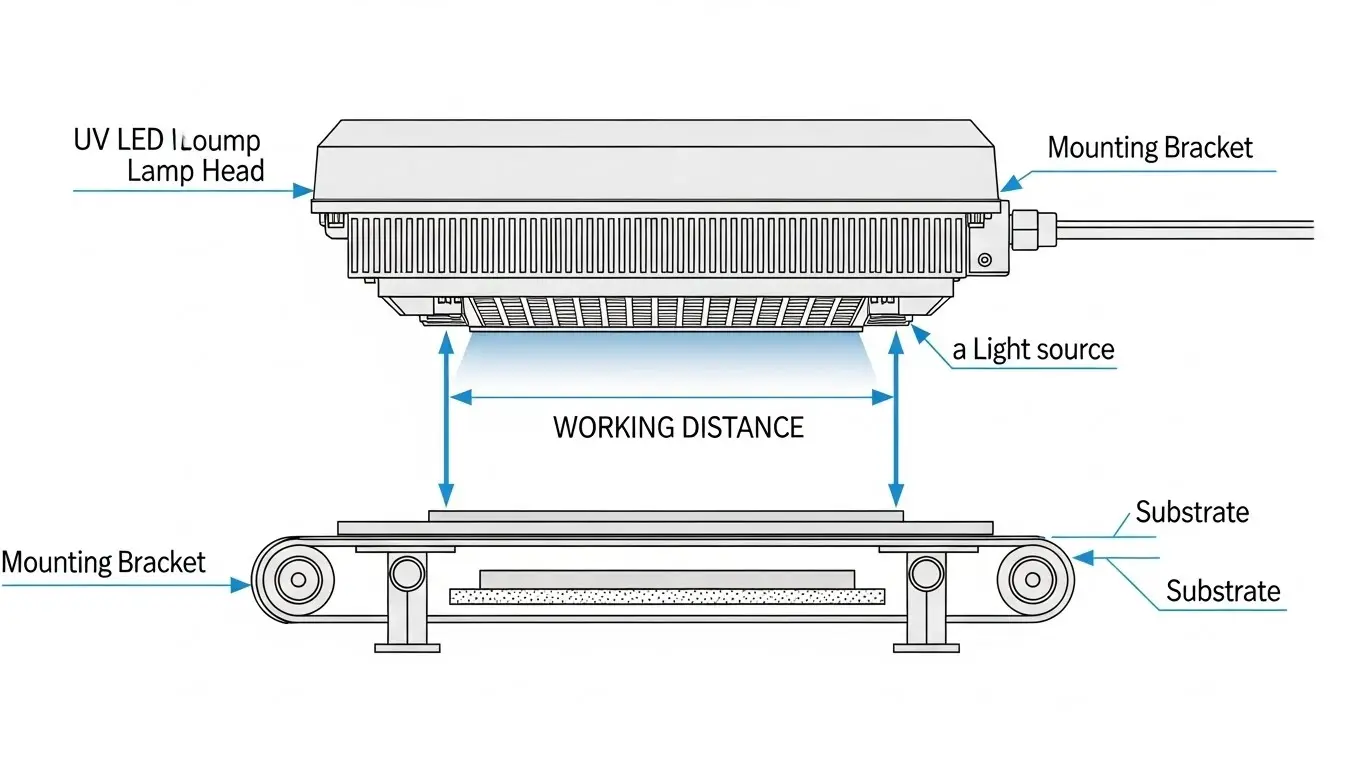
- Check Lamp Distance: LED intensity drops off strictly with distance. Ensure your lamp heads are mounted as close to the web as the manufacturer allows (often 10-20mm) to maximize surface energy.
- Inerting Chambers: For high-end applications like food packaging, consider nitrogen inerting. This displaces oxygen around the web, allowing for a perfect, instant cure without needing aggressive photoinitiators.
- Review Ink Formulation: Ensure you are using inks designed for LED. Standard UV inks may not have the right photoinitiator package to combat oxygen inhibition under UVA light alone.
Pro Tip: If you notice this issue primarily on white inks or heavy coverage areas, you might be dealing with light scattering.UV LED Curing for Flexo & Labelsoften requires specific setup adjustments for high-opacity colors.
What Wavelength Is Best for Flexo UV Inks?
The Answer: The industry standard wavelength for flexo UV inks is 395nm. This wavelength offers the best balance of deep penetration for through-curing thick ink layers and sufficient energy for general curing. While 365nm and 385nm are used for specific surface applications or varnishes, 395nm is the versatile workhorse for most colored flexo inks.
The Deep Dive: Matching Light to Chemistry
A mismatch between your LED lamp’s output and your ink’s photoinitiator absorption profile is a silent production killer. Unlike mercury lamps that blast the entire spectrum, LEDs are precise. If your ink is designed to react at 365nm but your lamp emits at 395nm, the ink simply won't cure, no matter how slow you run the press.
Wavelength breakdown:
- 395nm: The "Gold Standard" for flexo. It penetrates deep into pigments (especially dark colors like black and blue) to ensure adhesion at the substrate level.
- 385nm: Sometimes preferred for clear coats, adhesives, or whites where slightly more surface curing power is needed without the yellowing risk of lower wavelengths.
- 365nm: Rarely used for general flexo inks due to lower intensity output from LEDs at this band, but excellent for specific specialized adhesives.
Troubleshooting Steps:
- Audit Your Inks: Request the "Spectral Absorption Curve" from your ink supplier.
- Verify Lamp Specs: Check your LED array's peak output.
- The "Blue" Test: If your blue or black inks are wrinkling or peeling (poor through-cure), your wavelength might be too short (e.g., trying to cure deep pigment with 365nm) or your intensity is too low.
For a detailed breakdown on selecting the right spectrum, read more on What Wavelength Is Best for Flexo UV Inks?.
How Do I Eliminate Odor in UV Flexo Prints?
The Answer: Odor in UV prints is almost always caused by uncured monomers trapped inside the ink film or breakdown products from photoinitiators. To reduce odor, ensure a complete "through-cure" by optimizing the UV dose (slowing the press or adding power) and switching to "low-migration" (LM) inks designed for food packaging that use high-molecular-weight photoinitiators.
The Deep Dive: The Smell of Failure (Literally)
In the world of packaging—especially food and beverage—odor is a rejection criteria. If a customer complains about a "chemical smell," it usually means the ink didn't polymerize 100%. Those leftover liquid components are migrating out and off-gassing.
Common Causes of Odor:
- Undercuring: The bottom of the ink layer is still liquid.
- Overcuring (Thermal): While rare with LED, extreme intensity on sensitive substrates can sometimes degrade coating components.
- Wrong Photoinitiators: Some general-purpose photoinitiators produce byproducts (like benzaldehyde) that have a distinct almond or chemical smell.
The Fix Checklist:
| Issue | Solution |
| Residual Monomers | Increase UV Dose (mJ/cm²). More energy ensures all monomers react. |
| Ventilation | Check air extraction at the press. Even with LEDs, ozone (rare) or ink fumes need removal. |
| Ink Type | Switch to low-odor/low-migration (LM) series inks. |
| Reflector/Lens Dirt | Clean LED lenses. Dirty glass blocks UV energy, leading to undercuring. |
Learn more about specific protocols for sensitive packaging in our guide: How to Reduce Odor in UV Flexo Inks with LED Curing.
How Can I Improve Cure Adhesion on High-Speed Runs?
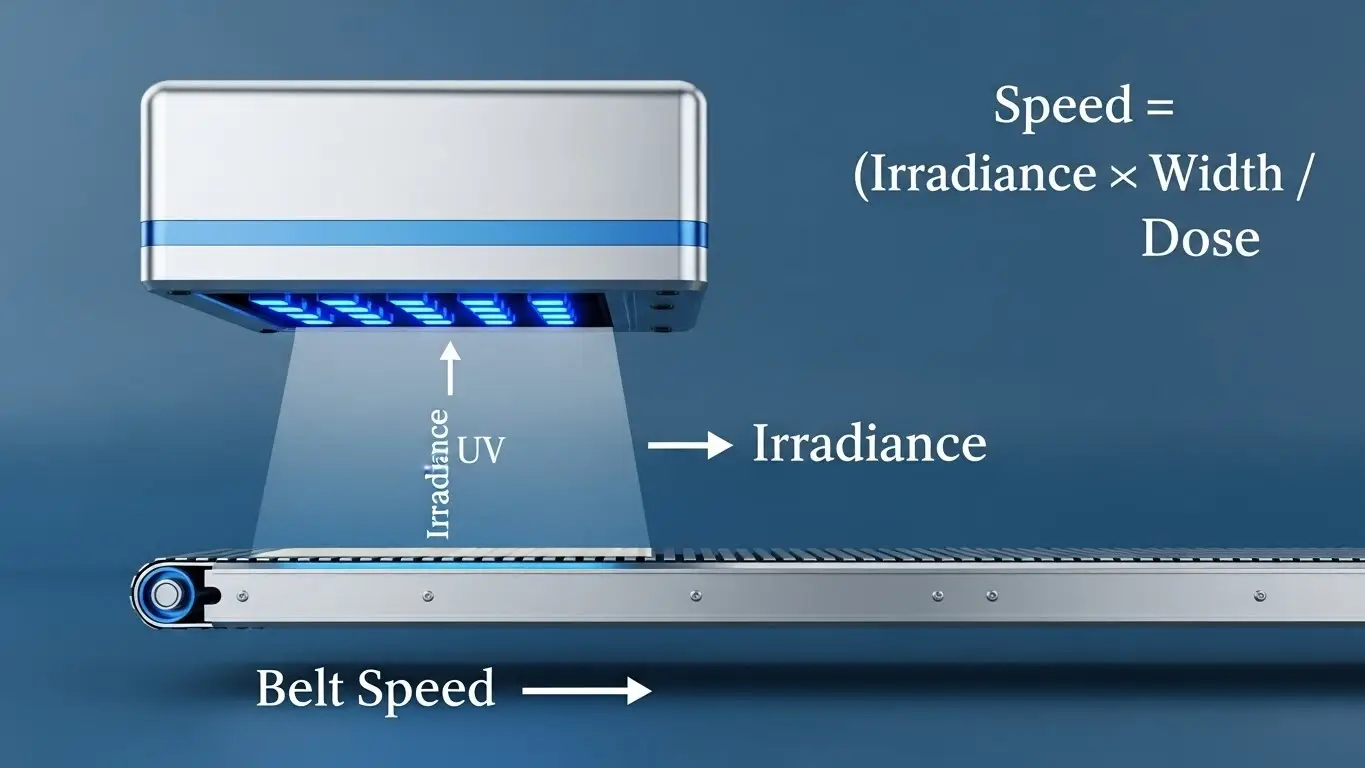
The Answer: Poor adhesion at high speeds typically means the ink isn't receiving a sufficient total UV dose (Time x Intensity). To fix this without slowing down, you must increase the dwell time by using wider LED arrays (or multiple rows of arrays) or increase the peak irradiance to drive the reaction faster within the limited exposure window.
The Deep Dive: The Speed vs. Dose Equation
Speed is money in flexo. But as you ramp up to 500, 600, or 800 fpm, the web spends a fraction of a second under the lamp. If your LED system was sized for 300 fpm, you will inevitably hit a "cure ceiling."
Why Adhesion Fails at Speed:
At high speeds, the ink gets hit with high intensity (Peak Irradiance), but not enough total energy (Energy Density/Dose). The photoinitiators start the reaction, but the web exits the cure zone before the polymer chains can cross-link firmly to the substrate. This results in ink that passes the "thumb twist" test but fails the tape test.
Strategies for High-Speed Curing:
- Corona Treatment: Never skip this. High speeds require higher surface energy on the substrate (aim for 42+ dynes) to help the ink wet out and grip instantly.
- Review Lamp Power: Are your LEDs running at 100%? If you are already maxed out and failing adhesion tests, you need more hardware—specifically, physically wider lamp heads (e.g., moving from a 20mm window to a 40mm window) to double the exposure time at the same speed.
- Reflective Backgrounds: ensure the substrate isn't absorbing the UV. For clear-on-clear labels, ensure you have a light trap or reflector to maximize photon efficiency.
For advanced techniques on maintaining throughput, check out How to Improve Cure on High-Speed Web Printing.
Why Is My Ink Wrinkling or "Orange Peeling"?
The Answer: Wrinkling occurs when the surface of the ink cures significantly faster than the body (bottom) of the ink film. This creates a hardened "skin" that shifts over the liquid ink below. It is caused by excessive surface intensity relative to penetration depth, or ink films that are too thick (high BCM anilox).
The Deep Dive: The "Skinning" Effect
This is a classic issue when printing heavy layers, like opaque whites or metallic silvers. The pigment blocks the UV light from reaching the bottom. The LED cures the top instantly, but the bottom remains soft. As the bottom eventually cures (or moves), the top skin buckles, creating a texture like an orange peel.
Corrective Actions:
- Lower the BCM: Use a lower volume anilox roll to lay down a thinner ink film. LED UV is efficient, but it cannot defy physics; thick opaque layers are hard to penetrate.
- Adjust Focus/Power: Paradoxically, slightly lowering the peak intensity can sometimes help. It prevents the surface from "slamming shut" instantly, allowing photons to penetrate deeper before the top seals.
- Print Stations: Split the heavy color into two stations. It is better to print-cure-print-cure two thin layers of white than to try and blast through one thick layer.
Summary Checklist: Troubleshooting LED UV
Use this quick reference table to diagnose your press issues on the fly.
| Symptom | Likely Culprit | Immediate Fix |
| Surface Tacky | Oxygen Inhibition | Increase power; Check lamp height; Add nitrogen. |
| Poor Adhesion (Tape Fail) | Low Dose or Surface Energy | Check Corona treatment (Dynes); Increase dwell time. |
| Deep Scratching | Poor Through-Cure | Check Wavelength (395nm?); Thin the ink film. |
| Odor | Undercured Monomers | Slow press speed; Increase power; Switch to LM inks. |
| Wrinkling | Ink too thick / Surface cure too fast | Lower Anilox BCM; Split heavy colors into two decks. |
By understanding the physics behind common LED UV curing problems in flexo, you can move from "guessing and checking" to engineering a solution. LED is a robust technology, but it demands precision. Respect the chemistry, manage the dose, and your press will run faster and cleaner than ever before.
Share on Social:


