UV LED Curing for Printing: Best Practices for Consistent Results
UV LED curing for printing has revolutionized the pressroom, offering instant drying, energy efficiency, and the ability to run heat-sensitive substrates without distortion. However, achieving consistent results requires more than just installing a lamp; it demands a strategic approach to integration, parameter management, and daily operation.
Whether you are running narrow-web flexo labels or high-speed digital lines, stability is the ultimate goal. In my years on the production floor, I’ve learned that "it looks dry" is the most dangerous phrase in printing. True consistency comes from mastering the variables—irradiance, dose, and wavelength—and locking them down with rigorous process control. This guide covers the essential best practices to ensure your UV LED system delivers a perfect cure, shift after shift.
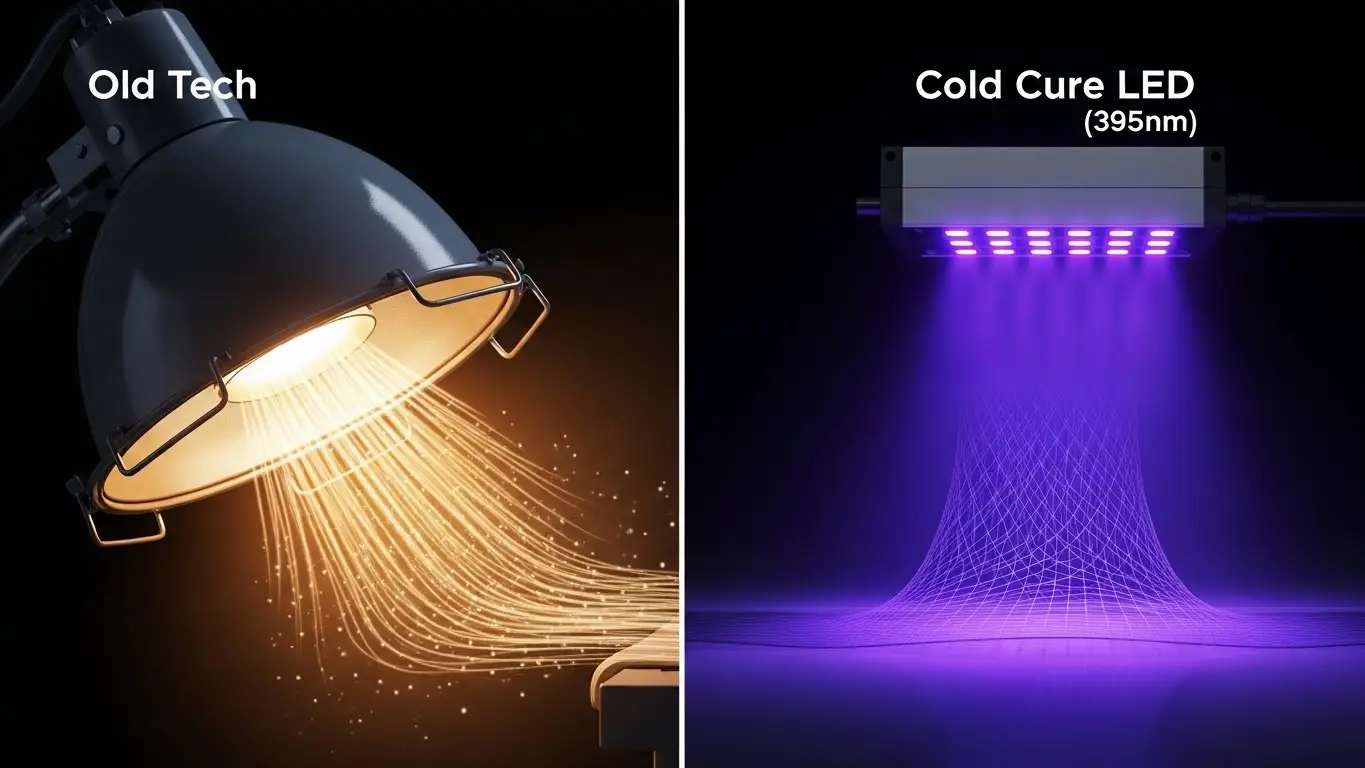
What Is UV LED Curing for Printing and Why Is It Replacing Mercury?
UV LED curing for printing is a photopolymerization process that uses narrow-spectrum ultraviolet light from Light Emitting Diodes (LEDs) to instantly crosslink inks, coatings, and adhesives. Unlike mercury arc lamps that emit broad-spectrum heat and ozone, LED systems provide a focused, "cold" cure that improves energy efficiency, reduces maintenance, and enables printing on thin, heat-sensitive films.
The Shift from Mercury to LED: Precision Over Power
The transition to LED isn't just about saving electricity; it's about gaining control. Traditional mercury lamps degrade unpredictably, shifting their spectral output over time. This forces operators to constantly adjust press speeds or guess when a bulb is "too old."
In contrast, UV LED systems offer:
- Instant On/Off: No warm-up time means you can switch lamps off between jobs or even between labels, drastically cutting standby energy consumption.
- Thermal Management: By eliminating infrared (IR) heat, you prevent substrate deformation. I once worked with a shrink-sleeve converter who cut their waste by 15% simply because the LED system didn't warp the film during press stops.
- Consistent Output: LEDs provide stable irradiance for thousands of hours, meaning the cure you get on Monday morning is the same as Friday afternoon.
Why Is Consistency Critical in UV LED Curing?
Consistency in UV LED curing prevents costly defects like ink migration, blocking (layers sticking together), and poor adhesion. A stable curing process ensures that every linear meter of product receives the exact energy dose required to fully polymerize the ink, regardless of fluctuations in press speed or environmental conditions.
The Hidden Dangers of "Under-Curing"
Inconsistent curing is often invisible to the naked eye. The surface might feel tack-free, but the bottom layer of the ink film—where adhesion to the substrate happens—might remain liquid. This "through-cure" failure often reveals itself only after the product has been shipped, leading to catastrophic batch returns.
To maintain consistency, you must monitor three core variables:
- Irradiance (Peak Intensity): Measured in Watts/cm², this is the "punch" of the light that penetrates deep into thick ink layers.
- Energy Density (Dose): Measured in Joules/cm², this is the total accumulation of energy over time.
- Wavelength Match: Ensuring your LED output (typically 365nm, 385nm, or 395nm) aligns perfectly with your ink's photoinitiators.
How Do I Optimize UV LED Curing for Flexo & Labels?
To optimize UV LED curing for flexo & labels, match your lamp’s wavelength to your specific ink set and ensure the cooling system is robust enough to maintain stable output at full press speeds. Proper alignment of the lamp head relative to the web path is also non-negotiable for uniform exposure.
Strategic Station Placement
In flexo workflows, not every station needs the same curing power.
- Pinning vs. Full Cure: Use lower-intensity "pinning" lamps after initial color stations to set the dot structure and prevent gain. Save your high-power systems for the final cure or after heavy coverage stations like opaque whites.
- Chill Rollers: Even with "cool" LED, the chemical reaction generates heat. Ensure your web path includes sufficient cooling capacity if you are running unsupported films.
Pro Tip: "If you are retrofitting, don't just bolt LEDs where the mercury lamps were. LED heads are more compact. Move them closer to the nip to reduce the time between print and cure, which sharpens your dot quality significantly."
What Are the Common LED UV Curing Problems in Flexo?
The most common LED UV curing problems in flexo include surface tackiness due to oxygen inhibition, poor adhesion on non-porous substrates, and 'through-cure' failure in thick, pigmented inks. These issues typically stem from mismatched wavelengths, insufficient power for the press speed, or dirty optics blocking UV output.
Troubleshooting the "Sticky" Surface
Oxygen inhibition is the enemy of UV curing. Oxygen molecules in the air can quench the curing reaction at the very surface of the ink, leaving it tacky.
- The Fix: Increase the irradiance (peak power) to drive the reaction faster than oxygen can interfere. Alternatively, use nitrogen inerting systems for sensitive food-packaging applications.
Handling Opaque Whites
White ink is notoriously difficult because titanium dioxide pigments reflect UV light.
- The Fix: You need high peak irradiance to punch through the reflection. Do not rely on "dose" alone (slowing the press); you need raw power (intensity) to penetrate to the base.
| Problem | Likely Cause | Suggested Fix |
| Surface Tack | Oxygen Inhibition | Increase peak irradiance or use an inerting chamber. |
| Poor Adhesion | Incomplete Bottom Cure | Check compatibility of ink photoinitiators with LED wavelength (e.g., 395nm). |
| Banding | Uneven Array Output | Clean the quartz window on the lamp head; check for failed diode segments. |
| Warping | Excessive Heat | Check cooling system flow; ensure LED is not over-driven beyond spec. |
What Are the Benefits and Setup Considerations for Flexo LED UV Curing?
The primary benefits of flexo LED UV curing are drastic energy savings, instant start-up capabilities, and the elimination of ozone extraction ductwork. Setup considerations must focus on thermal management integration and ensuring the LED array covers the maximum web width plus a safety margin.
Energy ROI and Operational Efficiency
The ROI on LED is often calculated in energy savings, but the operational uptime is where the real money is.
- No Shutters: Mercury lamps need mechanical shutters that jam and break. LEDs do not.
- Longer Lifespan: An LED array can last 20,000+ hours compared to 1,000-2,000 hours for a mercury bulb. This virtually eliminates downtime for bulb changes.
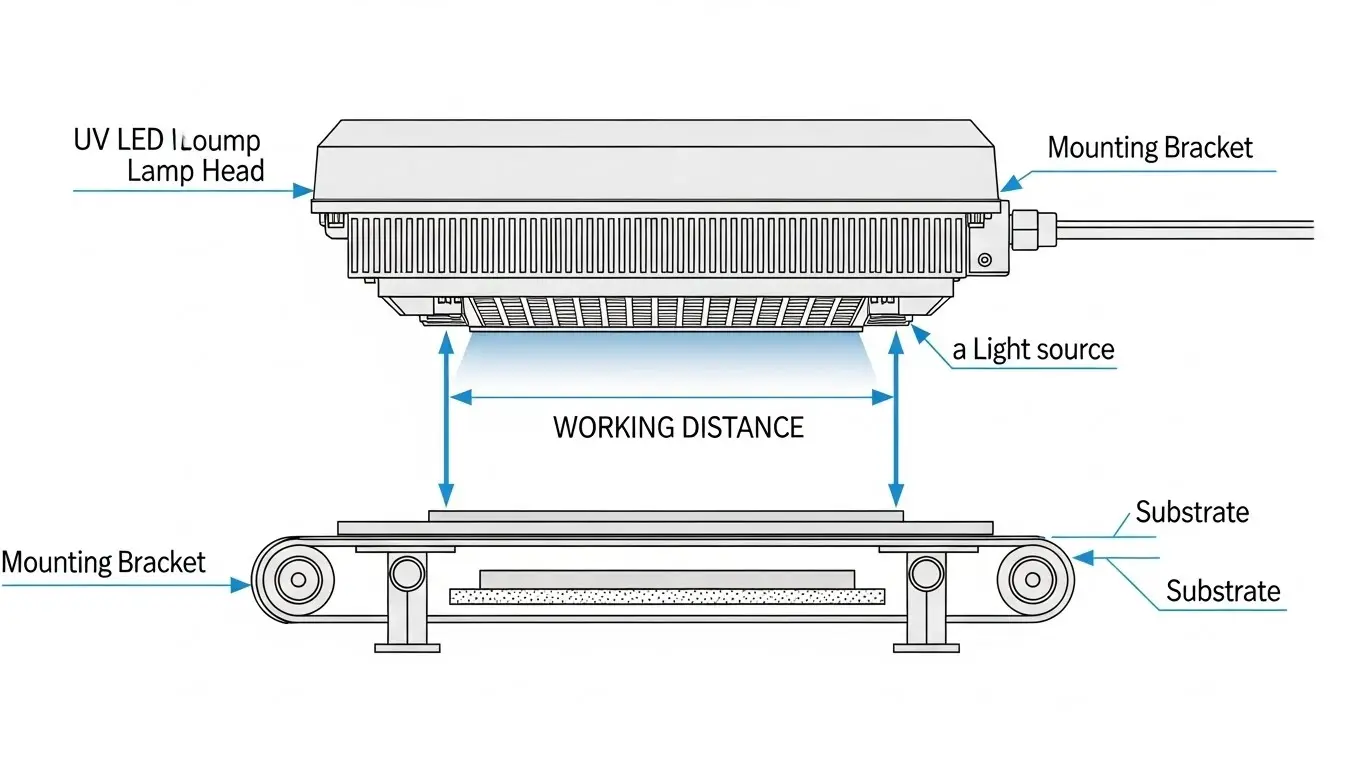
Installation "Gotchas"
When setting up:
- Working Distance: LEDs lose intensity quickly over distance. Position the lamp head 10mm–20mm from the substrate for maximum efficiency.
- Cooling Lines: If using water-cooled LEDs, ensure your chiller lines are insulated to prevent condensation from dripping onto the web.
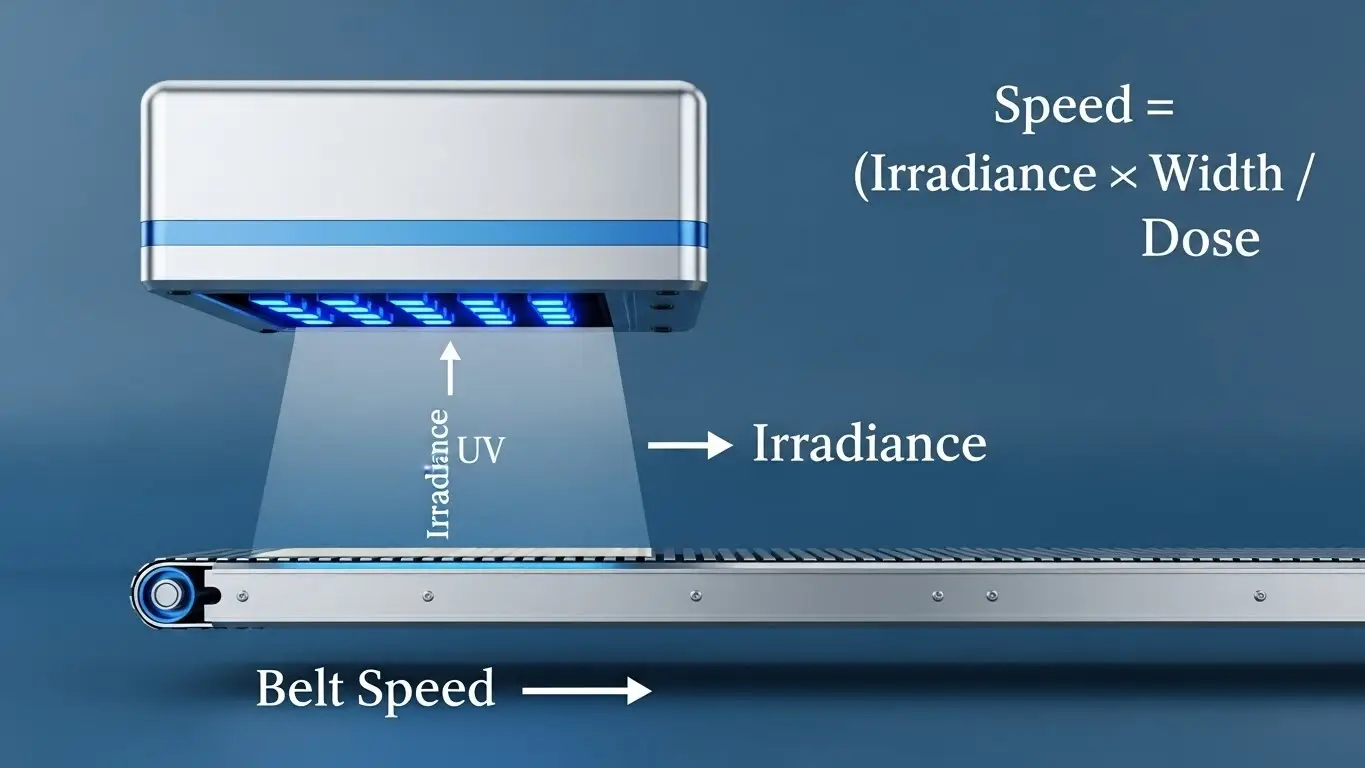
How to Size a Printing UV LED Curing System for Web Width?
To correctly size a printing UV LED curing system for web width, calculate the total irradiation area required using the formula: Width (L) = Required Energy (Q) × Web Speed (V) / Lamp Power (W). Always size the LED array slightly wider than your maximum print width to prevent edge-cure issues.
The Sizing Formula Explained
You cannot guess the size. You must use data.
- Q (Energy): The mJ/cm² your ink supplier specifies for a full cure.
- V (Speed): Your maximum production speed (e.g., 150 m/min).
- W (Power): The output of the lamp in mW/cm².
Example Calculation:
If your ink needs 200 mJ/cm² and you run at 100 m/min (approx 166 cm/s), and your lamp outputs 8 Watts/cm² (8000 mW/cm²)... you need to solve for the exposure window size (Length in the direction of web travel) to ensure the web spends enough time under the light.
However, for Web Width (Cross-direction):
If you print a 330mm web, do not buy a 330mm lamp. Buy a 350mm or 360mm lamp.
- Why? Web weave. If the web wanders even 5mm to the left, and your lamp is exactly the web width, the edge of your label will be wet. Wet ink on idler rollers creates a cleanup nightmare that stops the press for hours.
Best Practices for Maintenance and Monitoring
Routine maintenance for UV LED systems involves daily inspection of the quartz window for ink mist and weekly verification of output using a calibrated radiometer. Keeping the optics clean is the single most important factor in maintaining consistent curing power over the system's lifespan.
The "Clean and Check" Routine
LEDs are robust, but they are not invincible.
- Optics Cleaning: Ink mist and paper dust cure onto the lamp glass instantly. Use a lint-free cloth and isopropyl alcohol (or the manufacturer's recommended cleaner) every shift. A dirty window can cut UV energy by 20-30% in a single day.
- Filter Management: If your system is air-cooled, check the air intake filters. Clogged filters lead to overheating, which automatically dims the LEDs to protect them, subtly ruining your cure consistency.
- Radiometry: Do not trust the display on the power supply. It tells you what power is going to the lamp, not what light is coming out. Use a "puck" or strip radiometer to measure actual energy reaching the web.
Choosing the Right Inks and Substrates
Selecting the right inks requires verifying that the formulation is specifically "LED-optimized" to react to narrow bandwidths like 395nm or 385nm. Do not assume traditional UV inks will cure under LED lights; mismatched chemistry leads to weak crosslinking and product failure.
Dual-Cure vs. Dedicated LED Inks
- Dual-Cure Inks: These are formulated to work with both mercury and LED systems. They are great for transition periods but may be slightly slower or more expensive.
- LED-Specific Inks: These are highly reactive to specific narrow wavelengths. They offer the fastest cure speeds and best physical properties (scratch resistance, adhesion) but cannot be cured by mercury lamps effectively.
Substrate Compatibility:
Because LEDs emit negligible IR heat, you can expand your product portfolio to include:
- Thermal shrink sleeves (OPS, PETG)
- Thin unsupported films (BOPP, PE)
- Heat-sensitive linerless labels
Conclusion
Achieving consistent results with UV LED curing for printing is a blend of correct specification, smart integration, and disciplined maintenance. It changes the game from "hoping it dries" to "knowing it's cured."
By understanding the physics of the process—matching wavelength to ink, sizing your array correctly for the web, and maintaining rigorous process control—you can unlock the full potential of your press. You will reduce waste, lower energy bills, and, most importantly, deliver a product that you can trust.
Ready to upgrade your process?
- Dive deeper into specific applications in our guide on UV LED Curing for Flexo & Labels.
- Troubleshoot existing issues with Common LED UV Curing Problems in Flexo.
- Planning a new installation? Review Flexo LED UV Curing: Benefits and Setup.
- Ensure perfect fitment by learning How to Size for Web Width.
Consistency isn't an accident. It's an engineering choice. Make the right one.


