UV LED Curing for Offset Printing: Sheetfed Setup, Retrofit Steps, Costs, and Real Results
UV LED curing for sheetfed offset printing is a method that uses UV LED curing energy to harden UV inks and UV coatings/varnish instantly on a sheetfed offset press. This guide covers the practical setup options, what an LED-UV retrofit typically involves, the cost and ROI factors you should plan for, and what “real results” look like in print finishing—especially around spray powder reduction, fewer setoff/marking issues, and faster post-press handling in the delivery stack.
It’s written for pressroom teams, production managers, and owners who want to make decisions based on job mix and press integration realities (not hype). If you’re new to the topic, start with UV LED curing for offset printing.
What Is UV LED Curing in Sheetfed Offset Printing?
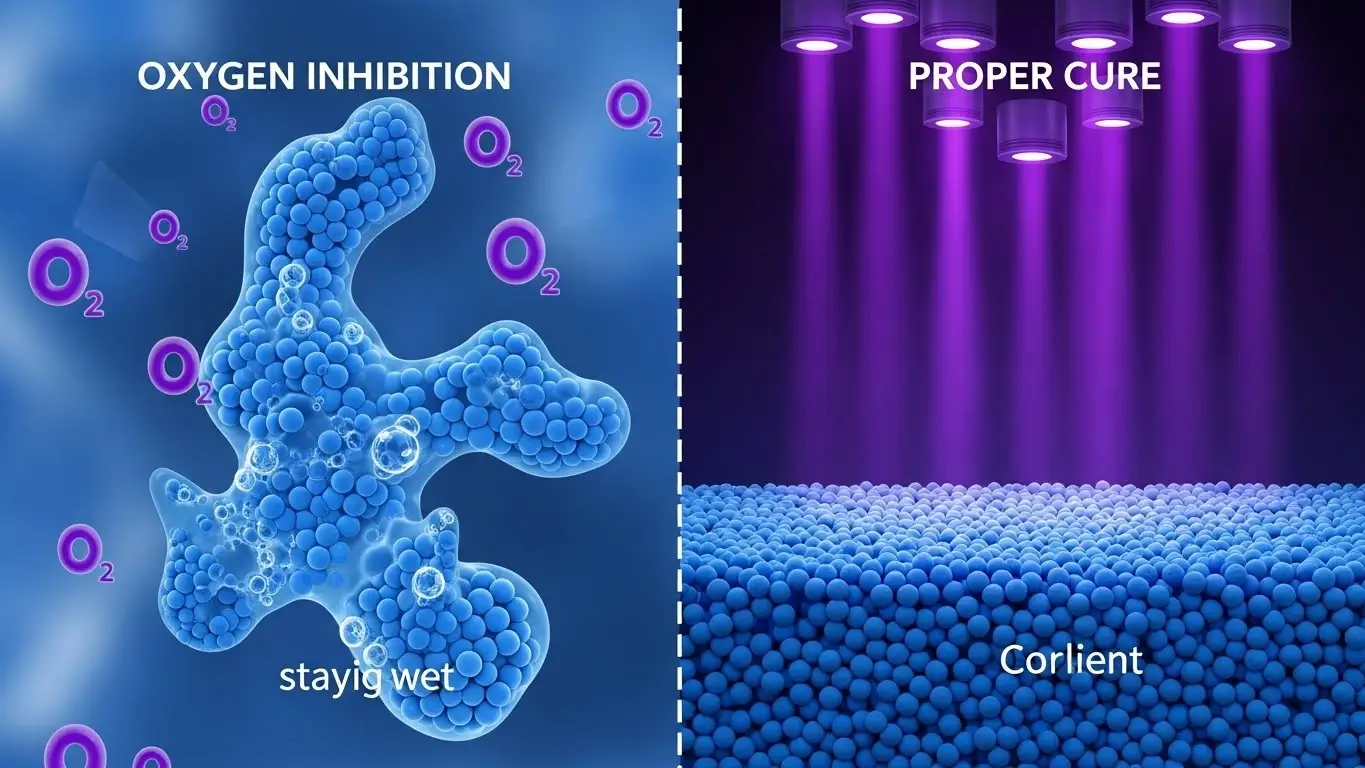
UV LED curing in sheetfed offset is the process of using UV LED light to trigger photopolymerization in energy-curable inks and UV varnish so the ink film cures (hardens) rather than slowly “drying.” That difference matters because curing vs drying changes your production workflow: sheets can be handled, stacked, and finished sooner with less risk of setoff prevention problems.
On a sheetfed lithography press, curing usually happens near press delivery (or between units), where press speed, the cure window, and rub resistance requirements meet real-world handling. A quick glossary helps: curing dose (energy delivered), irradiance (intensity), wavelength (LED output band), and setoff (ink transfer in the stack). For decision framing, see choose LED UV curing for offset printing.
What’s the difference between LED UV curing vs mercury UV in offset?
The biggest difference between LED UV and mercury UV is how the light is generated and controlled—LED arrays switch “instant on off,” while a mercury vapor UV lamp typically needs warm-up time and has different heat load and maintenance intervals. Both can cure UV inks/coatings, but compatibility, retrofit complexity, and operating behavior vary.
| Factor | LED UV (LED array) | Mercury UV (arc lamp) |
|---|---|---|
| Warm-up / cycling | Instant on/off cycling | Warm-up time; cycling limits |
| Lamp life | Long lamp life hours | Shorter bulb life; reflector wear |
| Heat load | Lower heat to sheet | Higher heat load |
| Maintenance | Module-based; fewer consumables | Bulbs/reflectors; more routine changes |
| Ink/coating compatibility | Must match LED wavelength | Broad UV output; different cure response |
| Hybrid option | Often used in hybrid UV systems | Arc + LED interchangeable in some builds |
Mercury still fits where broad-spectrum UV or legacy coating/ink sets dominate, while LED excels in controllability and lower heat—especially when you want a modern UV retrofit. For retrofit context, use checklist before retrofitting LED UV offset press.
What types of sheetfed jobs benefit most from UV LED curing?
UV LED curing is most valuable when…
- Fast turnaround is the product (same-day delivery, short runs, rush work) with no wait time before finishing.
- Heavy solids or dense coverage increase scuff resistance demands and slow conventional drying.
- Inline or post-press coating (spot UV coating or UV varnish) needs consistent handling quickly.
- Folding carton packaging and converting require sheets to be further processed immediately (die-cut/crease/glue).
- Heat-sensitive or tricky substrates (specialty coated stocks) can’t tolerate high heat load.
- Perfecting jobs where stack behavior and marking risk are high at press delivery.
- Lamination scheduling pressure when film lamination can’t wait on oxidation drying.
Example workflow: print + coat → stack cleanly → die-cut and glue the same day. For job ideas, see sheetfed offset LED UV curing applications.
How Does UV LED Curing Work on a Sheetfed Offset Press?
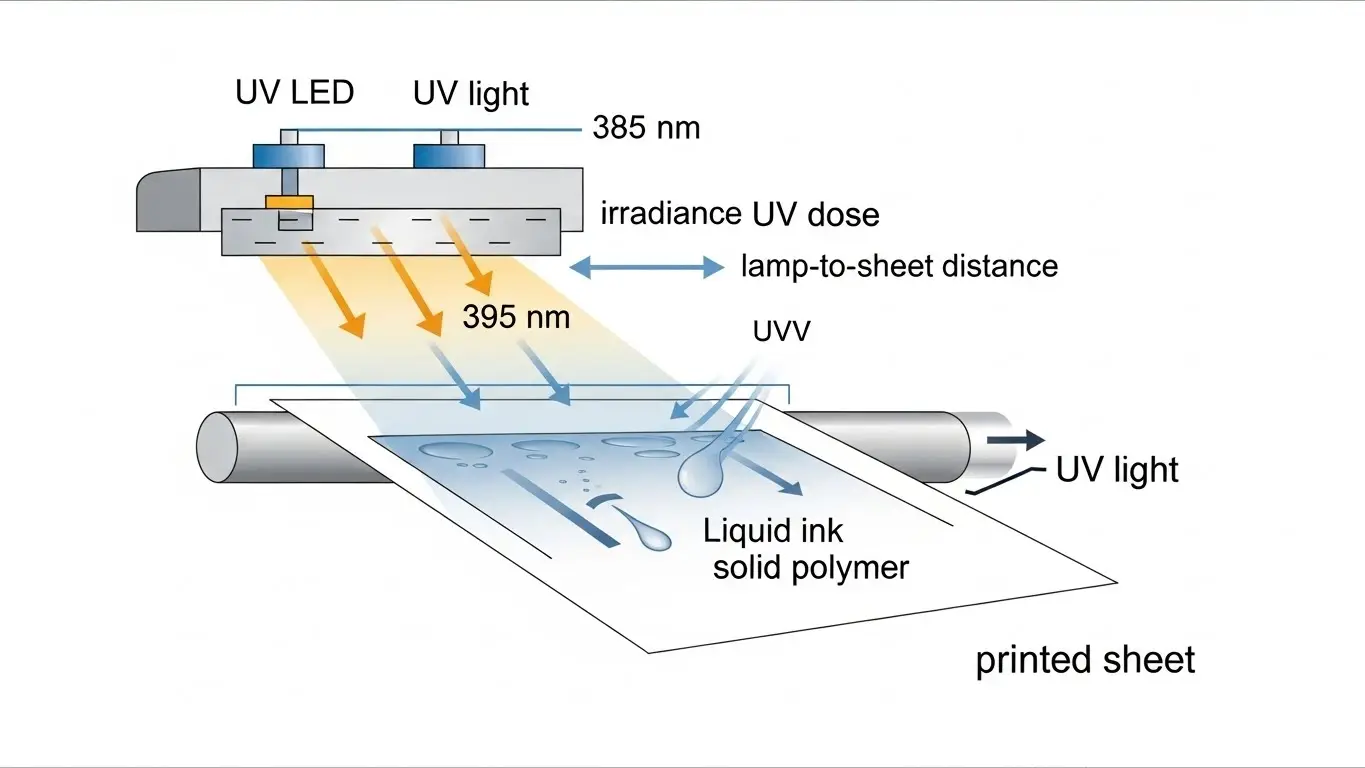
UV LED curing works by delivering UV wavelength energy (often in bands like 385 nm or 395 nm) that activates the photoinitiator response inside UV inks/coatings, driving polymer crosslinking so the ink film hardens. In press terms, it’s not magic—it’s matching wavelength alignment and delivering enough curing dose to the sheet at your target press speed.
Think in practical variables: irradiance (intensity at the sheet) and exposure time (how long the sheet sees that intensity). Lamp-to-sheet distance and coverage affect cure uniformity—especially on heat-sensitive substrates or heavy solids. If you want a press-focused walkthrough, read how LED UV curing works on sheetfed offset press.
Which curing variables can operators control on press?
Operators can control cure results mainly by adjusting…
- Lamp power setting (effective irradiance delivered to the sheet).
- Press speed (exposure time changes as sheets/hour change).
- Lamp distance / geometry (lamp-to-sheet distance impacts intensity at the surface).
- Ink coverage percent (solid areas need more energy than light tints).
- Coating weight / film thickness (thicker UV coatings need more dose).
- Substrate absorbency (coated vs uncoated stocks behave differently).
- Delivery handling (stack height, delivery temperature, and powder rate can hide cure issues).
Best practice: change one variable at a time, then document cure validation results. For tuning ideas, see sheetfed LED UV curing setup tips.
How do you know if ink is fully cured (not just “dry to touch”)?
A print can feel dry and still be under-cured, so…
- Rub test / scuff test: check rub resistance on heavy solids and coated areas.
- Tape test / quick adhesion test: confirm bonding—especially before lamination or gluing.
- Setoff check in the delivery stack: look for setoff/marking in the pile and on the back of sheets.
- Tackiness + gloss consistency: tack and uneven gloss often hint at cure window issues.
- Finishing stress checks: crease cracking, die-cut edges, glueability, and lamination behavior.
- Log pass/fail: keep a cure validation log tied to job tickets to prevent repeat defects.
If smearing or marking shows up, use does LED UV curing reduce setoff in offset printing to diagnose why “no marking” didn’t happen.
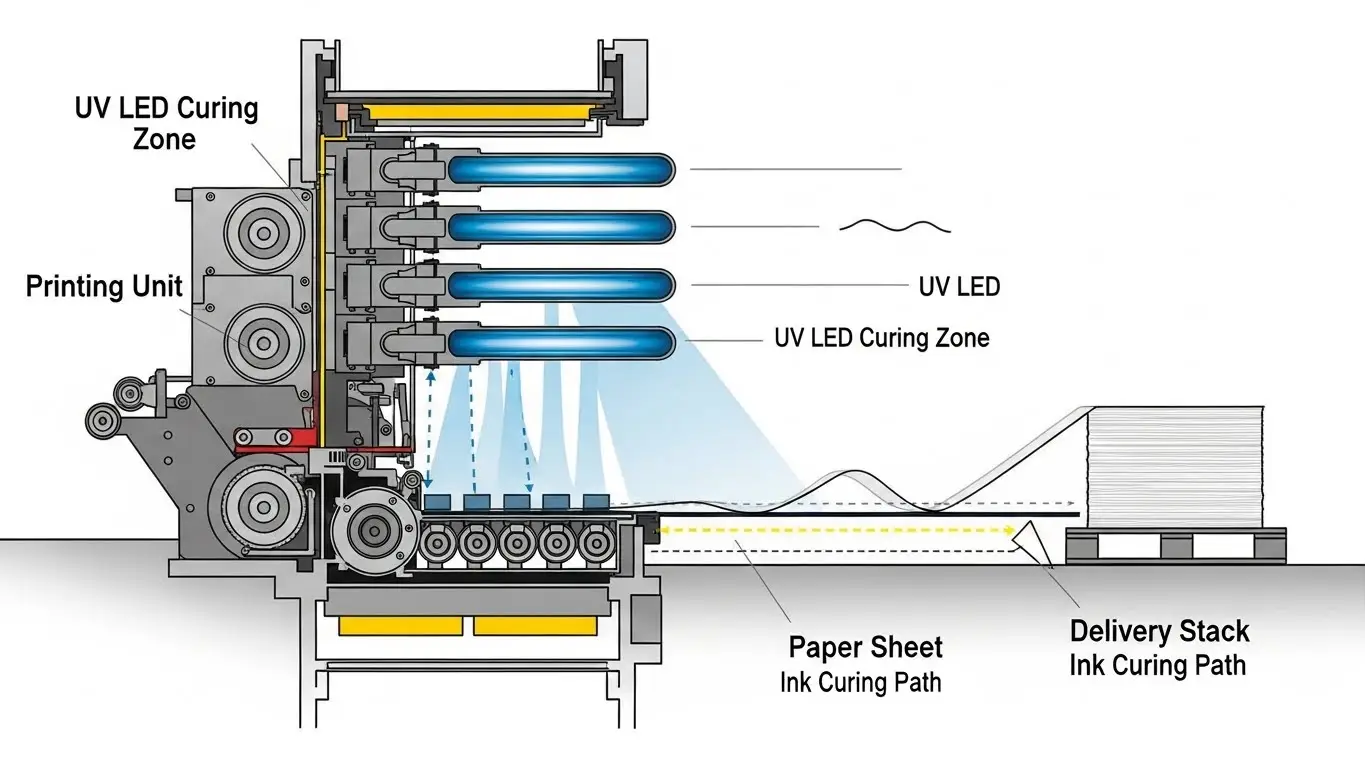
What UV LED Setup Options Exist for Sheetfed Offset?
Sheetfed UV LED can be set up in a few common ways depending on press configuration, job mix, and press footprint constraints. The main options are interdeck installation, delivery curing, or a combination setup that supports more demanding UV coatings/varnish and heavy solids. Perfecting unit layouts and coater unit placement can change what’s feasible.
Your high-level integration needs are consistent across setups: proper guarding, safety interlocks, a workable cooling method, and ventilation planning. If you’re mapping options to your press, start with sheetfed LED UV curing setup tips.
Should you place LED UV in the delivery or between units?
Choosing delivery vs interdeck depends on your setoff control requirements, target press speed, and how quickly you need cure-before-stack performance—balanced against space constraints and retrofit cost tier.
| Decision factor | Delivery-only curing | Interdeck curing |
|---|---|---|
| Setoff timing | Cure at the end; relies on stable delivery | Earlier cure reduces wet-on-wet risk |
| Speed sensitivity | Can be limited on heavy solids/coatings | Often better for demanding coverage |
| Retrofit complexity | Typically simpler install | More complex mechanical/electrical routing |
| Best-fit job types | Light-to-medium coverage, some coatings | Heavy solids, critical handling, fast finishing |
Rules of thumb:
- If you run heavy solids + coating and need cure-before-stack, interdeck is usually safer.
- If your priority is lower upfront cost and simpler integration, delivery-only may fit.
- If you’re chasing “no spray powder” outcomes consistently, placement matters as much as lamp power.
For selection guidance, see compare LED UV curing systems for printing machines.
What changes in the delivery stack and powder usage with UV LED?
When UV LED curing is dialed in, the delivery behaves differently because cured sheets resist blocking and setoff, reducing the need for anti-setoff powder in many jobs. You’ll often see lower marking scratches and more stable stack behavior—especially when cure uniformity is consistent across the sheet.
That said, powder reduction is job-dependent: thick coating weight, high coverage percent, or partial cure can still require powder rate control. Watch pile temperature, stack height, and sheet-to-sheet blocking risk, and keep handling SOPs tight (jogger settings, delivery air, gripper release timing). For setoff-focused guidance, read does LED UV curing reduce setoff in offset printing.
How Do You Retrofit UV LED onto an Existing Sheetfed Offset Press?
A UV LED retrofit is the process of integrating UV LED lampheads, power supplies, and controls onto an existing press through a structured path: press survey → retrofit design → installation → commissioning and cure validation. In practice, success depends on press compatibility (space, power, guarding, and controls) as much as it depends on lamp performance.
You also need to plan the operational side: hybrid operation (UV + conventional inks), operator training, downtime planning, and service support for modules and monitoring. Roles matter—an integrator handles press integration and safety interlocks, while your plant team supports utilities, scheduling, and SOPs. Start with checklist before retrofitting LED UV offset press.
What’s the step-by-step retrofit process from survey to go-live?
Most successful retrofits follow these steps…
- 1) Job mix review: map substrates, UV inks, UV coatings/varnish, coverage, and finishing needs.
- 2) Site assessment: verify press model, press configuration, available footprint, and access points.
- 3) Measurement/3D scan: confirm lamphead placement geometry and cable routing paths.
- 4) Retrofit design: select placement (delivery/interdeck/combination) and define safety interlocks.
- 5) Utilities planning: confirm electrical upgrade needs, cooling loop requirements, and ventilation/exhaust.
- 6) Mechanical install: mount brackets, shielding, guards; verify sheet path clearance.
- 7) Electrical integration: install power supply, controller/HMI, and interlock testing.
- 8) Commissioning: set baseline settings, check cure uniformity, validate cure testing on real jobs.
- 9) Acceptance criteria: document pass/fail (rub, adhesion, setoff checks) and speed targets.
- 10) Training + handover: operator SOP, maintenance plan, spare parts plan, service escalation.
For a printable checklist, use checklist before retrofitting LED UV offset press.
How much downtime should you expect for a retrofit?
Retrofit downtime depends mainly on…
| Downtime driver | Why it adds time | How to reduce it |
|---|---|---|
| Mechanical fitment | Tight access and custom brackets | Pre-fab parts; staged install |
| Electrical upgrade | Power capacity, routing, interlocks | Off-shift work; pre-planned wiring |
| Cooling/ventilation | Cooling loop + exhaust ducting complexity | Confirm utilities before install |
| Commissioning time | Validation runs + cure testing | Prepare test jobs and acceptance criteria |
| Training shift | SOP adoption prevents repeat issues | Schedule training during ramp-up |
Plan downtime as installation + commissioning/validation (separate blocks), and keep a contingency buffer without making promises. A strong pre-plan helps—see checklist before retrofitting LED UV offset press if you maintain alternate slugs, and use the official checklist here: checklist before retrofitting LED UV offset press.
Can one press run both conventional and UV after retrofit?
Many shops aim for hybrid capability, which means the press can support conventional inks and UV inks—but only if the workflow is designed to prevent ink train contamination and changeover SOP failures. Hybrid isn’t just hardware; it’s scheduling, labeling, and disciplined operator behavior.
Practical SOP bullets:
- Flag UV vs conventional on job ticketing and schedule mixed runs intentionally.
- Segregate supplies (inks, coatings, blankets where relevant) with clear storage labeling.
- Standardize roller wash-up and verification steps before switching modes.
- Validate coating unit use and finishing compatibility (glueability/lamination).
If you’re planning hybrid, include it in your integration scope: offset printing UV LED curing system integration.
What Equipment Do You Need for UV LED Curing in Sheetfed Offset?
A sheetfed UV LED system typically includes…
- UV LED lamphead / LED cassette sized to your sheet width and placement.
- Power supply matched to the lamphead load and press electrical constraints.
- Controller/HMI for lamp power setting, monitoring, and alarms (often with segment control).
- Cooling method (air-cooled or water-cooled) sized for continuous production.
- Shielding and guarding with safety interlocks aligned to press safety requirements.
- Monitoring sensors (temperature, status, sometimes output tracking) for repeatability.
- Spare parts kit and a preventive maintenance plan for optics/cleanliness.
For system-level planning, see offset printing UV LED curing system integration.
What are the key system specs to compare (so you don’t buy wrong)?
Compare UV LED systems using specs that affect cure consistency, like…
| Spec | Why it matters on press |
|---|---|
| Wavelength peak | Must match ink/coating chemistry and cure window |
| Irradiance profile | Impacts curing dose at speed; affects consistency |
| Dose capability | Determines whether heavy solids/coatings fully cure |
| Cure width | Must cover format with margin for alignment |
| Cure uniformity | Prevents partial cure, setoff, gloss variation |
| Working distance | Affects lamp distance and intensity at the sheet |
| Cooling capacity | Stabilizes output and extends module life |
| Integration protocol | Interlocks/controls reduce operator error |
| Monitoring + service SLA | Improves uptime and reduces troubleshooting time |
For side-by-side comparisons, use compare LED UV curing systems for printing machines.
What inks and coatings are required for LED UV sheetfed offset?
LED UV curing usually requires inks/coatings formulated to respond efficiently to the LED’s wavelength output, so “LED-compatible” means more than a label—it’s formulation alignment that supports a stable cure window at your press speed. UV coatings/varnish can work well, but coating weight and ink film thickness directly influence curing dose needs and rub resistance results.
Before you commit, ask suppliers: What substrates are validated (coated stocks vs uncoated)? What dose range is recommended? How does the system behave on heavy solids? Is glueability or lamination compatibility proven? What are the common failure modes (tacky ink, poor adhesion, setoff/marking)? For compatibility specifics, see inks compatible with LED UV offset curing.
How Much Does a UV LED Retrofit Cost for Sheetfed Offset?
The cost of a UV LED retrofit depends on scope: how many lampheads you need, where you place them (delivery vs interdeck), and how much press integration work is required around controls, safety interlocks, cooling, and ventilation. Budgeting also needs to include downtime cost and the transition costs tied to UV inks and UV coatings/varnish—especially if you’re changing suppliers or standardizing new job tickets and SOPs.
Hidden costs often surprise teams: electrical upgrade work, cooling capacity, exhaust ducting, training time, spare modules, and the validation runs required to prove “real results.” For planning help, start at UV LED curing for offset printing.
What factors change UV LED retrofit pricing the most?
Pricing changes the most when…
- Press format size increases cure width requirements.
- Lamphead count grows (single delivery vs multi-position setups).
- Placement shifts from delivery-only to interdeck (more fitment + routing).
- Controls integration requires deeper press interface work and interlocks.
- Facility power forces an electrical upgrade or new power distribution.
- Cooling choice moves from simple air-cooled to larger water-cooled loops.
- Monitoring features and service coverage raise total cost of ownership.
- Hybrid capability adds process changeover requirements (SOP + training).
To structure the selection process, see compare LED UV curing systems for printing machines.
How do you estimate ROI for UV LED in sheetfed offset?
ROI is usually driven by two levers: cost savings and revenue upside, and the cleanest way to estimate it is to track a small set of metrics tied to waste, speed, and finishing throughput.
| ROI lever | Metric to track | How to measure |
|---|---|---|
| Reduced rework | Reprint rate, marking complaints | Before/after baseline by job type |
| Faster turnaround | Jobs/day, lead time to die-cut/laminate | Timestamp from print to finish |
| Less powder + handling | Powder usage, setoff/marking defects | Delivery logs + QC checks |
| Energy and maintenance | Power draw, module service events | Utility and maintenance records |
| New capability | New substrates/jobs won | Sales mix and margin tracking |
Simple scenario logic: if “no wait time” enables faster finishing and reduces marking-related waste, the same press can produce more sellable output—especially when utilization rate is high. For decision framing, use choose LED UV curing for offset printing.
What Are the Benefits of UV LED Curing for Sheetfed Offset?
Shops adopt UV LED curing for sheetfed offset because…
- Instant curing reduces delays between printing and print finishing.
- Less setoff/marking improves delivery stack quality and customer satisfaction.
- Better rub resistance helps in handling, converting, and transport.
- Lower heat output supports more heat-sensitive substrates and stable sheet behavior.
- Spray powder reduction can simplify downstream processes when cure is consistent.
- More predictable results come from standardized settings and operator SOPs.
If you’re weighing benefits against constraints, see choose LED UV curing for offset printing.
What “results” should you track after installation?
To prove the retrofit worked, track results in three categories…
| Category | KPI examples | Notes |
|---|---|---|
| Quality | marking defects, rub failures, adhesion issues | Tie to job types and substrates |
| Throughput | press speed achieved, makeready time, downtime events | Compare before/after baseline |
| Cost | waste sheets, powder usage, electricity consumption | Capture 30–90 day window |
Add supporting measures: finishing lead time (print-to-die-cut/laminate), reprint rate, and customer complaints tied to setoff/marking. Use these “real results” to refine recipes and SOPs over time. For a broader overview, revisit UV LED curing for offset printing.
What Problems Happen with UV LED in Sheetfed Offset (and How to Fix Them)?
Most UV LED issues show up as cure, adhesion, or handling problems, and the fastest way to resolve them is to map symptoms to likely causes, then validate changes with repeatable checks.
| Symptom | Likely cause | Quick checks | Fix approach |
|---|---|---|---|
| Tacky ink | Insufficient dose; speed too high | Rub test, tack check, settings log | Increase dose, reduce speed, re-test |
| Scuffing | Partial cure or thick ink film | Scuff test on solids | Adjust lamp power, film thickness |
| Setoff/marking | Cure-before-stack not achieved | Delivery stack inspection | Placement review, dose/speed tuning |
| Poor adhesion | Substrate/ink mismatch; contamination | Tape test, substrate ID | Validate ink set, clean process, re-test |
| Gloss variation | Cure non-uniformity; optics contamination | Visual + rub across sheet | Clean optics, confirm uniformity |
| Heat-related sheet issues | Cooling/ventilation imbalance | Pile temperature | Improve cooling method/airflow plan |
If you need a deeper integration lens, use offset printing UV LED curing system integration.
Why is the ink tacky or scuffing even though it looks cured?
If ink looks cured but scuffs, the usual cause is…
- Insufficient dose at your current press speed (dose drops as speed rises).
- Thick ink film on heavy solids that needs more curing dose to harden fully.
- Wavelength mismatch between the LED output and the ink formulation.
- Dirty optics or poor lamp distance reducing irradiance at the sheet.
- Inconsistent cure uniformity across the format (edges vs center).
- Skipping re-test after adjustments, so the defect returns on the next run.
Fix sequence: log settings → increase dose or reduce press speed → verify lamp distance → clean optics → re-run rub test and document. For ink matching, see inks compatible with LED UV offset curing.
Why am I getting setoff/marking in the stack after switching to UV LED?
Setoff after UV LED usually means…
- Cure at delivery is incomplete (not enough cure-before-stack performance).
- Stack height is too high for the current handling SOP and pile temperature.
- Powder misuse (too much or too little) is masking the root cause.
- Placement strategy is misaligned (delivery-only when interdeck is needed).
- Press speed is too high for the current curing dose.
- Finishing timing is too aggressive before sheets stabilize.
Work the checklist: inspect the delivery stack → adjust dose/speed → reassess placement → confirm setoff checks on test sheets. For targeted guidance, read does LED UV curing reduce setoff in offset printing.
Why does adhesion fail on certain substrates after retrofit?
Adhesion failures usually come from substrate surface or ink mismatch, especially when the substrate coating chemistry or surface energy doesn’t match the ink/coating system you’re curing. In practice, cure and adhesion are different: a surface can feel hard yet still bond poorly if the formulation/substrate pairing is wrong or the surface is contaminated (powder residue, silicone contamination, handling debris).
Compatibility checklist: confirm substrate ID and supplier TDS, verify ink/substrate match, run tape test or crosshatch test, check for powder residue, then revalidate dose and coating compatibility. If the issue tracks to chemistry rather than settings, switch to a proven formulation set—start with inks compatible with LED UV offset curing.
What Are the Most Common Mistakes During Sheetfed UV LED Setup and Retrofit?
The most expensive mistakes happen before the system is even installed…
- Buying on max irradiance instead of cure uniformity and integration fit.
- Choosing the wrong placement (delivery vs interdeck) for the real job mix.
- Skipping ink/coating validation, then blaming hardware for chemistry issues.
- Under-planning utilities (facility power, cooling, ventilation) and losing time.
- Weak safety planning (guarding gaps, incomplete safety interlocks).
- No operator training plan, so shift-to-shift settings drift.
- No acceptance criteria or baseline KPIs to prove results after commissioning.
- Forgetting spare modules/service coverage until the first downtime event.
- Rushing hybrid workflow changeovers without a changeover SOP.
Use checklist before retrofitting LED UV offset press to avoid the most common retrofit complexity traps.
What should be in a pre-retrofit checklist to avoid costly surprises?
Before you sign off on a retrofit, confirm…
- Press feasibility: press model verification, press configuration, space measurement, access points.
- Utilities audit: electrical load audit, cooling capacity, ventilation plan, exhaust routing.
- Job mix analysis: substrates, coatings, coverage %, finishing requirements, press speed targets.
- Supplier sign-off: inks/coatings validated for LED wavelength and cure window.
- Safety plan: guarding, safety interlocks, operator exposure controls, SOP readiness.
- Acceptance criteria: rub, adhesion, setoff checks, cure uniformity targets, documentation plan.
- Downtime schedule: install window + commissioning/validation + training shift.
- Spares/training: spare parts plan, service escalation, operator training plan.
For a full checklist, use checklist before retrofitting LED UV offset press.
Best Practices for Dialing In UV LED Curing on a Sheetfed Press
Once installed, consistent curing comes from standardizing settings and building a simple routine that makes cure repeatable across operators, shifts, and substrates. Start with baseline settings, then apply one-variable tuning so you can trace cause and effect. Verify cure routinely (rub/setoff checks), log changes in the job ticket, and keep optics clean so irradiance at the sheet stays stable.
Preventive maintenance matters: monitor LED output behavior, maintain cooling method performance, and refresh operator SOPs so press speed changes don’t silently reduce curing dose. For practical pressroom tips, see sheetfed LED UV curing setup tips.
How do you create a “recipe” library for repeatable curing results?
A curing recipe is a documented combination of substrate, ink/coating, press settings, and validation checks that lets you reproduce results without guessing.
| Recipe field | Example entry |
|---|---|
| Substrate SKU | Coated stock (brand/grade) |
| Ink set ID | UV inks (LED-compatible set) |
| Coating type | UV varnish / coating weight |
| Coverage percent | Heavy solids vs light coverage |
| Press speed | Target speed range |
| Lamp power percent | Baseline + adjusted settings |
| Placement | Delivery / interdeck / combination |
| Tests | Rub test, tape test, setoff checks |
| Notes | Lamination/glueability outcomes |
| Revision control | Who changed it and why |
Build it by starting with your top 10 job profiles, validate pass/fail tests, train operators, then revise based on KPI improvements. For setup guidance that supports recipes, use sheetfed LED UV curing setup tips.
FAQs About UV LED Curing for Sheetfed Offset Printing
Below are quick answers to the most common UV LED sheetfed questions…
- Is UV LED curing the same as drying? No—UV LED curing hardens inks/coatings via photopolymerization, which is why handling can happen sooner.
- Can I retrofit UV LED on my existing press? Often yes, if press integration (space, power, guarding, controls) is feasible and planned.
- Does LED UV reduce setoff/marking? It can, when cure-before-stack is achieved and delivery handling SOPs match the job mix.
- Do I need special inks and coatings? Typically yes—use LED-compatible UV inks and validated UV coatings/varnish.
- Where should the curing be placed? Delivery-only, interdeck, or combination—choose based on coverage, coatings, and speed targets.
- What maintenance is required? Keep optics clean, maintain cooling, monitor system status, and follow a preventive maintenance schedule.
- Is hybrid (UV + conventional) possible? Often, but only with disciplined changeover SOPs and supply segregation.
- How do I validate cure quality quickly? Rub test, tape test, and delivery stack setoff checks tied to job tickets.
- What should I ask vendors/integrators? Uniformity, cure width, monitoring, service SLA, integration experience, and acceptance testing.
For the full topic overview, revisit UV LED curing for offset printing.
Is UV LED curing better for packaging and fast finishing?
For packaging workflows, UV LED can be better because it supports faster converting with less marking risk—especially when sheets need to be further processed right away. Folding carton workflow benefits often show up in handling: improved scuff resistance, cleaner delivery stack behavior, and smoother timing into die-cutting and glueability steps.
Still, validate ink/coating chemistry for odor/taint concerns, lamination compatibility, and abrasion in converting. The best approach is job-by-job qualification using your recipe library. For packaging examples, see sheetfed offset LED UV curing applications.
How do I choose the right UV LED system for my press and job mix?
The right system is the one that matches your job mix, press constraints, and validation plan, so use a decision checklist instead of shopping by a single spec.
- Placement strategy: delivery vs interdeck based on coverage, coatings, and finishing speed.
- Speed targets: confirm curing dose capability at your real press speed range.
- Substrates + coatings: validate wavelength/ink match and coating weight behavior.
- Uniformity + cure width: ensure cure uniformity across the full sheet format.
- Cooling design: air-cooled vs water-cooled based on duty cycle and pressroom conditions.
- Monitoring features: alarms/status tracking to reduce troubleshooting time.
- Integration experience: proven press integration approach for your press configuration.
- Service network: service SLA, spares availability, and response plans.
- Acceptance criteria: define tests (rub, adhesion, setoff) before purchase.
To compare options systematically, use compare LED UV curing systems for printing machines.


