UV LED Curing System Integration Checklist for Production Lines

Integrating a UV LED curing system requires a systematic evaluation of mechanical fit, electrical requirements, and chemical compatibility. The essential checklist includes verifying peak irradiance and energy density (dose) requirements for your specific ink or coating, matching the curing window to conveyor speeds, ensuring proper thermal management (water vs. air cooling), and integrating control signals (PLC/NPN/PNP) with your existing production line logic. Successful integration minimizes downtime and ensures consistent curing quality without damaging heat-sensitive substrates.
Pre-Installation: Assessing Line Requirements
Before hardware installation begins, you must define the scope of the integration. This phase determines whether you need a retrofit of an existing arc lamp station or a completely new line design.
Mechanical Fit and Form Factor
Space constraints are often the biggest hurdle in retrofitting. UV LED heads are generally more compact than traditional arc lamps, but you must account for the supporting equipment.
- Irradiation Window: Ensure the emitting window covers the maximum width of your product.
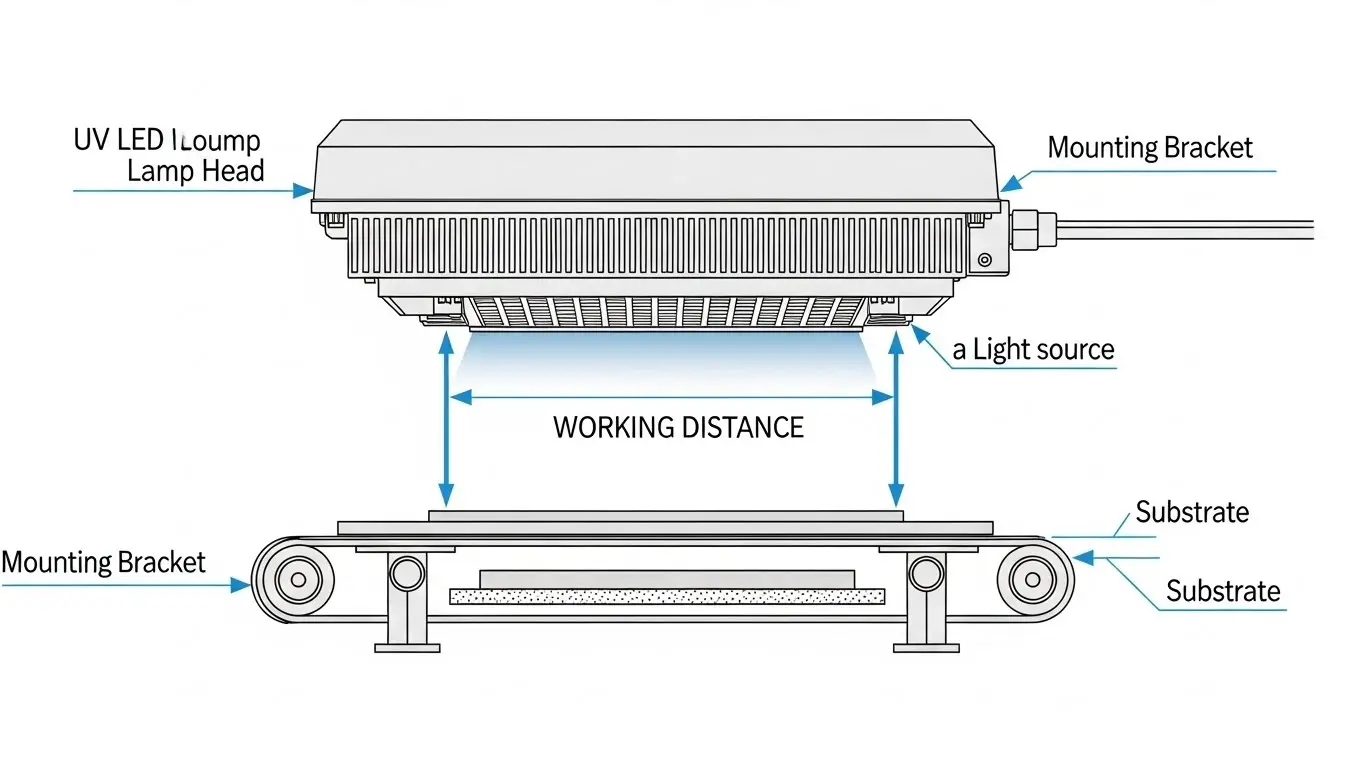
- Mounting Distance: LED intensity drops quickly with distance. Plan to mount the head 2mm to 10mm from the substrate for optimal power.
- Clearance: Check for potential collisions with grippers or taller parts on the belt.
For detailed layouts on different configurations, see our guide on UV LED Curing Systems for Coating: Area vs Conveyor.
Cooling System Infrastructure
High-power UV LED systems require active cooling to maintain junction temperatures and ensure longevity.
- Air-Cooled: Simplest integration but requires adequate ambient airflow and exhaust management to prevent dust recirculation.
- Water-Cooled: Requires a chiller and plumbing. This is preferred for high-power, industrial environments where ambient air is dirty or hot.
What Factors Affect UV Curing Efficiency?
UV curing efficiency relies on matching the UV LED output spectrum (wavelength) to the photoinitiator absorption profile of the chemistry.
If these two do not align, the coating will not cure, regardless of how much power you apply. Common wavelengths are 365nm, 385nm, 395nm, and 405nm. You must confirm with your ink or coating supplier which wavelength triggers their specific formulation.
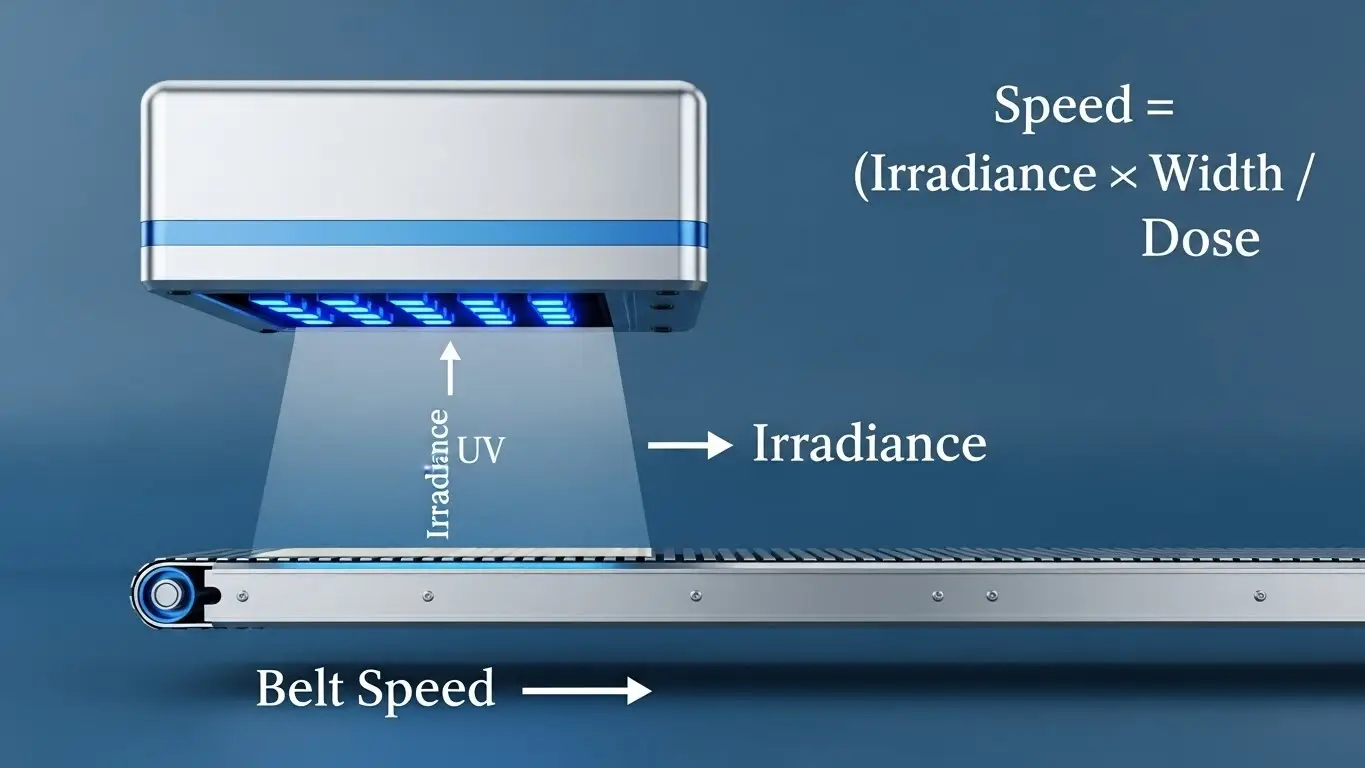
Furthermore, line speed plays a critical role. If the product moves too fast, the total UV dose (Energy Density, measured in J/cm²) will be insufficient. To calculate the right velocity for your dose requirements, read How to Choose Conveyor Speed for UV LED Curing.
Electrical and Control Signal Integration
This step ensures your curing system "talks" to your main production line properly.
PLC and Logic Integration
Modern UV LED drivers should be integrated directly into the machine's PLC (Programmable Logic Controller).
- Interlocks: The UV system must turn off immediately if the conveyor stops to prevent burning the product or belt.
- Intensity Control: Use 0-10V or 4-20mA analog signals to adjust UV intensity dynamically based on line speed.
- Fault Monitoring: Map error signals (overheating, LED failure) to the main HMI (Human Machine Interface) to alert operators instantly.
Power Supply Planning
Unlike arc lamps which require massive ballast warm-up times and high voltage, UV LEDs allow for instant on/off switching. However, ensure your main panel has sufficient amperage for the DC power supplies.
For specific applications involving powder, check our article on UV LED Curing Systems for Powder Coating: Line Design Basics.
How Do You Retrofit a UV LED System?
Retrofitting involves removing the old heat-generating arc lamps, installing the compact LED heads, and bypassing the old shutter systems.
- Remove Old Ducting: Since LEDs don't produce ozone (specifically 395nm and above), you can often remove massive extraction ducting, freeing up plant floor space.
- Install Shielding: Even though LEDs are safer, light shielding is still required to protect operator eyes from high-intensity UV light.
- Adjust Chemistry: This is the most critical step. You cannot use "standard" UV inks; you must switch to LED-formulated inks or coatings. Learn more about UV LED Curing for Coatings to understand the chemical differences.
Comparison: Retrofit vs. New Line Integration
| Feature | Retrofit Integration | New Line Design |
| Space Constraints | High (must fit existing footprint) | Low (designed around the LED) |
| Cooling | Often limited to existing airflow | Can plumb for water-cooling easily |
| Conveyor Logic | Must adapt to legacy PLCs | Native integration with modern controls |
| Cost | Lower capital expenditure | Higher initial investment |
Testing and Validation Checklist
Once installed, the system must be validated before full production.
- Radiometry Check: Use a calibrated UV radiometer to measure the actual irradiance (W/cm²) at the substrate level, not just at the light source window.
- Adhesion Testing: Perform cross-hatch tape tests or solvent rub tests to verify the cure is thorough, not just on the surface.
- Thermal Profiling: Ensure the substrate temperature remains within limits. This is vital for heat-sensitive plastics.
- Uniformity Scan: Check that the UV light is uniform across the entire curing width.
If you are unsure about the basic components required for these tests, review What Is a UV LED Conveyor Curing System? for a breakdown of standard hardware.
Frequently Asked Questions
Q: Do I need to replace my conveyor belt when switching to UV LED?
A: Not usually. UV LEDs emit significantly less infrared heat than arc lamps, so they are actually gentler on conveyor belts. However, ensure the belt material is UV-stable to prevent degradation over time.
Q: Can I use my existing mercury UV inks with a new LED system?
A: Generally, no. Mercury lamps are "broadband" (emitting many wavelengths), while LEDs are "narrowband" (emitting one specific peak). You usually need to switch to LED-specific formulations that react to 395nm or 365nm.
Q: How do I determine the correct wattage for my integration?
A: Wattage depends on the ink's reactivity and the required production speed. Higher speeds generally require higher wattage (irradiance) and dose. It is best to conduct a lab test with your ink supplier first.
Q: Is water cooling better than air cooling for integration?
A: Water cooling allows for smaller, more compact LED heads, which is easier for tight integrations. Air cooling is bulkier but eliminates the risk of water leaks. Choose based on your available space and maintenance capabilities.
Key Takeaways
- Match Chemistry First: Ensure your ink/coating is formulated for the specific LED wavelength (e.g., 395nm) before installing hardware.
- Control the Distance: Mount LED heads close (2-10mm) to the substrate to maximize energy transfer and curing efficiency.
- Integrate Safety: Connect the UV system to the conveyor PLC so the lights turn off instantly if the belt stops, protecting the product.
- Validate with Data: Always use a radiometer to verify the actual UV dose reaching the product during the commissioning phase.
Conclusion
Successful UV LED curing system integration relies on more than just bolting on a light source; it requires a holistic approach covering mechanical alignment, electrical logic, and chemical compatibility. By following this checklist, you can transition to a cooler, more energy-efficient production line that delivers consistent product quality.
Share on Social:


- PREV: What Is a UV LED Conveyor Curing System? (The 2026 Industry Guide)
- NEXT: Null