How UV LED Curing Works in Inkjet Printing (The 2026 Engineering Guide)
UV LED curing works through a process called photopolymerization. When specific wavelengths of UV light (typically 395nm) hit the ink's photoinitiators, they trigger an instantaneous chemical chain reaction that transforms liquid monomers into a solid, durable polymer network. Unlike thermal drying which relies on evaporation, this reaction happens in milliseconds and generates minimal heat, allowing for high-speed production on heat-sensitive materials.
In this guide, we will cover the engineering mechanics behind this technology:
- The Chemistry: How photoinitiators and monomers lock together.
- The Process: The critical difference between "pinning" and "full curing."
- The Specs: Why 395nm is the standard versus 365nm.
- The ROI: Energy efficiency and maintenance comparisons.
- Troubleshooting: Solving sticky surfaces and oxygen inhibition.
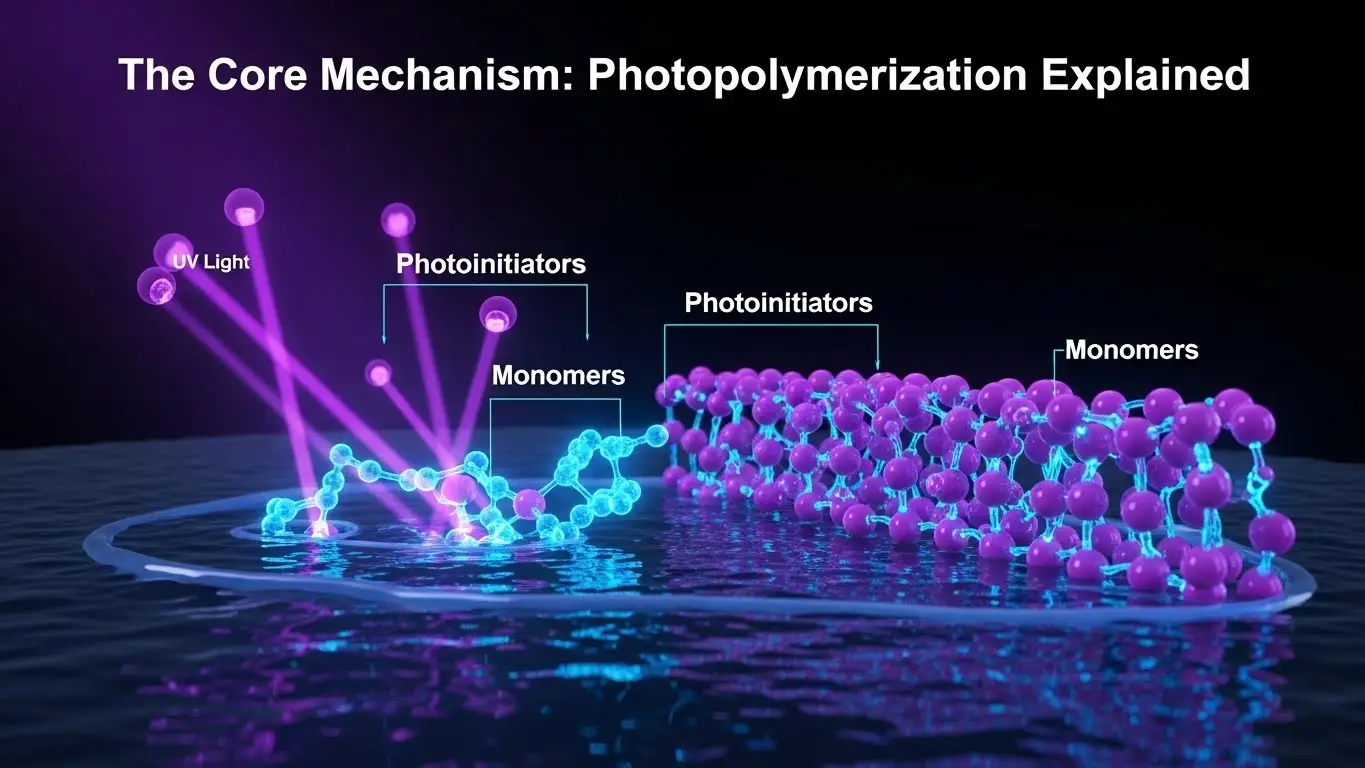
The Core Mechanism: Photopolymerization Explained
At the heart of every industrial UV inkjet system is a chemical reaction, not a drying process. Traditional water-based or solvent inks dry when the liquid carrier evaporates into the air. UV inks, however, turn from liquid to solid through cross-linking.
The process relies on three main components within the ink:
- Photoinitiators: The "trigger" that reacts to UV light.
- Monomers & Oligomers: The "building blocks" of the plastic.
- Pigments: The colorants.
Think of it like a "Lock and Key" mechanism. The UV LED light acts as the key. When it hits the photoinitiator (the lock), the initiator fragments and creates free radicals. These radicals launch a chain reaction, forcing the liquid monomers to bond together instantly into a rigid, cross-linked polymer network.
For a deeper dive into the chemistry and specific applications, read our UV LED Ink Curing Guide.
The Two-Step Process: Pinning vs. Full Curing
One of the biggest advantages of LED technology over older mercury vapor lamps is the ability to precisely control intensity. This allows for a two-step process that is essential for high-quality imaging: Pinning and Curing.
1. Pinning (The "Freeze" Frame)
Immediately after the printhead jets the ink droplets onto the substrate, they naturally want to spread out (dot gain) or mix with neighboring colors (bleeding).
- The Solution: A low-intensity UV LED lamp is placed right next to the printhead.
- The Result: It applies just enough energy to "gel" or "freeze" the droplet in place without fully hardening it. This maintains sharp edges and high resolution.
2. Full Curing (The Hardening)
Once the image is printed, the substrate passes under a high-intensity UV LED array (often at the end of the carriage or belt).
- The Action: This blasts the ink with maximum irradiance (W/cm²).
- The Result: The ink fully polymerizes, creating a scratch-resistant, chemical-resistant surface.
If your prints look blurry or the colors are muddy, your pinning settings might be off. Learn more about how to Prevent UV Ink Smearing with Proper LED Curing.
Wavelengths Matter: 365nm vs. 395nm
Not all UV light is the same. In the industrial inkjet world, matching the LED wavelength to your ink's photoinitiators is critical for adhesion.
- 395nm (The Standard): This is the most common wavelength for UV inkjet curing. It penetrates well through colored pigments (especially black and cyan) and matches the absorption peak of most modern commercial inks.
- 365nm (Deep Curing): This shorter wavelength has higher energy but lower penetration depth in pigmented inks. It is typically used for clear coats, varnishes, or specialized adhesives where surface sealing is less of a priority than deep adhesion.
- 405nm: Often used in conjunction with 395nm to ensure curing at the very bottom of thick ink layers (like in 3D textured printing).
Selecting the wrong wavelength results in "surface cure" where the top is dry but the bottom is wet, leading to adhesion failure. If you are upgrading your system, check out our guide on What UV LED Curing Lamp Is Best for Inkjet Printing?.
Why Inkjet Systems Are Switching to LED (The 2026 ROI)
The shift from Mercury Vapor lamps to UV LED is driven by three hard metrics: Heat, Uptime, and Consistency.
Cold Curing Technology
Mercury lamps emit a broad spectrum of light, including a significant amount of Infrared (IR) radiation, which creates heat. This limits you to printing on heat-resistant materials.
UV LEDs emit a narrow bandwidth (monochromatic) with negligible IR. This "cold curing" capability allows you to print on:
- Thin shrink films (without warping).
- Thermal paper.
- Sensitive electronics.
Lifespan & Energy
- Mercury Lamps: Last ~1,000 hours. They degrade over time, requiring frequent calibration to maintain cure speeds. They also require 10–20 minutes to warm up.
- UV LEDs: Last 20,000+ hours. They offer "Instant On/Off" capability, meaning they only consume energy when actually curing ink. This eliminates standby power costs completely.
Common UV LED Curing Problems & Solutions
Even with advanced LED systems, issues can arise if the chemistry and physics aren't aligned.
Oxygen Inhibition
Oxygen in the air likes to steal the free radicals needed for polymerization. If the UV intensity is too low at the surface, oxygen will stop the reaction, leaving the ink feeling tacky or sticky.
- The Fix: Increase the peak irradiance (W/cm²) or use a nitrogen inerting system (common in high-speed label printing).
Adhesion Failure
The ink cures hard but peels off the substrate.
- The Cause: Often due to high surface tension on the substrate or "over-curing" which makes the ink too brittle.
- The Fix: Treat the substrate (Corona treatment) or adjust the lamp height to slightly widen the focal point.
Implementing UV LED in Your Production Line
Integrating UV LED isn't just for new machines; retrofitting is a standard procedure in 2026.
- Retrofitting: Most wide-format and single-pass printers using mercury lamps can be retrofitted with LED arrays. The compact size of LED heads (like the 225x40mm series) makes them easier to fit into tight carriage spaces.
- Controller Integration: Modern LED drivers must interface with your printer's PLC (Programmable Logic Controller) to synchronize the "Instant On" timing with the printhead firing.
Frequently Asked Questions (FAQ)
What is the difference between pinning and curing?
Pinning is a low-intensity UV exposure used to "freeze" the ink dot immediately after jetting to prevent spreading. Curing is the final high-intensity exposure that fully hardens the ink for durability and adhesion.
Why is my UV ink sticky after curing?
This is usually caused by "oxygen inhibition," where oxygen in the air interferes with the chemical reaction on the ink's surface. Increasing the UV intensity or peak irradiance usually solves this.
Can UV LED curing work on heat-sensitive materials?
Yes. UV LED is considered a "cold cure" technology because it emits very little infrared heat compared to mercury lamps. This makes it ideal for thin films, shrink wraps, and heat-sensitive plastics.
What wavelength is best for UV inkjet printing?
The industry standard is 395nm because it offers the best balance of curing speed and penetration through pigmented inks. Some specialized applications (like varnishes) may use 365nm.
How long do UV LED lamps last compared to mercury lamps?
UV LED lamps typically last over 20,000 hours and degrade very slowly. Mercury lamps usually last around 1,000 hours and degrade quickly, requiring frequent replacement.
Do UV LED lamps require warm-up time?
No. UV LED systems have "Instant On/Off" capability. They reach full intensity in milliseconds, unlike mercury lamps which can take 10–20 minutes to warm up.
Is UV printing hazardous?
Uncured UV ink can be a skin irritant and requires careful handling. However, once cured, the ink is inert and safe. UV LEDs also eliminate the ozone generation and mercury disposal risks associated with older lamps.
Conclusion
Understanding how UV LED curing works in inkjet printing is the first step toward optimizing your production line. By mastering the balance between pinning for sharpness and full curing for durability, you can achieve faster print speeds and higher quality results on a wider range of materials.
The technology has moved beyond simple drying; it is now a precise tool for controlling ink behavior. If you are experiencing adhesion issues or are ready to upgrade your curing setup, precise wavelength matching is your next step.
Ready to optimize your curing process? Contact UVET’s engineering team today for a compatibility test with your specific ink and substrate.


