What Is UV LED Ink Curing? The Complete Printer’s Guide to Systems, Lamps, Costs, and Setup
UV LED ink curing is a printing method that uses a UV LED lamp to trigger photopolymerization in UV-curable ink, turning liquid ink into a solid film in a controlled curing dose. For printers running inkjet printing across tough substrate compatibility requirements (from plastics to coated stocks), LED curing system integration affects irradiance, wavelength, printhead performance, and the entire production workflow—especially when comparing LED to mercury vapor UV. If you’re evaluating hardware, start with UV LED curing lamps to understand lamp formats, specs, and integration options.
What Is UV LED Ink Curing?
UV LED ink curing is a fast, controlled way to harden UV-curable inks using LED light instead of “air drying.” Unlike drying (where solvents or water evaporate), curing is a chemical reaction: a photoinitiator absorbs UV energy and starts crosslinking, creating a liquid-to-solid polymer network that can be instantly handled.
In practice, UV-curable inks are popular in digital printing and industrial inkjet because they can deliver an instant cure, strong adhesion, and a VOC-free process on many materials. You’ll see UV LED curing used for things like label printing on films and direct printing on plastics.
- Curing vs drying: curing forms a solid polymer; drying removes liquid carriers and can stay soft longer.
- Surface cure vs through cure: the goal is a tack-free surface and enough cure depth for durability.
- Where it’s used: digital/industrial inkjet for labels, plastics, and other non-porous substrates (learn what is UV LED curing in more detail).
How Does UV LED Ink Curing Work?
UV LED curing works by converting UV light into chemical energy that “locks” ink into a solid film through photopolymerization. When the UV spectrum hits the ink, photoinitiator activation begins—starting free-radical polymerization (and sometimes cationic polymerization) to build a dense polymer network.
Think of it like flipping a switch: UV energy dose (irradiance in mW/cm² × exposure time) pushes monomers/oligomers to link together until the surface becomes tack-free and the cure depth is sufficient. Factors like oxygen inhibition and ink chemistry can influence how quickly the top surface and the full film cure.
- UV hits ink film: LED output delivers irradiance at a defined working distance.
- Photoinitiators activate: they absorb energy and generate reactive species.
- Polymer forms instantly: crosslinking builds a hard polymer network.
- Surface becomes tack-free: reduced smear risk as cure reaches the surface.
- Through cure completes: enough exposure time drives cure depth and strength.
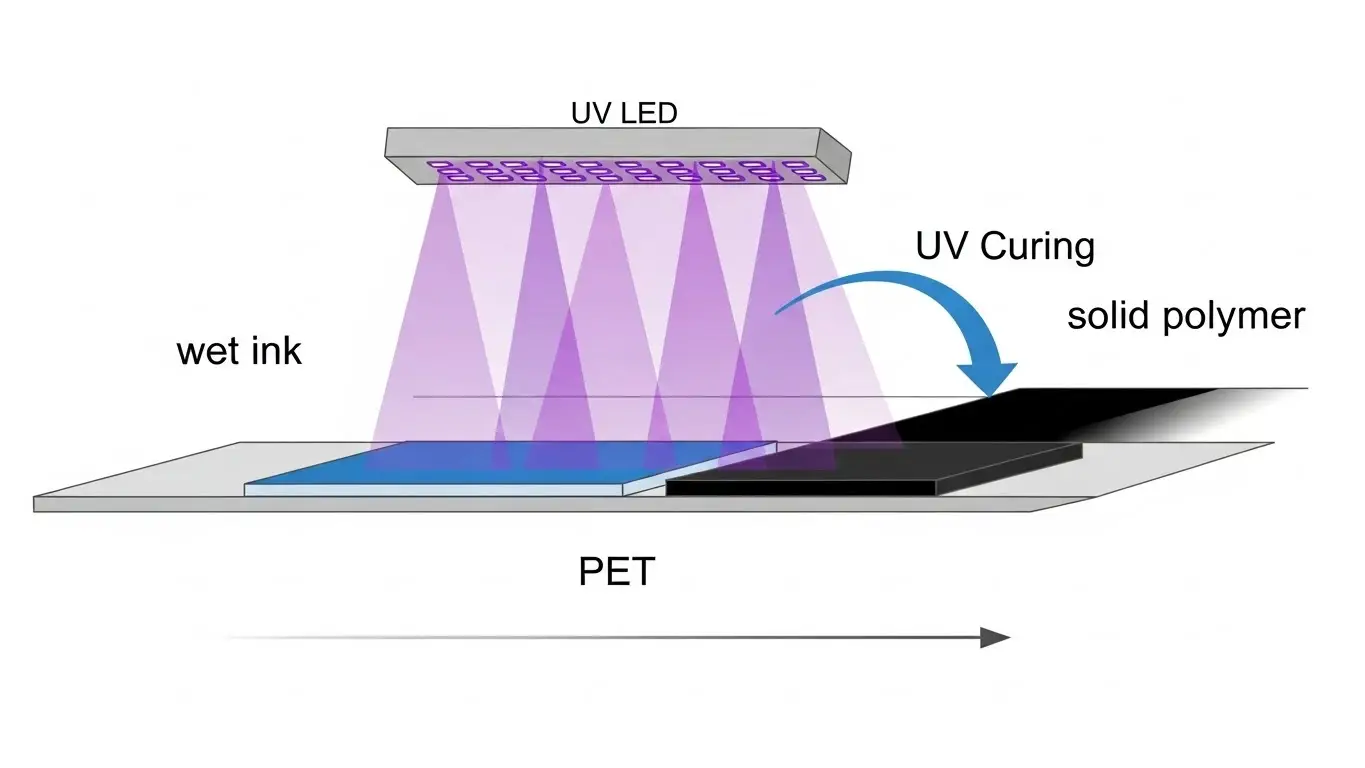
How Does UV LED Ink Curing Work in Inkjet Printing Systems?
In inkjet printing, UV LED curing fits into the workflow by curing right after drop formation so dots stay where the printhead placed them. The printhead carriage deposits ink; the substrate moves under an LED array; and curing happens within a narrow cure window that balances dot gain control, throughput, and heat management.
A key concept is pinning (a partial cure to “freeze” dots) versus full cure (final hardening for durability). Pinning helps reduce dot gain and improves edge definition—especially at higher line speed—while full cure ensures rub resistance and adhesion. For deeper background on the inkjet path, see how UV LED curing works in inkjet printing and how to choose an LED head that fits your line.
- Printhead jets droplets: stable drop formation supports consistent dot size and placement.
- Ink lands and wets: substrate surface energy drives spreading and early adhesion behavior.
- Optional interpass curing: pinning between passes controls dot gain and limits coalescence.
- Substrate advances: conveyor speed (or carriage motion) defines exposure time under LEDs.
- LED cures at set distance: lamp-to-substrate distance affects delivered irradiance and uniformity.
- Full cure finalizes film: the system hits the dose needed for hardness and durability.
When pinning or spot exposure is part of your workflow, UV LED spot curing can be a practical way to control interpass cure.
What Happens During the UV Ink Curing Process Step by Step?
Step-by-step, UV ink curing looks like this:
- Ink deposition: droplets form an ink film; film thickness and pigment loading affect cure sensitivity.
- Wetting and spreading: ink flows on the surface; PET films often need controlled surface energy.
- Pin cure (optional): a short exposure starts a gel stage to reduce dot gain and smearing.
- Gel stage develops: cure kinetics accelerate as the polymer network begins to form.
- Full cure exposure: the system delivers final dose for a tack-free surface and mechanical strength.
- Post-cure stabilization: some systems benefit from brief settling to reach target hardness and resistance.
- Adhesion checks: crosshatch plus rub resistance confirm bonding and cure uniformity on PET/PVC/glass.
- Durability verification: scratch resistance and handling tests validate the print for real production stress.
Learn more: UV LED spot curing systems for pinning/partial cure strategies in production.
What Role Do Wavelength and Intensity Play in UV LED Curing?
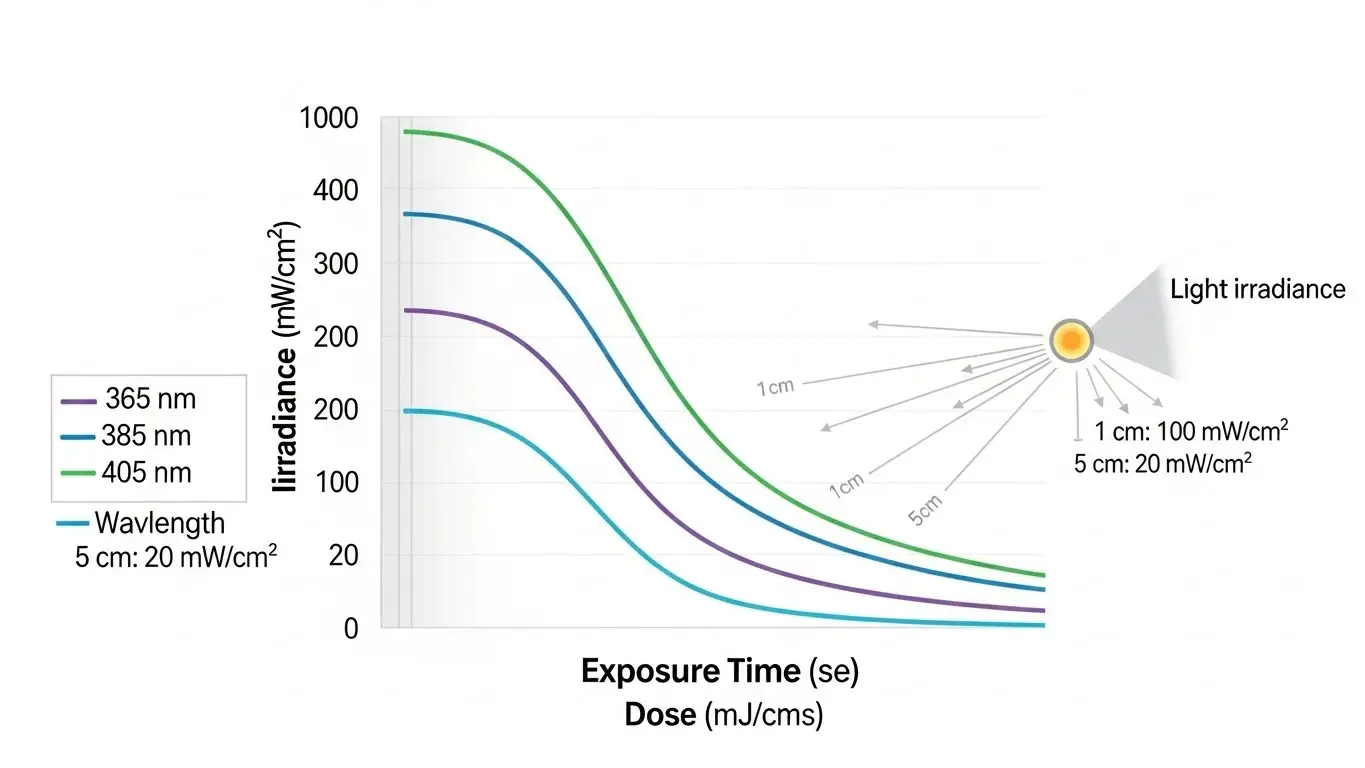
Two settings determine curing success: wavelength and intensity. Wavelength must match the ink’s photoinitiator absorption, while intensity (irradiance) and exposure time combine to create the dose (mJ/cm²) required for cure. If the spectral output doesn’t align with the photoinitiator package, even high power can underperform; if irradiance is too low (or distance too great), cure speed drops and shadowing effects increase.
Working distance matters because output falls with distance (often approximated by an inverse square law), and optics/reflector design influences beam shape and cure gradient across the width. Lamp aging and thermal load can also shift real-world performance—so spec checks should include measured output, not just rated output. For practical selection, see best wavelength for UV ink curing and lamp spec guidance on wavelength and irradiance.
| Condition | What you see | Likely cause | Practical adjustment |
|---|---|---|---|
| Too low | tacky edges, incomplete cure, poor adhesion | low irradiance, wrong peak wavelength, distance too high | reduce distance, slow line, match 365/385/395/405 nm to ink |
| Too high | brittle film, heat marks, warping | excess dose, overheating, poor thermal management | lower power, increase distance, improve cooling and exposure control |
What Are the Different Types of UV Curing Technologies?
UV curing technology comes in a few main categories, each with different spectral bandwidth, heat output, and integration tradeoffs:
- UV LED curing: narrow-band output (commonly 365/385/395/405 nm), high energy efficiency, instant on/off, long lifetime—often the “go-to” modern option.
- Mercury arc / mercury vapor UV: broad-spectrum UV with warm-up time and more heat; may require shutters and higher ventilation.
- Metal halide / microwave UV: variants of broad-spectrum systems that can be tuned but still carry legacy maintenance needs.
- Hybrid curing: combinations (UV/IR or LED + arc) used to widen cure windows or support mixed ink sets.
- Excimer UV (often with inert curing): specialized surface effects (e.g., matte) and sometimes nitrogen environments to reduce oxygen inhibition.
- Dual-cure systems: UV cure plus another mechanism (heat/moisture) for complex materials or deep sections.
If you’re choosing the LED option inside these categories, UV LED curing lamps is a solid starting point.
UV LED Curing vs Mercury Vapor UV Curing
UV LED and mercury UV both cure ink, but they differ in warm-up behavior, heat management, and lifetime economics. LEDs deliver narrow-band UV with instant on/off control; mercury systems deliver broad-spectrum UV but typically need warm-up time and may rely on shutter mechanisms to manage exposure.
| Factor | UV LED | Mercury vapor UV |
|---|---|---|
| Warm-up time | Instant on/off | Warm-up required |
| Spectral bandwidth | Narrow-band (photoinitiator match needed) | Broad-spectrum UV |
| Heat output | Lower, more controllable | Higher radiant heat |
| Maintenance intervals | Longer, fewer consumables | More frequent lamp/reflector upkeep |
| Environmental concerns | Mercury-free | Mercury disposal and compliance |
| Ozone generation | Typically minimal | Can generate ozone depending on lamp type |
| Energy consumption | Often lower for equivalent jobs | Often higher, especially with warm-up/idle |
From a “best for X” standpoint: UV LEDs are often best for heat-sensitive substrates, quick job changeovers, and printers optimizing total cost of ownership. Mercury UV can still be practical where broad-spectrum curing helps older ink sets, retrofits are constrained, or certain legacy processes are already validated. If you’re comparing upgrade paths, use UV LED vs mercury UV as your reference point—and factor in retrofit kits, curing uniformity targets, and ongoing energy costs.
Are All UV Inks Compatible With UV LED Curing?
Not all UV inks are automatically compatible with UV LEDs, because the ink’s photoinitiator package must match the lamp’s wavelength and spectral output. Traditional UV inks designed for broad-spectrum mercury lamps may under-cure under an LED if their absorption spectrum doesn’t align, especially with heavy pigment loading or low cure sensitivity.
Before you commit, confirm compatibility through documentation and testing:
- Check TDS/SDS: look for “LED-curable formulation” and recommended peak wavelength (365/385/395/405 nm).
- Run test prints: validate adhesion, rub resistance, and odor; don’t rely on appearance alone.
- Watch mismatch symptoms: tackiness, under-cure odor, poor adhesion, or migration compliance issues.
- Qualify suppliers: confirm ink viscosity, adhesion promoters, and cure settings for your substrate set.
Lamp choice must match ink formulation—use choose right UV LED lamp head for ink curing and the wavelength guidance in UV LED curing lamps.
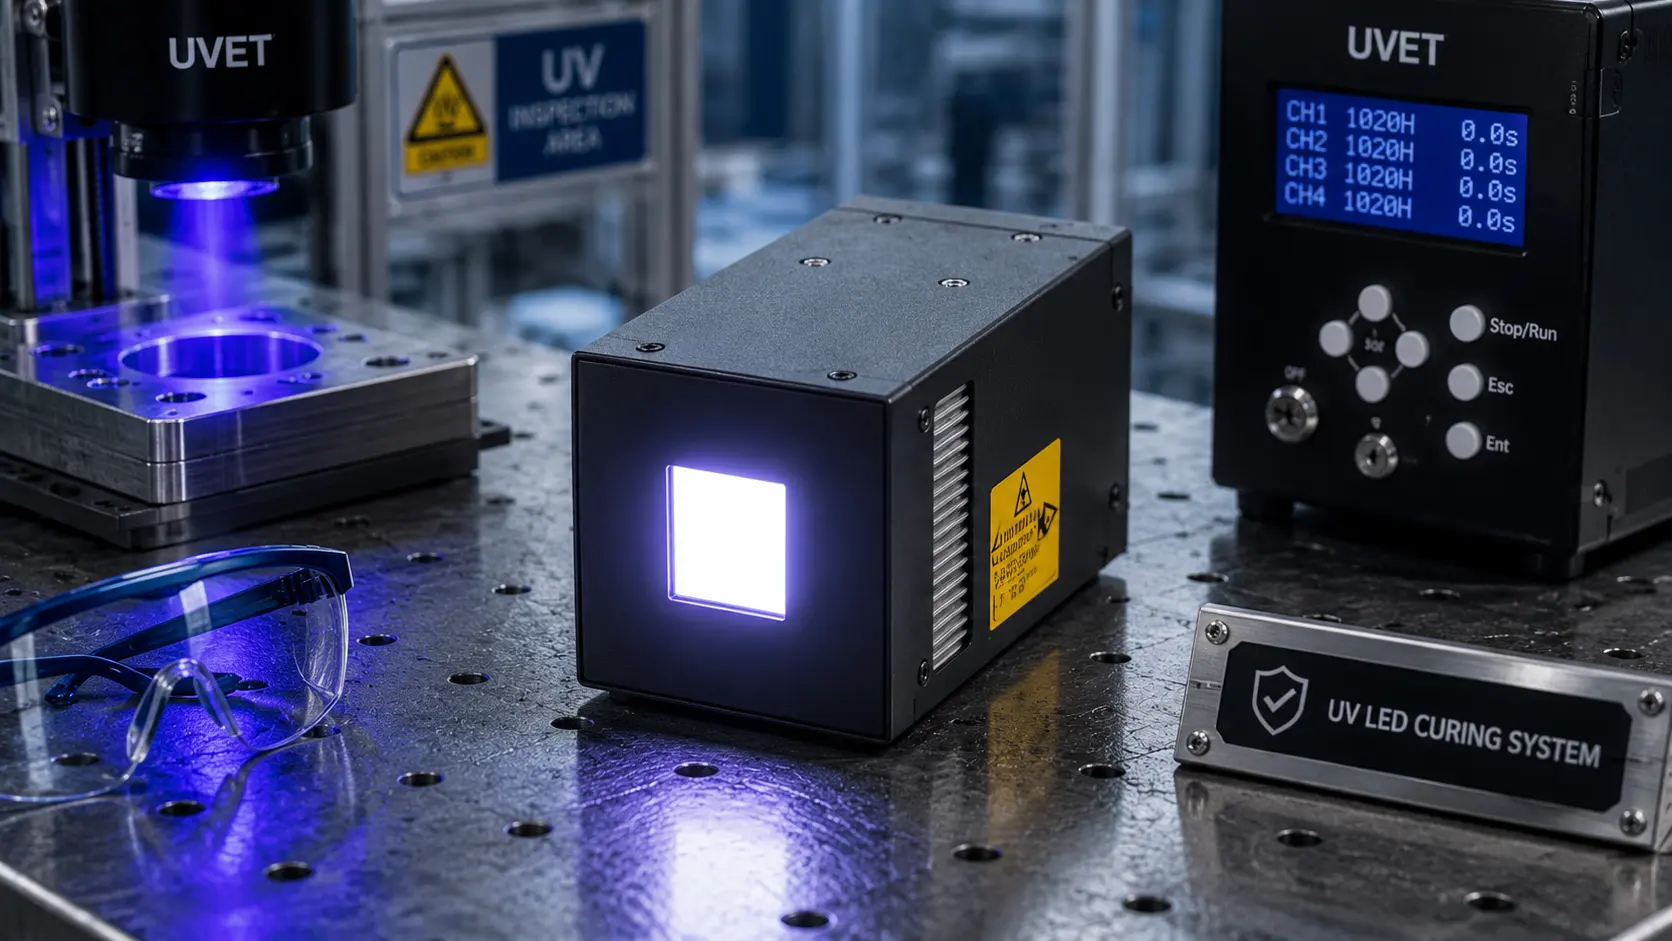
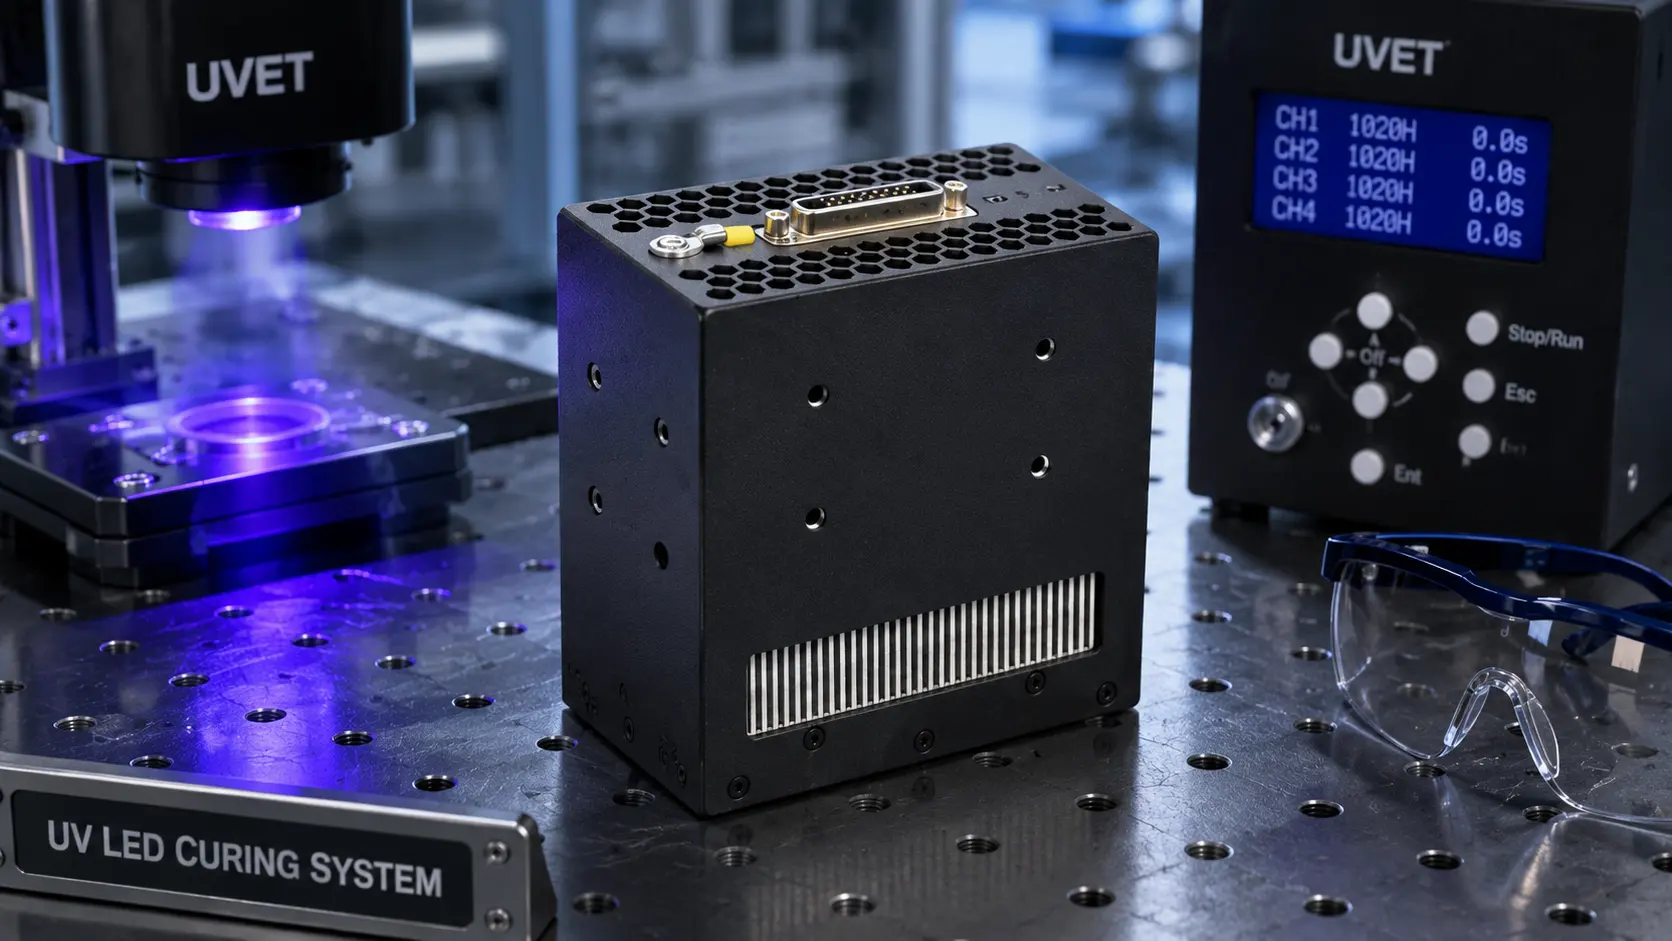
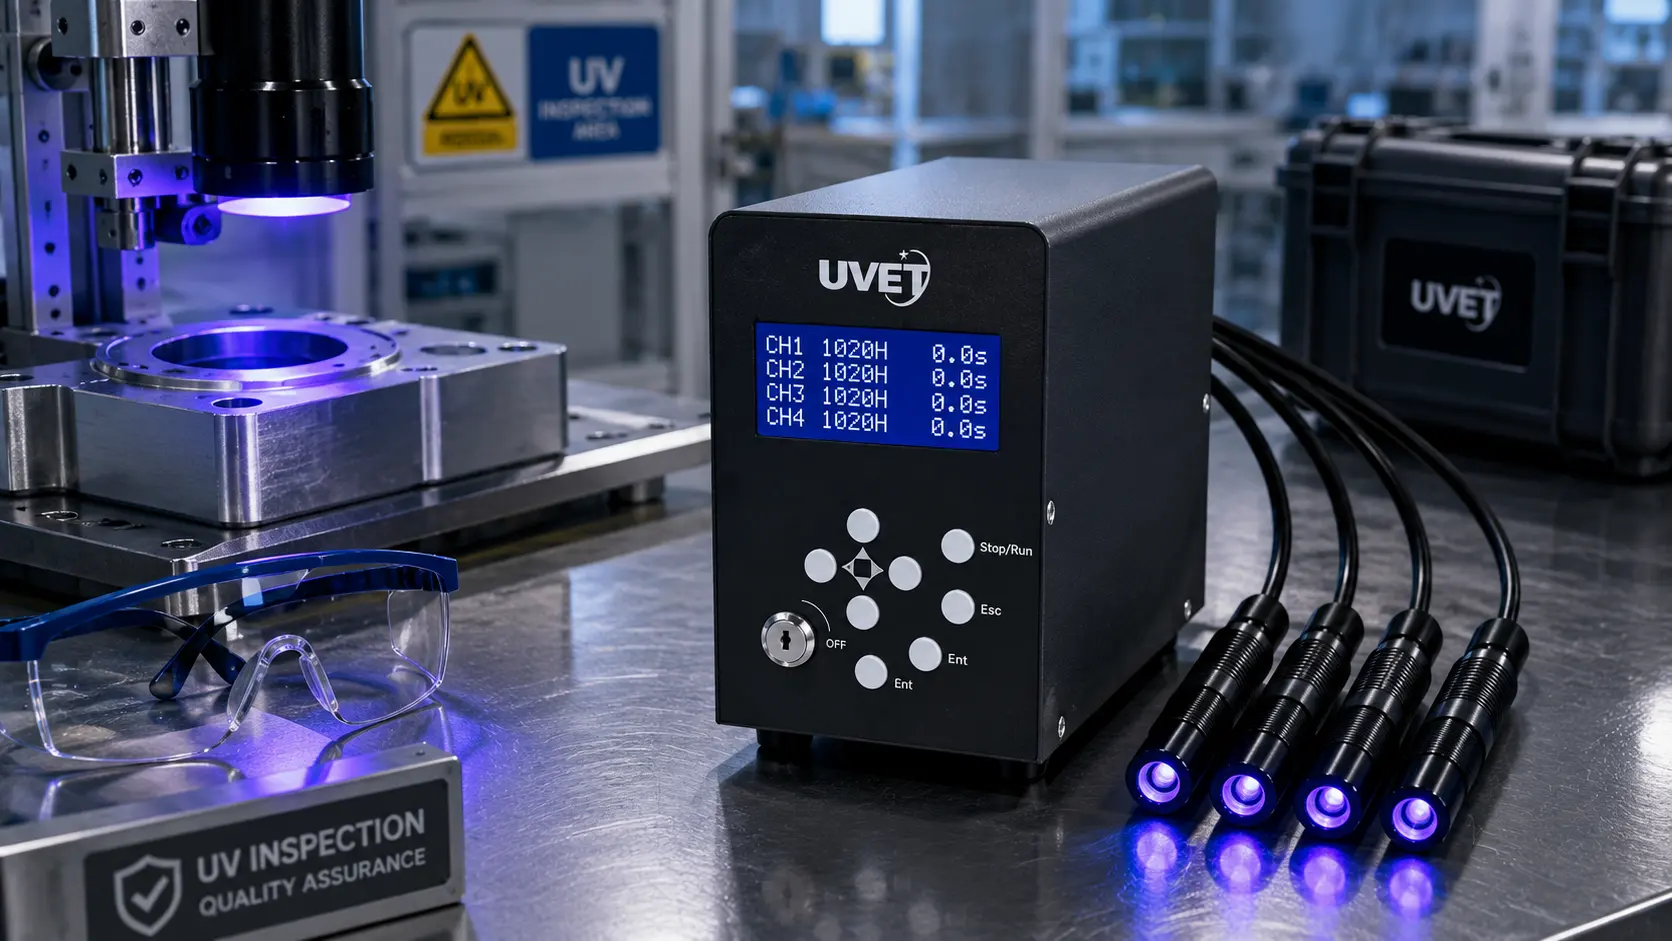
What Equipment Is Needed for UV LED Ink Curing?
A UV LED curing setup typically includes the lamp and the supporting hardware that makes output stable, safe, and repeatable. Beyond the LED lamp head itself, curing system integration often depends on cooling capacity, shielding, and integration I/O so the printer can trigger cure recipes at the right moment in the production workflow.
- LED lamp head: sized for curing width, target irradiance, and working distance.
- Driver/controller + power supply: controls drive current, on/off timing, and recipe settings.
- Cooling system: air cooling or water cooling with heat sink design for thermal stability.
- Optics/lens package: shapes beam uniformity and affects cure depth and edge cure.
- Shielding enclosure: reduces operator exposure and prevents stray UV.
- Interlock system: safety switches tied into doors/covers and emergency stops.
- Mounting brackets: rigid alignment to control lamp-to-substrate distance.
- Conveyor/transport integration: speed control to manage exposure time and dose.
- Integration I/O: PLC signals, triggers, and fault outputs for automation and alarms.
For a hub view of the core components, see UV LED curing equipment and a planning checklist at UV LED ink curing system spec checklist.
What Types of UV LED Curing Lamps Are Used in Printing?
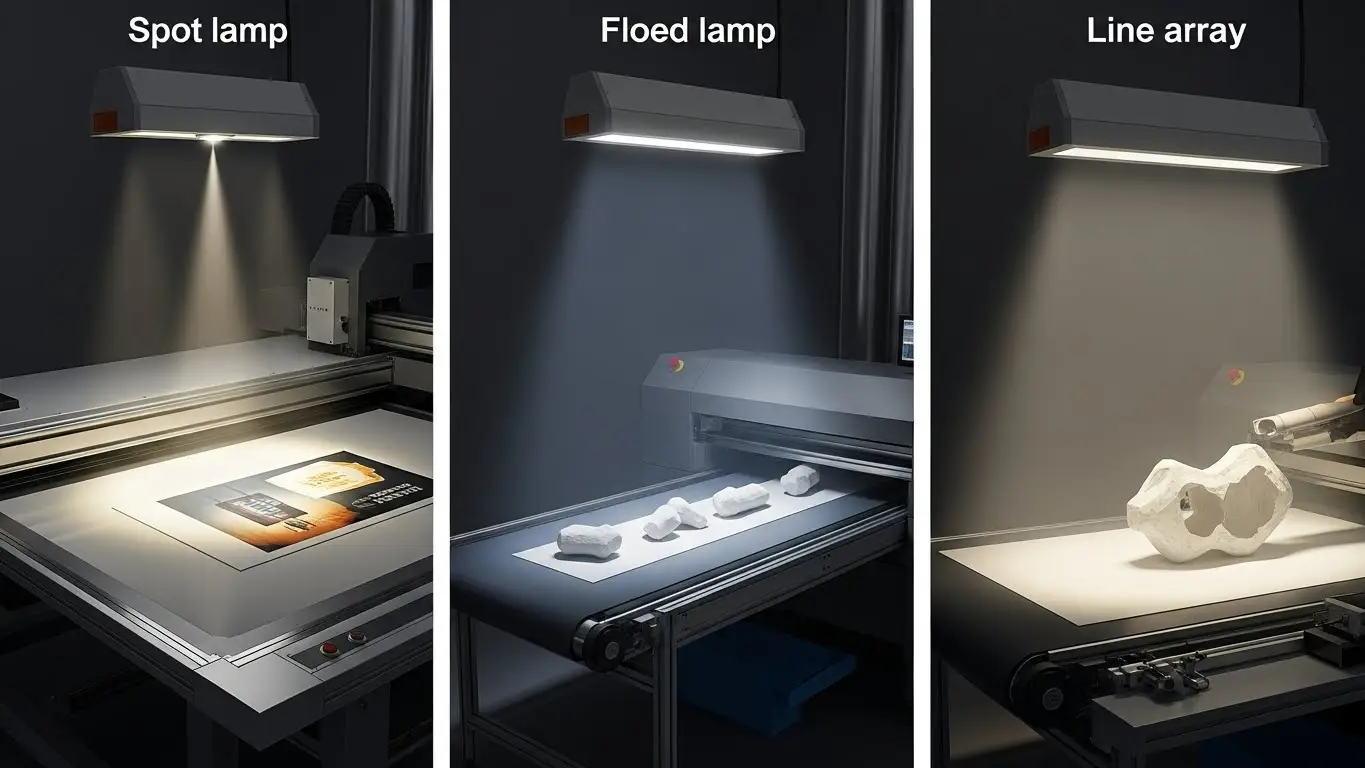
UV LED curing lamps come in several formats, and the best choice depends on curing width, object shape, and whether you need pinning, full cure, or both.
| Lamp type | Best use in printing |
|---|---|
| Spot curing lamp | Pinning, small areas, tight cure windows, and precision fixes on parts/objects |
| Flood curing lamp | Flatbed coverage where broad exposure and working distance flexibility matter |
| Line array | Conveyor curing units and high-throughput labels/wide-format where consistent width cure is critical |
| Integrated carriage lamp | Moving printhead carriage systems needing interpass curing and controlled dot gain |
| Handheld UV LED | Small jobs, touch-ups, validation checks, and maintenance tasks on-demand |
| Modular lamp segments | Scalable curing width and serviceability for changing production requirements |
| Water-cooled LED | High-duty-cycle industrial lines needing stable thermal performance |
| Air-cooled LED | Simpler installs with moderate duty cycles and easier maintenance access |
If you’re evaluating pinning and localized exposure, see UV LED spot curing systems. For portable options and operator considerations, use the handheld curing lamps guide.
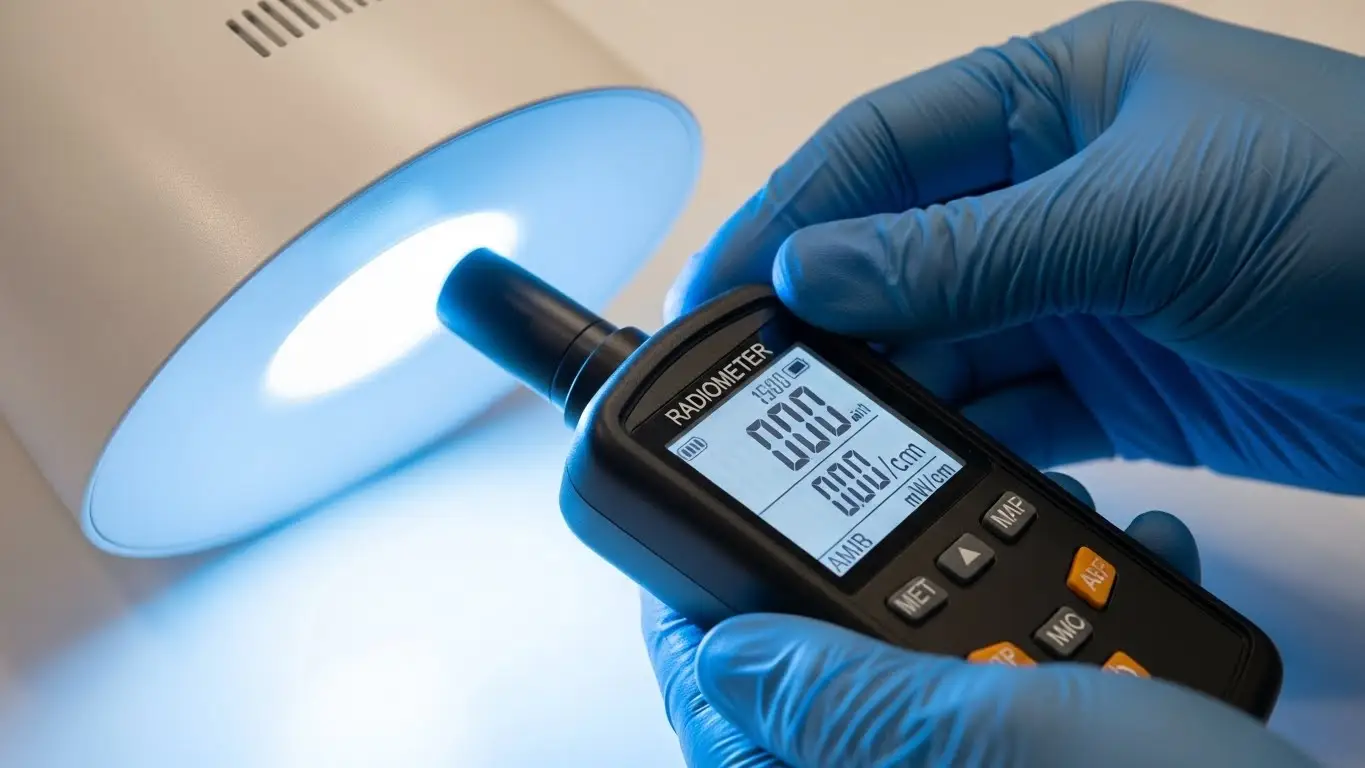
What Tools Are Used to Measure and Control UV Curing Quality?
If you can’t measure UV output, you can’t control curing quality. UV systems drift over time due to lamp aging, optics contamination, thermal changes, and process variation—so measurement tools turn “it looks cured” into a validated, repeatable process.
- UV radiometer / UV intensity meter: measures irradiance (mW/cm²) at the substrate plane.
- UV dose meter: verifies total energy dose (mJ/cm²) across a pass or exposure cycle.
- Dosimeter strips: quick visual checks for routine verification and changeover checks.
- Spectrometer: confirms spectral output and helps validate photoinitiator match.
- Irradiance mapping tools: checks uniformity across curing width and identifies edge under-cure.
- Calibration certificate tracking: ensures tools are traceable and comparable over time.
- Preventive maintenance log: ties output readings to cleaning, service events, and acceptance criteria.
Mini SOP example: Measure irradiance at three points → record in a process validation log → adjust distance/speed/power → re-check dose → sign off against acceptance criteria. For monitoring best practices, see UV output monitoring and troubleshooting context in UV LED curing troubleshooting for inkjet.
How Much Does a UV LED Ink Curing System Cost?
UV LED curing system costs vary based on curing width, target irradiance, duty cycle, and how much integration work your line requires. Instead of fixating on one price, it’s more useful to budget by cost categories (CapEx + OpEx) and define tiers based on performance and complexity—especially for retrofits.
Typical cost buckets include:
- Lamp module cost: LED array size, optics, wavelength options, and curing width.
- Controller/driver cost: recipe control, interlocks, and monitoring features.
- Cooling system cost: air vs water cooling, heat exchangers, and thermal design margin.
- Integration labor: mechanical mounting, electrical load, PLC/I/O wiring, commissioning.
- Measurement tools: radiometer/dose meter, mapping, calibration, and validation supplies.
- Consumables and maintenance plan: cleaning materials, spares, service access, and uptime strategy.
- Energy savings vs depreciation: lower operating expense can offset higher initial CapEx over time.
Choosing the right lamp affects cost and performance—use best UV LED curing lamp for inkjet printing and UV LED curing system setup for inkjet printing to frame realistic requirements.
What Factors Affect the Cost of UV LED Curing Systems?
The price of a UV LED curing system is driven by:
- Curing width: wider arrays cost more and require tighter uniformity control across the beam.
- Irradiance requirement: higher mW/cm² demands more LED power, optics, and thermal headroom.
- Duty cycle: continuous production needs more robust thermal management and higher-rated components.
- Wavelength options: multi-wavelength or specialized peaks add complexity to lamp modules and controls.
- Cooling method: water-cooled designs add plumbing and hardware but stabilize output under load.
- Enclosure and safety guarding: shielding, interlocks, and compliance requirements raise integration scope.
- Automation integration: PLC signals, sensors, and control loops increase engineering and commissioning time.
- Service and spares: contracts, spare parts, and customization needs change total lifecycle cost.
For narrow or targeted applications, UV LED spot curing systems can reduce cost by focusing power where needed. If portability is a cost driver, compare options like battery operated UV LED curing light.
Is UV LED Ink Curing Worth the Investment? (ROI Explained)
UV LED curing can pay off when the upgrade improves throughput, reduces downtime, and lowers rework—without creating new quality risks. ROI is usually less about “saving watts” and more about total cost of ownership (TCO): fewer stoppages for warm-up, fewer lamp replacements, more consistent output, and a wider reliable cure window that reduces scrap.
ROI levers to evaluate:
- Downtime reduction: fewer interruptions from warm-up, shutter issues, and frequent maintenance.
- Throughput increase: higher line speed or fewer passes due to better pinning and faster handling.
- Reject rate improvements: fewer tacky prints, adhesion failures, and smear defects (see prevent UV ink smearing with LED curing).
- Maintenance savings: longer lamp life and steadier output reduce intervention frequency.
- KPI impact: track energy cost per hour, OEE, capacity utilization, and lamp replacement frequency.
Example scenario (no promises): if a line is losing hours weekly to curing-related rework and lamp servicing, shifting to a longer-life LED system can move the break-even point earlier—especially when measured output stays stable. For the durability side, see improve UV ink adhesion led curing settings and “long lamp life / low maintenance” considerations in UV LED curing lamps.
What Are the Benefits of UV LED Ink Curing for Printers?
Printers adopt UV LED curing because it improves productivity and quality while expanding material flexibility and simplifying operations. Instant curing supports faster turnaround and better print sharpness; low heat curing helps protect heat-sensitive substrates; and consistent output with a compact footprint improves day-to-day uptime.
Productivity + quality
- Faster handling and reduced set-off with instant curing.
- More consistent dot control for sharper images and cleaner text.
Material flexibility
- Better results on films and non-porous substrates with the right ink/lamp match.
- Wider substrate versatility thanks to lower heat load.
Operations + safety
- Energy efficiency and longer lamp life with less maintenance.
- Cleaner operations (mercury-free systems) with improved process stability.
For a broader “why LED” view, see UV LED curing lamps.
Productivity and Print Quality Benefits
On the production floor, UV LED curing helps by…
- Improving dot sharpness and edge definition, especially on PET label films.
- Reducing smearing and set-off through instant cure and controlled pinning.
- Enabling higher line speed without sacrificing cure uniformity across the curing width.
- Supporting faster handling and stacking with fewer defects between passes.
- Increasing scratch resistance and rub resistance when dose matches ink chemistry.
- Improving gloss control and color density by stabilizing the ink film quickly.
- Reducing rework in multi-pass printing by keeping dots from coalescing.
For more on performance tradeoffs and lamp selection, see UV LED curing lamps.
Energy, Safety, and Environmental Advantages
UV LED systems also reduce operational burdens linked to heat, warm-up, and legacy lamp handling. Because LEDs are mercury-free, they avoid mercury disposal issues and can reduce ventilation needs tied to certain traditional UV processes. Lower power draw and reduced heat load can also help with substrate warping risks and overall thermal stability.
- Mercury-free: avoids mercury handling and disposal concerns.
- No warm-up: instant on/off improves efficiency and reduces idle losses.
- Reduced heat load: safer for thin films and heat-sensitive plastics.
- Reduced ventilation needs: often less ozone/heat-driven ventilation compared to some legacy setups.
- Safety basics: use UV shielding, interlocks, warning labels, and PPE (UV safety glasses).
For operator-focused procedures, use this UV safety checklist.
What Are Common UV LED Ink Curing Problems and Mistakes?
Most curing failures come from a small set of setup mistakes that shift the dose, the wavelength match, or the thermal balance. When output drifts or exposure time changes, problems often show up as tacky surfaces, poor adhesion, cure inconsistency, or even brittle films and color shift.
Common problems to watch for:
- Tacky surface / incomplete cure: dose too low, wrong wavelength, or speed too fast.
- Poor adhesion: under-cure at the interface, low substrate surface energy, or ink/substrate mismatch.
- Cure inconsistency / banding: uneven irradiance, misalignment, or process drift across the curing width.
- Substrate warping: excessive heat load or overexposure on thin plastics.
- Brittle ink film / cracking: over-cure, excessive dose, or embrittlement over time.
- Odor: under-cure or chemistry mismatch; confirm through cure depth and dose.
- Color shift: overheating, spectral mismatch, or uneven curing across the print.
A clean optic path matters—use UV LED curing lamps for maintenance guidance and UV LED curing troubleshooting for inkjet for deeper diagnostics.
Why Is UV Ink Not Curing Properly?
If UV ink isn’t curing, the root cause is usually insufficient delivered dose at the ink film, or a mismatch between lamp wavelength and ink photoinitiators. Confirm the basics first: measure irradiance at the substrate plane, verify exposure time from real line speed, and check working distance and optics cleanliness.
Diagnostic checklist:
- Insufficient dose: low irradiance, short exposure time, or excessive line speed.
- Wrong wavelength: peak doesn’t match photoinitiator absorption; pigments can increase shielding.
- Distance too far: lamp distance reduces irradiance; edges can under-cure first.
- Dirty window/optics: contamination blocks UV and creates cure inconsistency.
- Cooling failure: thermal drift reduces output or forces power limiting.
- Ink mismatch: non-LED-curable formulation or incorrect photoinitiator package.
- Oxygen inhibition: surface remains tacky despite “harder” lower layers on some chemistries.
- Process drift: changes in substrate reflectivity, film thickness, or humidity/storage conditions.
Quick confirm test: print a small test pattern, slow the line, reduce distance slightly, and re-measure dose—if cure improves, the issue is dose delivery, not just ink. For maintenance, see UV LED curing lamps; if pinning helps stabilize dots before full cure, consider UV LED spot curing systems.
What Happens If UV Ink Is Over-Cured or Under-Cured?
Both under-curing and over-curing damage print durability, but the symptoms and risks differ. Under-cure typically shows up as tackiness, odor, and adhesion failure; over-cure tends to cause brittleness, micro-cracking, warping, and accelerated aging from excess heat or cure gradient.
| Condition | Symptoms | Common causes | Risks | Quick fixes |
|---|---|---|---|---|
| Under-cured | tacky surface, poor rub resistance, adhesion failure | insufficient dose, wrong wavelength, high speed, oxygen inhibition | delamination, low solvent resistance, rejects | increase dose, reduce speed, reduce distance, match photoinitiator |
| Over-cured | brittle film, micro-cracking, substrate warping, color shift | excessive dose, overheating, long exposure | embrittlement, heat damage, long-term failures | reduce power, increase distance, improve cooling, validate with tests |
For tighter control, prioritize dose and irradiance control and confirm with durability testing (e.g., ASTM rub test where applicable).
What Are Best Practices for UV LED Ink Curing Setup and Operation?
A reliable curing process depends on consistent setup and routine checks that keep irradiance, dose, and alignment stable over time. The best results come from treating curing like a controlled process: build an SOP, measure output, log readings, and verify quality with repeatable tests rather than visual guesses.
Numbered best practices:
- Document an SOP: define cure recipes, working distance, speed setpoints, and changeover steps.
- Verify intensity and dose: validate with meters, not assumptions; record acceptance criteria.
- Keep optics clean: schedule cleaning and inspection to prevent edge under-cure and banding.
- Control cooling: confirm airflow/water flow and thermal stability before long production runs.
- Train operators: standardize setup steps and response actions when defects appear.
- Use test strips/patterns: quick verification during shift starts and substrate/ink changes.
- Track drift: control charting and preventive maintenance logs reduce surprise failures.
For operational checklists, see handheld UV LED curing lamp checklist and maintenance references in UV LED curing lamps.
How to Set Up a UV LED Curing System Correctly
To set up UV LED curing correctly, start with compatibility and measurement so your “recipe” is based on real irradiance and dose.
- Confirm ink/substrate pairing: verify LED-curable ink and substrate compatibility using TDS and small test prints.
- Select lamp placement/specs: choose curing width, wavelength, and optics; reference UV LED curing lamps.
- Mount and align the lamp: ensure rigid lamp alignment and safe shielding to maintain uniform working distance.
- Set working distance: use a distance gauge; keep lamp-to-substrate distance consistent across the full width.
- Map irradiance: perform irradiance mapping to verify beam uniformity and identify edge under-cure zones.
- Calibrate speed and duty cycle: confirm conveyor/carriage speed and exposure time align with your cure window.
- Print a test pattern: run a controlled test pattern print to evaluate dot gain, pinning needs, and early cure.
- Measure dose and adjust: validate dose (mJ/cm²) and tune power/speed/distance for a tack-free surface.
- Run adhesion and rub tests: do a crosshatch adhesion test plus rub/scratch checks to confirm durability.
- Document the cure recipe: lock in settings, inspection criteria, and troubleshooting steps for repeatability.
If you use pinning or localized exposure during commissioning, include UV LED spot curing systems in your setup plan, and follow a detailed guide at UV LED curing system setup for inkjet printing.
Tips to Improve UV Ink Curing Consistency
Once curing works, consistency comes from repeatable controls that catch drift early and keep the process inside a stable cure window.
- Run daily output checks with baseline readings at the start of each shift.
- Use drift detection triggers (e.g., % drop in irradiance) to prompt cleaning or service.
- Keep a cleaning optics schedule tied to production hours, not “when defects appear.”
- Control temperature and humidity around storage to reduce substrate and ink variability.
- Train operators on one standard changeover checklist and defect-response flow.
- Save job presets for speed, distance, and power to reduce manual setup variation.
- Add QC sampling plans (adhesion/rub checks) for new substrates and new ink batches.
- Review maintenance triggers monthly to spot slow process drift before failures spike.
Mini SOP template: Measure irradiance → compare to baseline → clean optics if out of range → re-measure dose → run a quick rub test → log results and release production. For routine maintenance guidance, see UV LED curing lamps; for portable verification scenarios, compare battery operated UV LED curing light.
Frequently Asked Questions About UV LED Ink Curing
Here are quick answers to common UV LED curing questions, with links back to the most relevant sections and internal resources.
How Long Do UV LED Curing Lamps Last?
Most UV LED lamps are designed to last thousands of hours, but real lifespan depends on thermal management, drive current, and duty cycle. Output degradation (often discussed as an L70 lifetime) is gradual, so “end of life” is usually defined by falling below your required irradiance or dose. The best practice is to measure intensity routinely and set clear derating and replacement criteria. See UV LED lamp lifespan for selection and maintenance context.
Is UV LED Ink Curing Safe for Operators?
UV LED curing can be safe when shielding, interlocks, and training are treated as part of the system—not optional add-ons. UV-A exposure can still affect eyes and skin, so use shielding curtains, warning labels, and PPE (eye protection and skin protection) and follow a documented risk assessment. Keep a safe operating distance and lock out access during curing via interlock switches. Use this UV LED safety checklist to standardize procedures.
Can UV LED Curing Be Retrofitted to Existing Printers?
In many cases, UV LED curing can be retrofitted if space, electrical load, cooling retrofit capacity, and control integration are feasible. You’ll typically need mounting constraints evaluated, PLC/IO signals defined, and a commissioning plan that includes validation testing for ink reformulation or LED-curable ink selection. Also consider warranty impact and safety guarding updates. For retrofit options, start with UV LED curing lamps and review pinning retrofits via UV LED spot curing systems.
What Industries Use UV LED Ink Curing Most?
UV LED curing is common in industries that need fast handling, durable prints, and reliable adhesion on non-porous substrates. Typical use cases include:
- Label printing and flexible packaging
- Folding cartons and promotional products
- Industrial product marking and direct-to-object printing
- Signage and wide-format UV graphics
- Bottle printing and electronics printing (including functional inks)
For more application examples and lamp formats, see applications of UV LED curing.


