UV LED Ink Curing System: Spec Checklist for Printing
A high-performance UV LED ink curing system does more than just dry ink; it defines the speed, durability, and quality of your entire print run. If you are upgrading from mercury lamps or building a new digital press, the specs on the datasheet translate directly to profitability. In my years analyzing curing technology at UVET, I’ve seen that missing a single parameter—like the correct peak irradiance—can lead to tacky substrates and rejected batches.
This guide provides the definitive spec checklist you need to vet your next curing system. We will cut through the noise and focus on the numbers that actually move the needle for industrial printing.
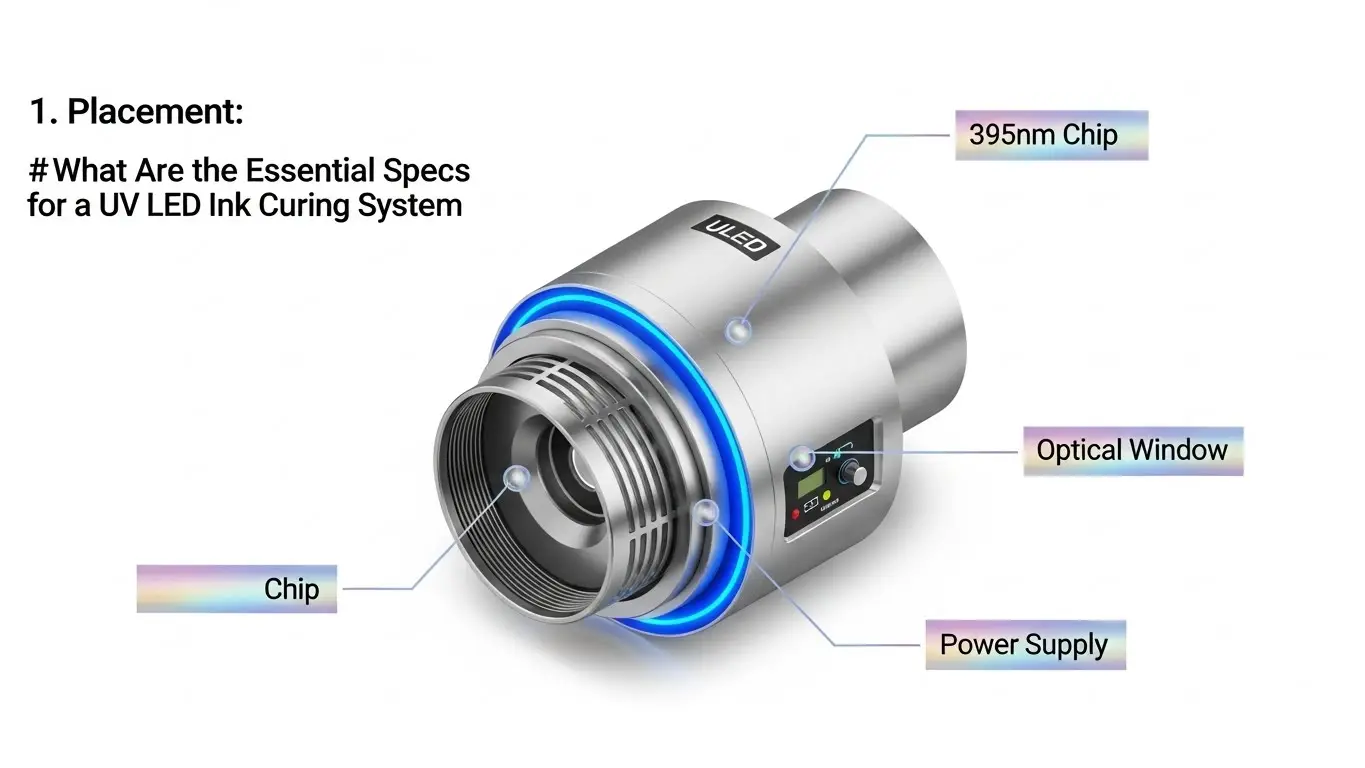
What Are the Essential Specs for a UV LED Ink Curing System?
To ensure compatibility and cure quality, you must evaluate four core specifications: Wavelength (typically 395nm for inks), Peak Irradiance (W/cm²), Energy Density (J/cm²), and Cooling Method (Air vs. Water). Matching these to your specific print speed and ink chemistry is the only way to guarantee immediate adhesion and prevent costly production downtime.
The "Big Four" Specifications Explained
When you open a spec sheet for a UV LED curing lamp, the data can be overwhelming. However, for printing applications—whether single-pass inkjet, screen, or flexo—you essentially need to balance energy output with integration constraints.
Here is the checklist you should keep on your desk:
- Wavelength: This must match the absorption profile of the photoinitiators in your ink.
- 395nm: The industry standard for curing colored UV inks (CMYK). It penetrates deep into the ink layer for through-curing.
- 385nm: Often used for higher curing efficiency without the yellowing effect sometimes seen at higher wavelengths.
- 365nm: Provides higher surface energy, often used for clear varnishes or adhesives where surface tack needs to be eliminated quickly.
- Tip: Most UVET systems offer selectable wavelengths, but 395nm is your likely starting point for digital printing.
- Peak Irradiance (Intensity): Measured in Watts per square centimeter (W/cm²).
- This is the "punch" of the light. High-speed printers need higher intensity to trigger the reaction in the fraction of a second the substrate passes the lamp.
- Target Spec: Look for 8W/cm² to 16W/cm² for high-speed industrial inkjet systems. Lower speeds (plotting) might only need 4-6W/cm².
- Cooling Mechanism:
- Water-Cooled: Essential for high-power, compact heads where stable output is critical over 24/7 shifts. It keeps the LEDs junction temperature low, ensuring the 20,000+ hour lifespan.
- Air-Cooled: Simpler integration (no chiller needed) but typically bulkier fans are required to dissipate heat. Best for scanning printers or lower-intensity setups.
- Emitting Window Size:
- The "Active Area" must cover your print width. Common sizes include 65x20mm or 160x20mm for scanning heads, or modular stackable units for single-pass bars.
Why Is Wavelength Critical for UV Ink Adhesion?
Wavelength determines how deep the UV light penetrates the ink layer. If you use the wrong wavelength (e.g., 365nm for a thick black ink), the light may block at the surface, leaving the base uncured. For most digital inks, 395nm is the optimal wavelength because it penetrates through pigments to cure the ink specifically at the substrate interface.
Matching Light to Chemistry
I cannot stress this enough: The lamp must match the ink. I once worked with a client struggling with ink peeling off plastic substrates. They were blasting the print with high power, but at the wrong wavelength.
- The Physics of Adhesion: Pigments (especially Black and Cyan) absorb UV light. If the light can't pass through the pigment to reach the bottom of the ink droplet, the ink won't bond to the material. It effectively creates a "skin" on top while remaining liquid underneath.
- The 395nm Advantage: This longer wavelength passes through pigments more effectively than shorter wavelengths (like 365nm), ensuring the base of the ink cures hard against the material.
If you are seeing adhesion failures, verify your wavelength compatibility before increasing power. You can learn more about optimizing your setup in our UV LED Ink Curing Guide.
Pinning vs. Curing: Do You Need Both?
Yes, for high-quality inkjet printing, you need both. Pinning uses a low-intensity light immediately after jetting to "freeze" the dot size and prevent color bleeding. Full curing follows with high-intensity light to polymerize the ink completely for durability. Skipping pinning often results in blurry edges and loss of detail.
The Two-Step Strategy for Sharp Prints
In industrial inkjet, we treat "Pinning" and "Curing" as two separate engineered events.
| Feature | Pinning (The "Freeze") | Full Curing (The "Seal") |
| Purpose | Stop dot gain; control drop spread. | Fully cross-link the polymer for hardness. |
| Intensity | Low (e.g., 1-4 W/cm²). | High (e.g., 8-16 W/cm²). |
| Position | Immediately next to the printhead. | At the end of the print carriage or belt. |
| Common Result | Tacky surface, holds shape. | Hard, scratch-resistant, dry surface. |
Pro Tip: If you notice your fine text is fuzzy or your colors are bleeding into one another (mottling), your pinning station is likely too weak or positioned too far from the jetting. Adjusting these settings is a primary way toImprove UV Ink Adhesion with LED Curing Settings.
How Does Irradiance Affect Print Speed?
Irradiance is directly proportional to your maximum line speed. The faster the substrate moves, the less time the ink is exposed to UV energy. To maintain a full cure at higher speeds, you must increase the peak irradiance (W/cm²) to deliver the necessary total energy dose (Dose = Intensity × Time) in that shorter window.
Calculating the "Dose" You Need
A common misconception is that "more power is always better." In reality, it is about the Dose.
- Dose (Energy Density): This is the total amount of energy that reaches the ink, measured in Joules (J/cm²).
- The Speed Trap: If you double your print speed, you cut the exposure time in half. To get the same cure, you theoretically need to double your intensity.
However, UV LED systems from UVET often feature Instant On/Off capabilities. This allows you to pulse the light exactly when needed, saving energy while delivering massive peak intensity (up to 16W/cm² in our water-cooled series).
If you run a high-speed single-pass printer, you cannot compromise on intensity. A weak lamp will force you to slow down production, killing your ROI. Conversely, too much intensity on a slow scan can embrittle the ink.
What Form Factor Considerations Avoid Integration Headaches?
You must evaluate the physical dimensions (Size LxWxH), the cooling clearance, and the emitting window alignment. The UV lamp must fit seamlessly into your print carriage without adding excessive weight or blocking maintenance access. Additionally, the emitting window must be slightly wider than the print path to ensure edge-to-edge curing.
Physical Specs Checklist
When retrofitting or designing a machine, the physical integration is where most projects stall.
- Weight: For scanning printers, the lamp is mounted on the moving carriage. Heavy lamps increase inertia, causing vibration and reducing print accuracy. Look for lightweight aluminum housing designs.
- Clearance: The lamp head is usually mounted 2-5mm above the substrate. Ensure the housing doesn't have protruding screws or fans that could crash into media clamps.
- Cable Management: High-power LEDs require robust cabling. Ensure your cable chains can handle the bend radius of the power and cooling lines.
Smearing Issues: If your lamp is misaligned or the emitting window is too narrow, you will see wet ink at the edges of the media. This is a classic sign of poor form-factor integration. LearnHow to Prevent UV Ink Smearing with Proper LED Curingby checking your alignment specs.
Does Spectrum Selection Impact Ink Color Accuracy?
Yes, the wrong wavelength can shift perceived colors or cause "yellowing" in clear coats. While 395nm is standard, it can slightly discolor certain white inks or varnishes. Using a 385nm lamp often mitigates this yellowing effect, ensuring that white under-bases remain pure and colors pop without alteration.
The Nuance of Color and Cure
For graphic arts, color fidelity is everything.
- Whites: UV White ink is notoriously difficult to cure because Titanium Dioxide (the white pigment) reflects UV light. A high-intensity LED (12W/cm²+) is often required to punch through.
- Varnishes: Clear coats don't have pigments to hide the curing reaction. Over-curing or using the wrong wavelength can lead to a yellow tint.
If you are printing high-end graphics or labels, verify if your system supports 385nm or if your ink manufacturer recommends a specific "Best Wavelength" for color stability. You can dive deeper into this trade-off in our article: What Wavelength Is Best for UV Ink Curing?.
Final Spec Summary Table
Use this quick-reference table to validate your potential supplier's offering:
| Specification | Standard Inkjet Requirement | UVET High-Performance Target |
| Wavelength | 395nm (Standard) | 365 / 385 / 395 / 405nm (Selectable) |
| Peak Irradiance | > 4 W/cm² | 8 - 16 W/cm² |
| Cooling | Air or Water | Fan (compact) or Water (high-power) |
| Lifespan | 10,000 Hours | 20,000+ Hours |
| Control | On/Off | 0-100% Dimming / PWM |
| Warm-up Time | 0 Seconds (Instant) | Instant On/Off |
Selecting the right UV LED curing system is an engineering decision, not just a purchasing one. By adhering to this spec checklist, you ensure your production line runs faster, cleaner, and with higher profitability.
Share on Social:


